• Skip to primary navigation
  • Skip to main content
  • Skip to primary sidebar
FAMIS Services
Logo, Texas A&M University System, Office of Information Technology
  • About FAMIS Services
    • FAMIS and Canopy Applications
    • FAMISweb
    • FAMIS Data in BusinessObjects
    • FAMIS Governance
    • FAMIS Services Team
  • Contacts
    • Contact FAMIS Services
    • Contact FAMIS Production Services
    • FAMIS Contacts
  • Documentation
    • Tutorials
    • Core Concepts
    • White Papers
    • User Manuals
    • Tools: Glossary, Codes, Crosswalks & Screen Info
  • Laserfiche
  • News & Updates
    • Updates
    • Alerts, Maintenance and Outage Notices
    • Calendar
  • Services & Requests
    • FAMIS Help
    • FAMIS Transaction Portal
    • FAMIS Update and Feature Requests
    • FAMIS Training
    • Request Forms
    • Interface – File Feeds
    • Production Contacts, Reports & Schedule
    • Security Contacts & Forms
      • Security Access Request
      • Security Audit Reports
    • Year-End Jobs
    • Year-End Job Request Form
  • Office of Information Technology
    • Services
    • Contact the Office of Information Technology
    • Search OIT
Home / Tutorials / FAMIS Production-Creating a New FAMIS Connection Profile

FAMIS Production-Creating a New FAMIS Connection Profile

Print

In November 2022, FAMIS moved to a new technology platform. To use the new version of FAMIS, a new connection profile must be used. Users may need to work with their IT departments to open the outbound connection and set up a new profile.

The current version of OpenText HostExplorer (version 15.0.5 or higher) must be installed before preparing a replatformed FAMIS connection profile. To check the installed version and, if necessary, install the latest version of OpenText HostExplorer, see Installing OpenText HostExplorer to Connect to FAMIS.

To create a new replatformed FAMIS connection profile from scratch:

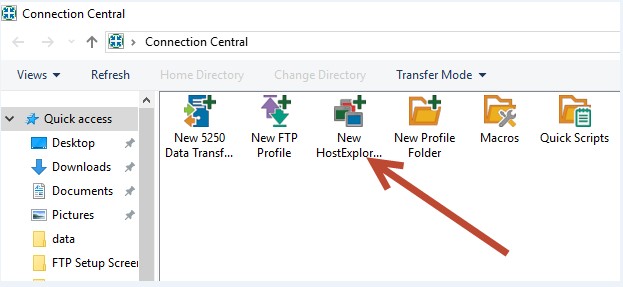
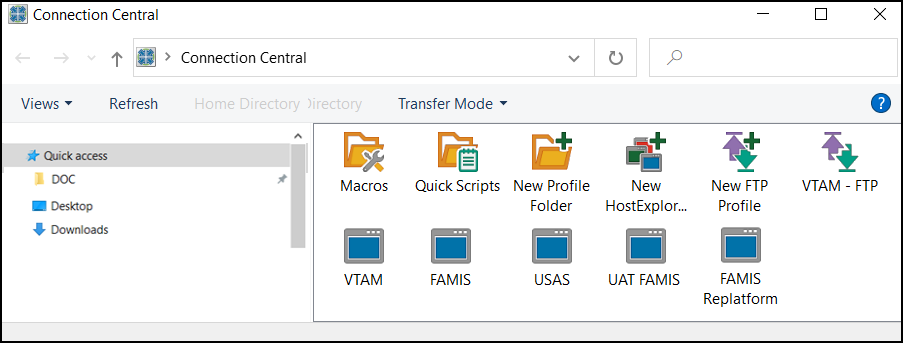
  1. Open Connection Central.
  2. In the Connection Central window, double-click on the New HostExplorer Profile icon.

    Screen capture of Connection Central profile window with New HostExplorer Profile icon highlighted
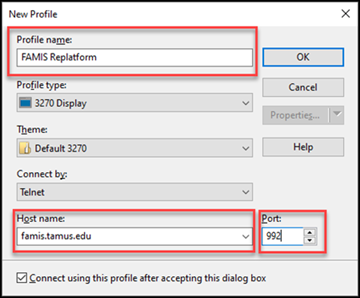
  3. In the New Profile window, enter a name for the profile, the Host name (famis.tamus.edu), and the Port: number (992), and then click OK.

    Screen capture of Connection Central New Profile window with host name and port number highlighted
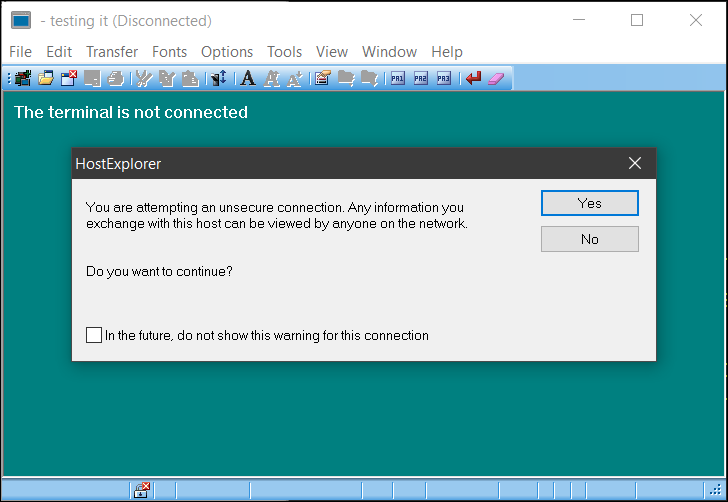
  4. The connection window will open, and the program will attempt to connect to replatformed FAMIS. The connection will fail. Disregard the failure message, and click Yes to continue.

    Screen capture of OpenText HostExplorer connection failure message
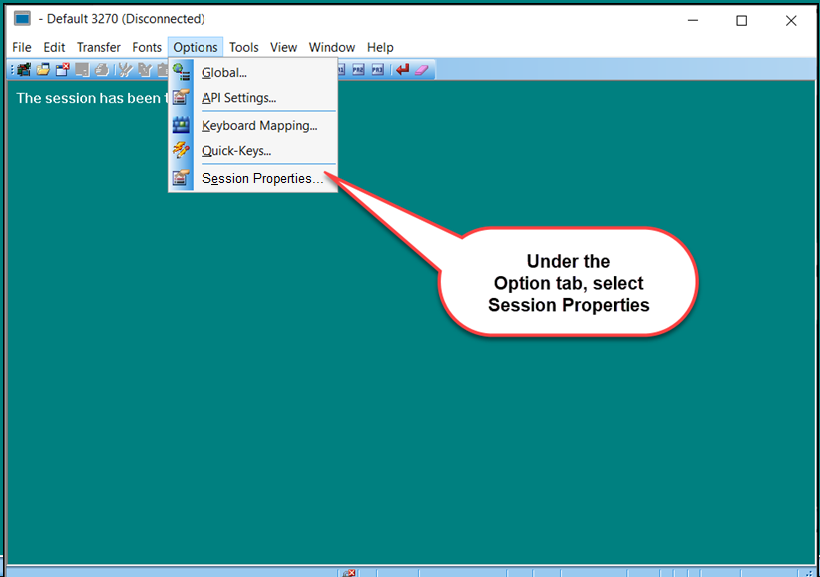
  5. In the session window menu bar, click on the Options tab and select Global Options…

    Screen capture of OpenText HostExplorer session options with global options highlighted
  6. In the HostExplorer Global Options window, click on the General tab.
    In the General options section, verify that the Prompt on Window Close and Prevent Automatic Shutdown by Windows options are checked.
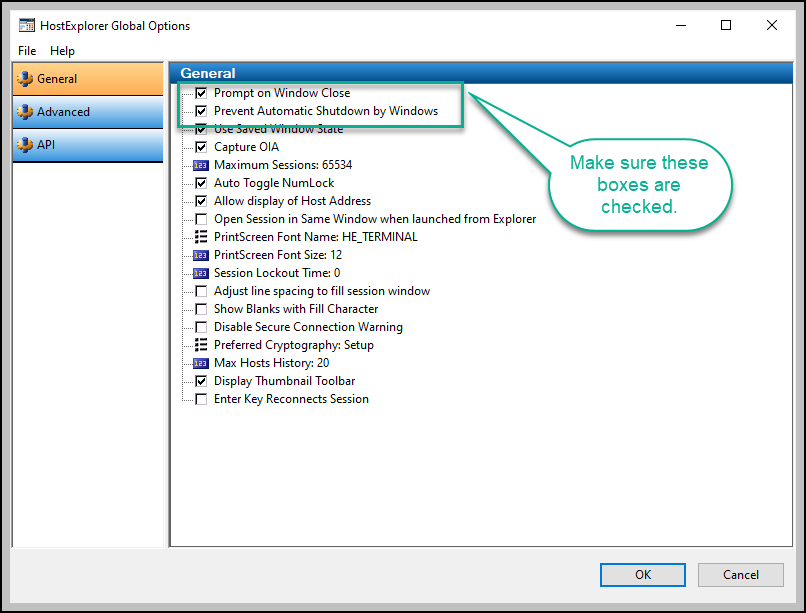
    Screen capture of OpenText HostExplorer global options general section with Prompt on Window Close and Prevent Automatic Shutdown by Windows options highlighted
    Click OK.
  7. Go to the Options menu again and select Session Properties.

    Screen capture of OpenText HostExplorer options menu with session properties highlighted
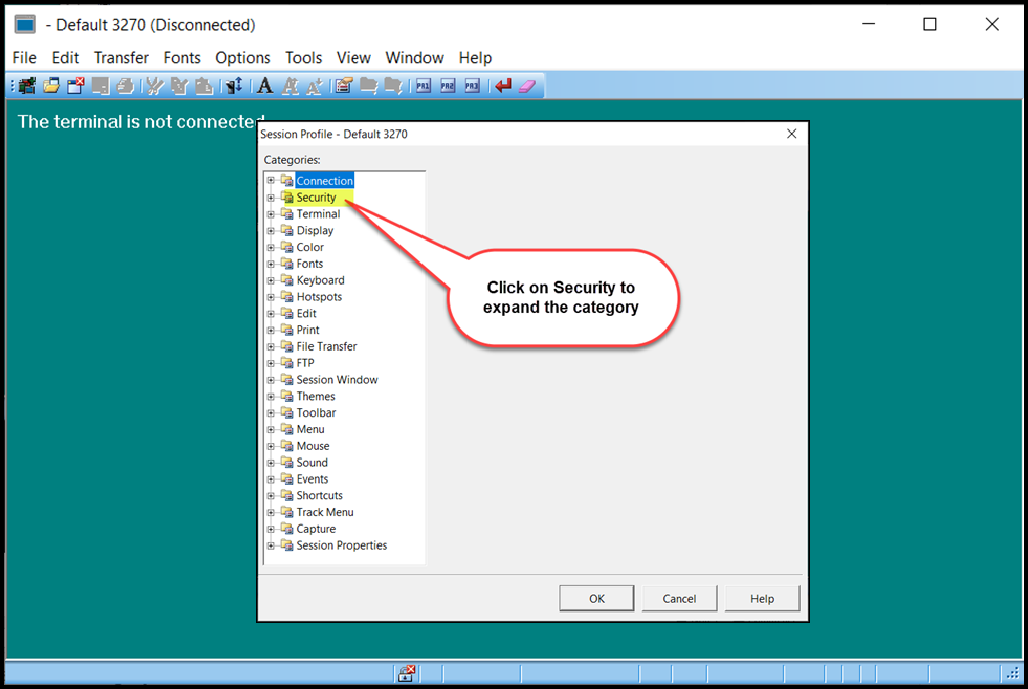
  8. In the Categories tree, double-click Security to expand that category.

    Screen capture of Session Profile screen with Security options highlighted
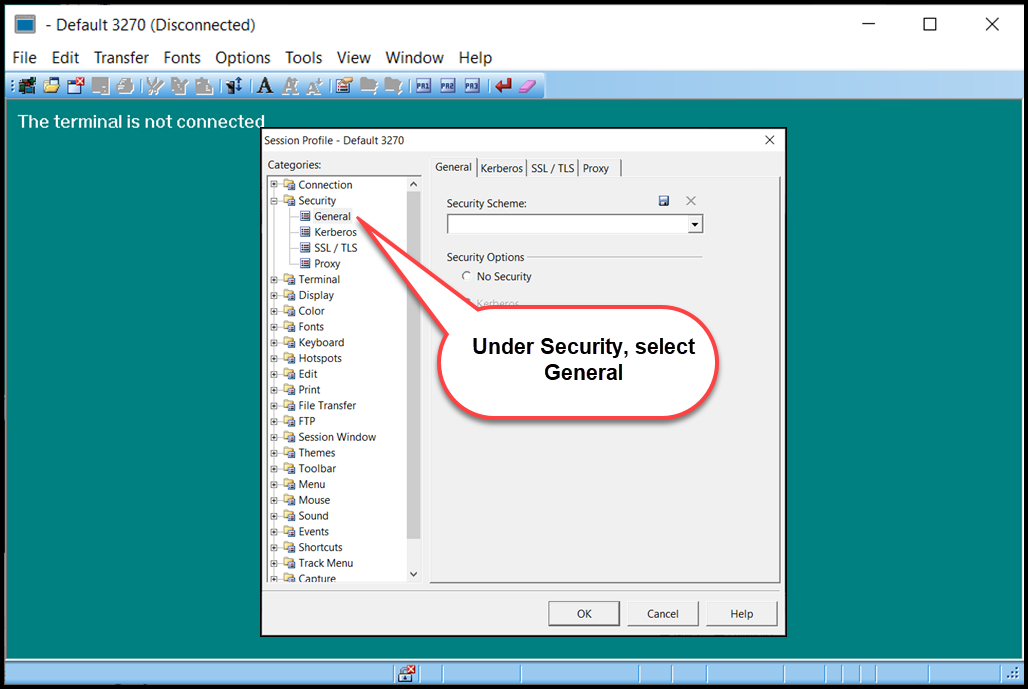
  9. Under Security, select General.

    Screen capture of Session Profile window with General options highlighted
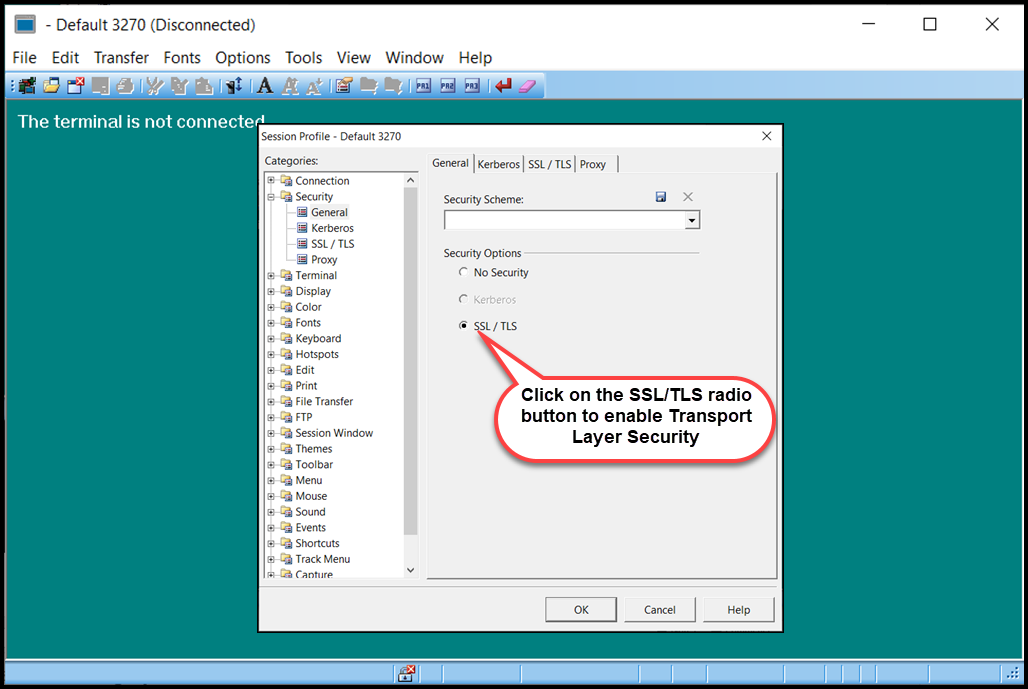
  10. In the General tab, click on the SSL/TLS radio button to select it, and then click OK to return to the main window.

    Screen capture of OpenText HostExplorer Session Security options with SSL/TSL selected
  11. On the main window, select Options and then Session Properties again.

    Screen capture of OpenText HostExplorer options menu with session properties highlighted
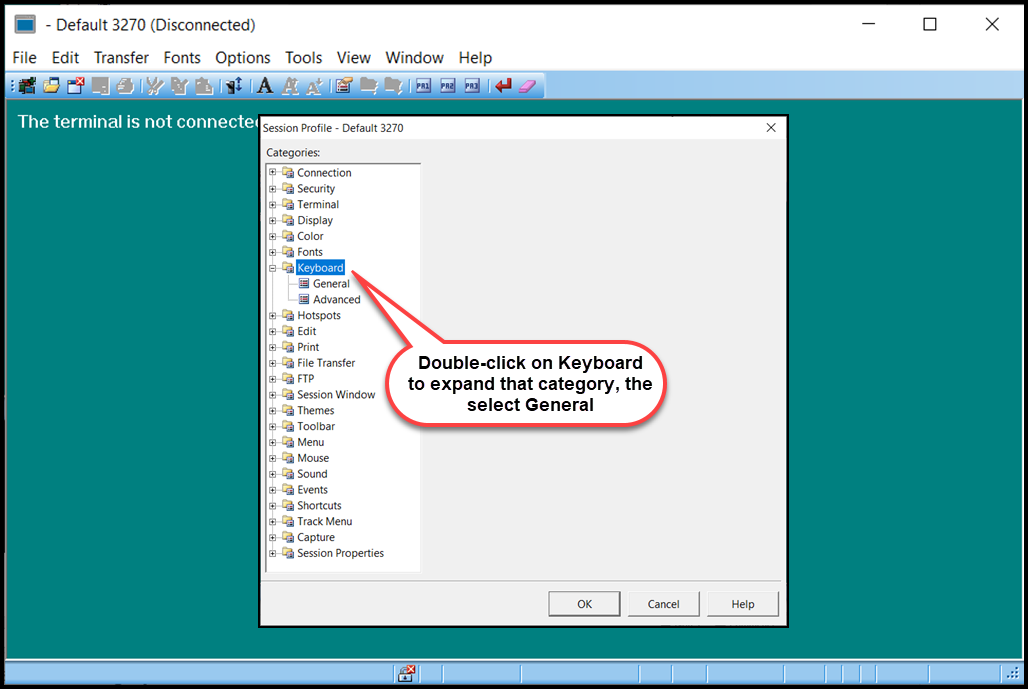
  12. In the Categories file tree, double-click Keyboard to expand that category. Under Keyboard, click on General.

    Screen capture of Session Properties window with Keyboard options highlighted
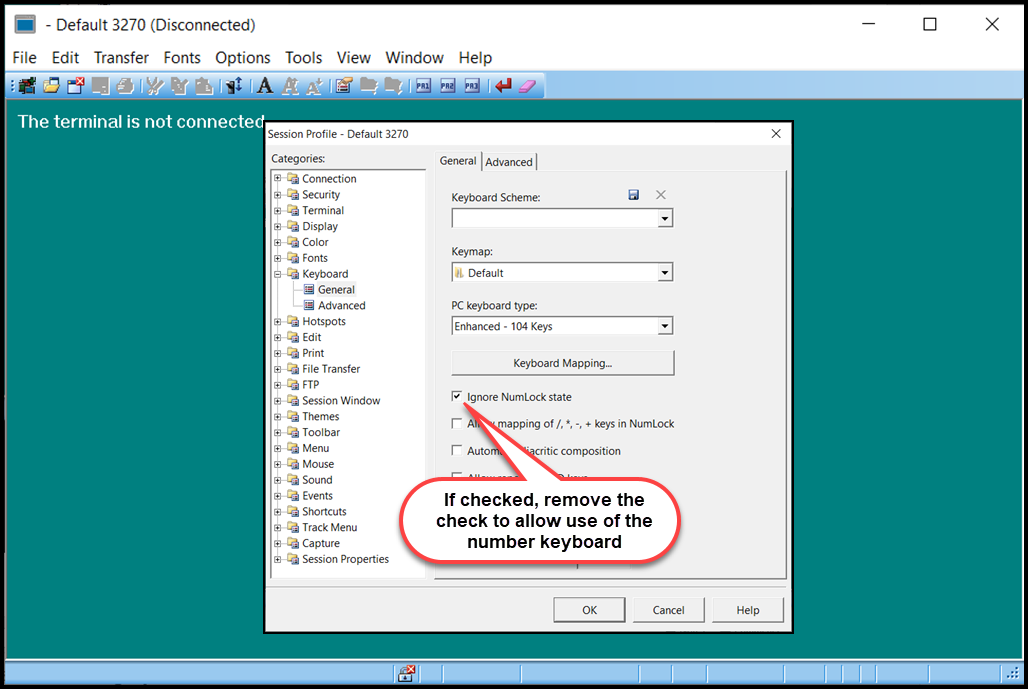
  13. Verify that the Ignore NumLock state checkbox is unchecked. If it is checked, click on the checkbox to deselect it, and then click OK.

    Screen capture of Session Properties window with Keyboard option for enabling Number Lock highlighted
  14. The new replatformed FAMIS connection profile is now configured.

    Screen capture of Connection Central window with new FAMIS connection icon
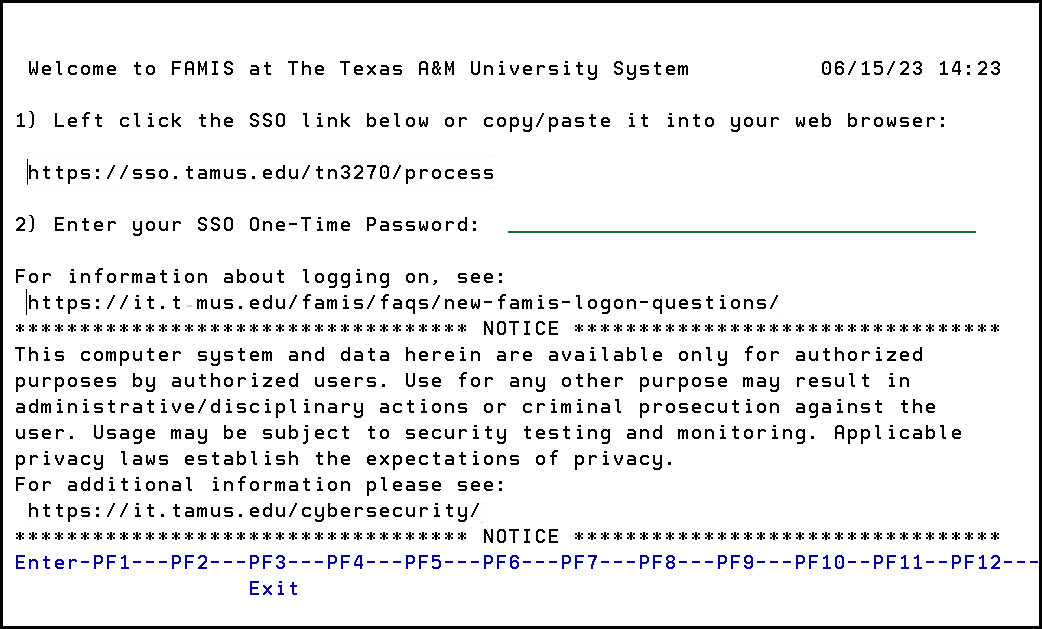
  15. Double-click on the new FAMIS connection icon. If the profile is configured properly, the new FAMIS Logon screen will be displayed.

    New FAMIS Logon
  16. The FAMIS session window can be configured to show URL links as active, clickable hotspots that will open the displayed URL. To activate hotspots, click on the View tab in the FAMIS session window menu bar, and select Hotspots.

    Activate hotspots screenshot
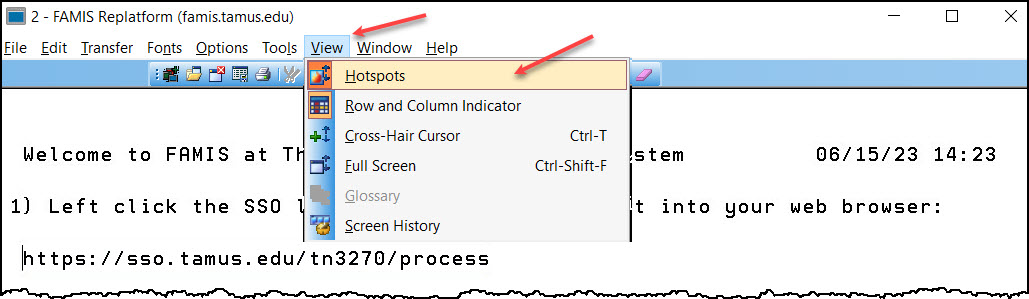
    This is a toggle; the same action will turn hotspots off.
  17. The new FAMIS Logon screen with hotspots activated will be displayed.

    New FAMIS Login image with links activated
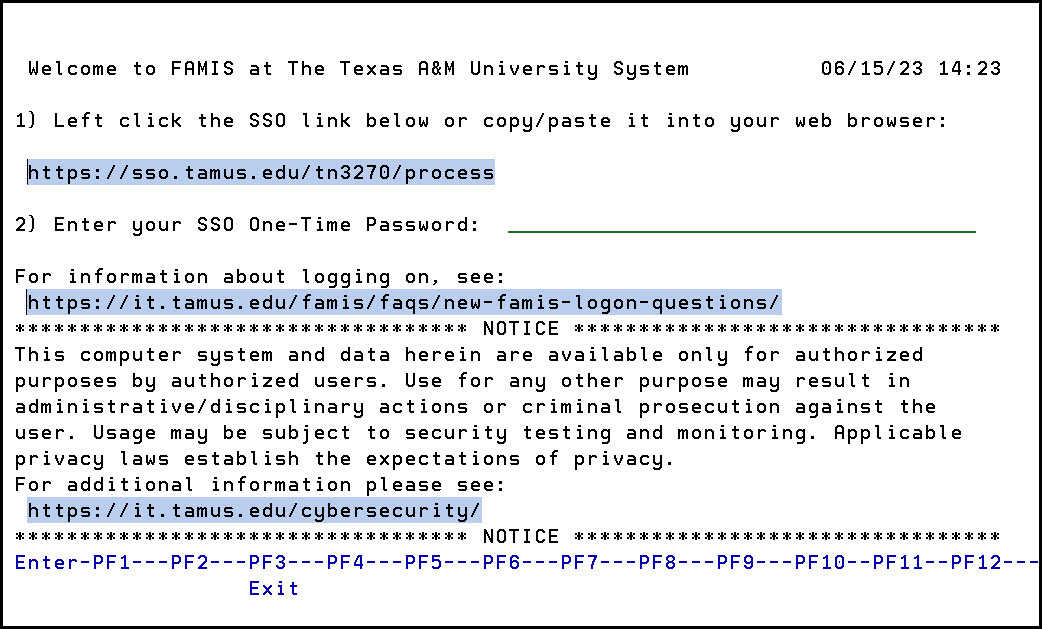
    Click on the SSO link to retrieve the FAMIS One-Time Password to login to FAMIS.

Primary Sidebar

Copyright © 2025 Texas A&M University System All rights reserved.

301 Tarrow Street, College Station, TX 77840 | MAP | Phone: (979) 458-7700 | email: support@tamus.edu
State of Texas | Texas Homeland Security | Texas Veterans Portal | Statewide Search | Risk, Fraud & Misconduct Hotline | Privacy | Web Accessibility | State Link Policy | Campus Carry

Texas A&M University System