FAMIS Services provides a document that details the format of the records included in the transactions file.
When creating the spreadsheet to convert transactions for posting, you use two Excel tabs in the worksheet. One tab is for the Batch Header record ($$# transaction code), and the other tab is for the data entry transaction records (i.e., for journal entries, these may be 060 transaction codes).
- Open your spreadsheet file in Excel and set the columns to match the formats given in the FAMIS document. The columns should have fixed widths that match these specifications, and the data should be entered in the defined format.
For instance, most dates use the yyyymmdd format, and all eight characters must be entered (e.g., 20210630). Numeric fields contain nine dollar digits and two cent digits; therefore, $1,224.45 would be entered as 00000122445, a total of 11 characters.
For column widths, when the layout document calls for an A3 format, the column for that field should be set to a column width of 3. If it calls for an N9.2 format, the column width should be set to 11 (9+2).
- Save the file in Excel. The filename will most likely have an .xls extension.
- To save the Excel tabs in a format that can be processed by FAMIS:
- Edit each of the tabs.
- For each tab, Go to File > Save As.
- Choose Formatted Text (Space delimited) and click Save. You will have one text file for Transactions and one for Header. Your saved files should have a .PRN extension.
When saving the Header file, you can simply call it Header. When saving the Transaction file, the name should be the format that FAMIS expects and should match the expected naming conventions from your documentation (e.g., Dyymmdd). The rest of the filename will be created during the file transfer protocol (FTP) process.
- Edit each of the .PRN textfiles to remove the column header information and then save the files again.
- Copy and paste the (one row) Header record, inserting it as the first record of the Transaction file and then save the Transaction file again.
- Because you saved the file using Excel, the filename will look like Dyymmdd.PRN. This is not the naming convention used by FAMIS, so you must rename the file to match the expected FAMIS format.
- Find the .PRN file in the folder / location where it is stored on your computer.
- Right-click on the filename of the file and select Rename from the dropdown menu.
- If you are sending the file as a TEST file, change the .PRN extension to .TEST (Dyymmdd.TEST).
- If you are sending the file as a PRODUCTION file, delete the .PRN extension (Dyymmdd).
- Send the files to the mainframe by FTP. Only the file that contains both the Header and Transaction records need to be sent.
When uploading the file, you should point the transfer to the specified mainframe location (e.g., K728XX.FISCAL.BUD). Once the file is uploaded, it will be available in FAMIS with a name that matches one of these formats –
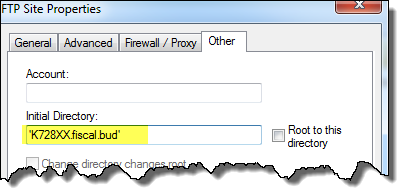
For example, in an OpenText FTP profile, the location is entered in the Initial Directory field:

Please note, the file location should be entered with a leading and ending single quote: ‘K728XX.FISCAL.BUD’ .
Save the file on your local computer as Dyymmdd or Dyymmdd.TEST. When the file is uploaded to the FTP location, the entire filename available to FAMIS becomes:
- K728XX.FISCAL.BUD.Dyymmdd.TEST if this is a test post
OR
- K728XX.FISCAL.BUD.Dyymmdd if this is a production post.
Make sure the test files always have the .TEST extension to prevent accidental posting to the Production database.
Helpful Hint When Using the FTP Process
When you use the command
CWD 'K7nnXX.VENDOR.VBAR280.INPUT
it tells the computer to append this value to the front of your destination data set name. After this command has been issued and a STOR command is used,
STOR D170802.TEST
the filename becomes a combination of both, resulting in a final data set name,
K7nnXX.VENDOR.VBAR280.INPUT.D170802.TEST .
