This job aid outlines the activities for an HR Contact to complete a Change Job business process and the related transactions. Related transactions may include promotions, transfers (including between System Members), demotions, change in job attributes (Overtime Flag, Longevity, etc.), reclassifications, changes in hours or work periods, and changing location.
Change Job (TAMU)
This custom job aid is intended for TAMU, TAMUG, and TAMHSC.

Prerequisites
- Discuss the change with your department leadership and budget office prior to initiating this process in Workday. Also, remember to consult any relevant regulations prior to making the change.
- The employing Supervisory Organization is responsible for ensuring appropriate approvals and budget authority prior to initiating any change job event (including any additional approvals required beyond what is configured in Workday).
- If the Employee is being moved to a position, this position must be created or already exist in the appropriate supervisory organization prior to initiation of the Change Job business
- If an employee is changing companies, any active Flexible Work Arrangements should be ended.
Important Information
- If the change moves the Employee from a Biweekly pay group to a Monthly pay group, it is best practice to enter the effective date as the first day of a current biweekly pay day. This will help avoid putting the Employee into two different pay groups within the same pay period resulting in a possible under- or over-payment for the Employee. Please consult with your Classification & Compensation specialist (hrcomp@tamu.edu) to determine the most advantageous effective date so the Employee does not go without a paycheck for an extended period. The HR Contact should communicate to the Hiring Manager the change in pay and pay frequency (biweekly/monthly) for the Employee prior to the change. It is the Hiring Manager’s responsibility to communicate this change to the Employee.
- If the Employee is transferring to a different supervisory organization, the proposed Manager, current Manager and proposed Department Head will need to approve the business process.
- When an Employee’s position is being reclassified, first use the Edit Position Restrictions business process to update the position details and responsibilities. Second, process the Change Job business process. The Edit Position Restrictions business process cannot be completed at the same time as the Change Job business process.
- If increasing or decreasing Academic Pay Period from/to 4.5 months or the scheduled hours from/to 20 hours, there may be an impact to the Employee’s eligibility for benefits and/or their State Group Insurance Contribution (SGIP). You may want to consult relevant regulations or discuss proposed change with a Benefits Partner (benefits@tamu.edu).
- If an Employee is being demoted, or if their FTE or compensation is being reduced, you need to consult with Employee Relations (employee-relations@tamu.edu) before processing. Once approval has been obtained, attach it to the Change Job action.
- Ensure you enter in the correct organization ID# (SO-XXXXX or 02XXXXXX_MXXXXX) for the supervisory organization the proposed position is under. If not, the position number will not populate in the Change Job action.
- If the Employee is a Graduate Fellow, refer to the job aid Change Job (Graduate Fellow) for instructions.
Getting Started
- Navigate to the Employee’s Worker Profile using their UIN.
- Select Actions > Job Change > Transfer, Promote or Change Job.
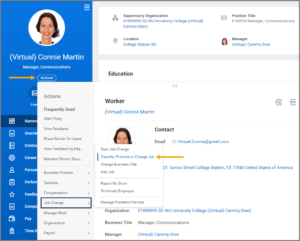
Note: Use the Start Job Change business process if you are only changing a job attribute (Overtime Flag, Longevity, etc.).
- For the Start Date, refer to the Important Information tab.
- In the Why are you making this change? field, refer to the following guidelines. If multiple actions are occurring in the business process, choose the most predominant reason.
- Data Change > Hours or Work Period Change. Used when changing the Employee’s scheduled hours (FTE %) and/or their assigned annual work period without any other Employee or position changes.
- Data Change > Job Classification Change. Used when changing the job classification of the same position without any other Employee or position changes. Use the Start Job Change business process instead if you are only changing a job attribute (Overtime Flag, Longevity, etc.).
Note: Job classifications that can be overridden at the position level include: Campus Security Designation, Hazard Duty Pay Eligible Flag, Longevity Eligible Flag, Overtime Flag and Term Appointment.
-
- Data Change > Location Change. This is where the position is housed (College Station TAMU, Galveston TAMUG, Bryan TAMHSC, etc.)
- Data Change > Position Reclassification. Used when changing the job profile of the same position as a result of reevaluating the job duties of an Employee’s position, or making any combination of other data changes that do not result in the Employee being assigned a title that would be considered a promotion or demotion. The Edit Position Restrictions must be completed and approved on the position prior to initiating Change Job for the Employee.
- Data Change > Position Title Change. Used to change the job profile and title for Student Workers and Graduate Assistants to comply with financial aid or grant funding changes and to preserve the working relationship after graduation. If the department needs to change the working title, use the Title Change business process. Position Title Change is not used for the reclassification, promotion, or demotion of faculty or staff.
- Demotion > Demotion New Position. Used when an Employee is moving from one position to another position with a lower pay range, a title of lower status, and perhaps requiring less education, experience or responsibility. Any action considered a demotion must be discussed with Employee Relations (employee-relations@tamu.edu) before proceeding.
- Demotion > Demotion Reclassification. Used when the job duties or responsibilities of an Employee’s current position are re-evaluated and the same position is assigned to a different job profile with a lower pay range, a title of lower status, and perhaps requiring less education, experience or responsibility. Any action considered a demotion must be discussed with Employee Relations (employee-relations@tamu.edu) before proceeding. The Edit Position Restrictions business process must be completed and approved on the position prior to initiating Change Job for the Employee.
- Promotion > Promotion New Position. Used when an Employee is moving from one position to another position requiring higher qualifications, higher rate of pay, and a title change.
- Promotion > Promotion Reclassification. Used when the job duties or responsibilities of an Employee’s current position are reevaluated and the same position is assigned to a different job profile requiring higher qualifications, a higher rate of pay and a title change. The Edit Position Restrictions business process must be completed and approved on the position prior to initiating Change Job for the Employee.
- Transfer >Employee Transfer. Used when an Employee is moving from one position to another position which are assigned the same pay grade.
Note: The Transfer reason is most often used when an Employee is selected for another job through the recruiting process within a different system member part or Company. Refer to the A&M System Part Numbers & Workday Companies resource.
- The Who will be the manager after this change? field will auto-populate with current manager. Ensure the position is under the correct Manager before processing this request. If it is not, process the Move Worker event on the same effective date moving the position under the appropriate Manager.
- The Which team will this person be on after this change? field will auto populate from the previous question. Ensure the correct supervisory organization is selected.
- Only change the Where will this person be located after this change? field if doing a data/location change for the Employee. This is where the position is housed (e.g., College Station TAMU, Galveston TAMUG, Bryan TAMHSC, etc.).
- If the Do you want to use the next pay period? checkbox is selected, it will default the effective date to the next pay period. Uncheck this box if you are using a date other than the next pay period.
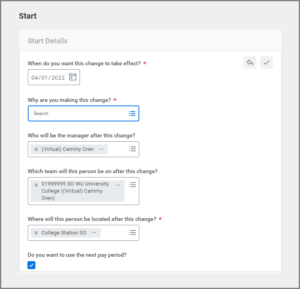
- Save your changes and select Start.
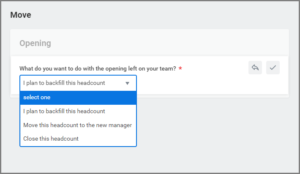
- If there is a change in Employee’s Supervisory Organization, the Move section will display. Select what you would like to do with the open position and any team the individual is currently managing (if applicable).
- What to do with the opening left on your team?
- I plan to backfill this headcount. Use this when the recently vacated positions department plans to replace the Employee’s position. This keeps the position where it currently is.
- Move this headcount to the new manager. This will move the Employee’s current position number to the new Manager.
- Close this headcount. Use this when the Employee is moving into a new position number and the prior department wants to eliminate the position. This closes the current position.
- This person is a manager. Do you want to move their teams with them?
- What to do with the opening left on your team?
- Select Next.
- In the Job section, select the position the Employee is changing to, if applicable. Once the position is selected, the remaining fields on the page will auto-populate. Otherwise, make changes to the Job Profile, Job Title or Business Title fields, as needed.
- Position will default to the Employee’s current position. Select appropriate position if Employee is being transferred or promoted into a new position; only viable open positions under the new Manager will display here. If the Employee is being reclassified, skip this field.
- Job Profile. If the Employee is being transferred to a new position, details for the new position will display here; if the Employee is being reclassified, please change this to the proposed job profile.
- Job Title. Auto populates from the Job Profile.
- Business Title. Auto populates from job title and will display on Worker Profile. This is the working title of the position and may be different from the official title. This is what will appear on the Worker Profile page
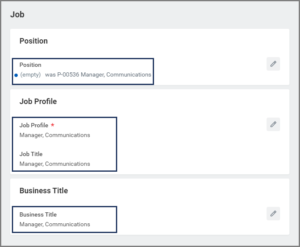
- Select Next.
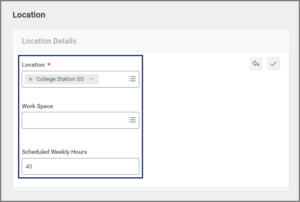
- In the Location section, add or edit the following fields: Location, Work Space, and Scheduled Weekly Hours.
Note: Location is the geographic city where the University Facility resides. Work Space is the physical facility and office where a Worker primarily performs job duties (Work Space is not a required field).
- Select Next.
- In the Details section, add or edit the following:
- Additional Job Classifications. This field will be used to override or add job classifications on the position if needed.
- Employee Type. Will show appropriate type, such as staff, faculty, student, etc.
- Time Type. If scheduled weekly hours is 40, this will only show Full-Time; otherwise, can be switched to Part-Time.
Note: The time type must match on the position. If time type does not match, you will need to submit Edit Position Restrictions to update the time type on the position and then submit a Change Job to update the time type for the Employee.
-
- Pay Rate Type. Salaried or Hourly.
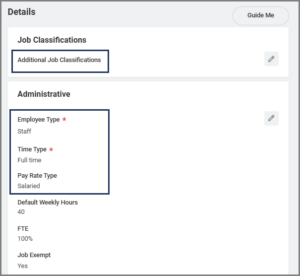
- Location Weekly Hours. The actual number of hours the Employee is working.
- Default Weekly Hours. DO NOT CHANGE. This will always be 40.
- FTE. Will automatically calculate based on default weekly hours.
- Job Exempt. Cannot be changed unless job classifications and other revisions have been made to allow for a status other than the default for Job Profile.
- End Employment Date. Will only appear if the position was designated as temporary/casual (Temporary/Casual Position Guidelines).
- First Day of Work. Select the first day in office.
- Notify By. Select date Workday will notify the Employee of the change. Nothing will appear in the Worker History or Profile until this date.
- Annual Work Period. Select the period during which the Employee is designated to work and receive compensation. Default for staff will be 12 month. For Faculty members, an appointment must be approved by Faculty Affairs.
- Work Period Percent of Year. Automatically calculated based on Annual Work Period.
- Disbursement Plan Period. Must match the Annual Work Period.

- Pay Rate Type. Salaried or Hourly.
Important: For positions that require risk training, be sure to select the Additional Job Classifications: Exposure Risk Training, if the job classification is not already assigned at the Job Profile level.
- Select Next.
- Add attachments in the Attachments section, if necessary. Do not attach documentation containing any medical information. Redact social security numbers, or information pertaining to other employees.

- Select Next.
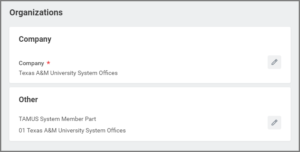
- In the Organizations section, review and edit the Company and TAMUS System Member Part fields, if needed.
- Select Next.
- Review, add, or edit the information under the Compensation section. Many fields will auto-populate based on the position.
- Add or edit the Employee Visibility Date, which indicates when the Employee can see this change in their own worker history.
- The Compensation Package and Grade Profile are guidelines to assist in determining the monthly or hourly plan amount.
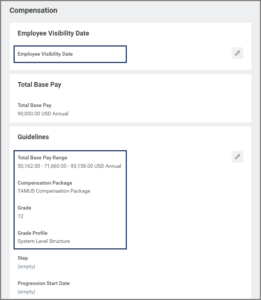
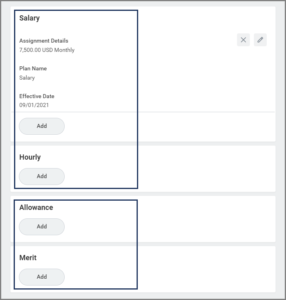
- Salary or Hourly section. Select Add to choose the correct pay group. To determine if a position is Salary or Hourly, see Job Descriptions.
- Complete the following fields:
- Compensation Plan (Salary or Hourly). Do not touch the additional details section, which includes adding an end date to the compensation.
- Amount (Pay Rate). Use the approved budgeted rate.
- Frequency (Monthly or Hourly). If the role is non-exempt, the frequency will be hourly. If the role is exempt, the frequency will be monthly. Information can be found at Titles and Salaries. For a salary amount, the section will default to an annual frequency and this needs to be updated to be monthly including the amount.
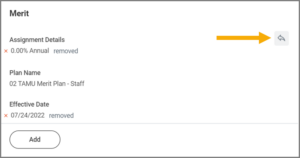
- Special Note for Compensation: During the Change Job process, regardless of the reason for initiating it, Workday may delete the salary and/or allowances for the Employee. You will know this has happened if “Total Base Pay” reads $0.00. Under the Salary, Hourly, or Allowances section, if you see Red X’s, please make sure to select the arrow button on that section to Restore these amounts. Double check this has been done by reading Total Base Pay. The Total Base Pay should never be $0.00.
- Add or edit the Allowance section, if necessary.
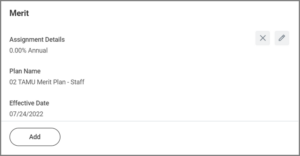
- In the Merit section, restore the Merit Information. It is important to restore the merit plan to ensure the Employee would be included in the end of Fiscal Year merit process. If you do not restore the merit plan, the Employee will not be in the upcoming merit process. The merit plan will not automatically give the Employee merit, this will be done through the Position Budgeting Application (PBA) by Finance.
- Select Next.
- Review the Summary section before submitting the process.
Note: You can also make edits to fields on this page or select the Guide Me icon to go back to the Guided Editor.
- Comments. Leave a comment regarding the changes that are occurring.
- Select Submit.
Navigate to the Up Next tab for the next steps in the process.
Up Next
Upcoming Reviews/Approvals
The HR partner will receive an inbox task to review. It will route to additional security roles. The Department Head (except for Graduate Assistant positions or if Job Overlap Period is selected as a reason) or an Executive Approver (only if it is a reclassification for Staff or a promotion for Faculty/Staff) will receive an inbox task to approve the business process.
Note: When multiple Executive Approvers are assigned to an organization, all Executive Approvers will be required to approve select tasks to move the process forward.
Any onboarding activities required as a result of changes made during this business process should route to the Employee.
Potential Tasks and To Dos
- If the hire is initiated from recruiting, the HR Partner will receive the Inbox task Request One-Time Payment to confirm a one-time payment relocation allowance was included in the offer.
- The HR Contact will receive a To Do Offboarding Procedure if there is a change in location, company or Supervisory Organization.
- The Absence Partner will receive the To Do Determine Time Off Payout for Change Job to evaluate the potential payout for any Time Off balance.
- If the Worker is assigned a new Supervisory Organization or a new position in the same Supervisory Organization, the HR Contact will receive the Inbox task Assign Roles if the Worker’s new position needs assignments changed or added.
Assign Roles (HR Contact)
- The Assign Roles subprocess routes to the current HR Contact and will list all current security roles the Employee possesses (e.g., Manager, Budget Contact, HR Contact, Search Committee Roles over requisitions, Department Head). It will show old values and new values for employee transfer, so the inbox recipient can see the old title, manager, and supervisory organization, as well as the new title, manager, and supervisory organization. Then there are the following options for how to handle the Employee’s existing security roles in Workday.
- Transfer role assignments to. The Employee selected in this box will take all security roles with them on their position, leaving none behind on the old position.
- Copy role assignments from old position to new position. The old position will retain the previous security roles, and the new position the Employee is moving into will have those same security roles added in.
- Copy role assignments from. The Employee selected in this box will be used to create a copy of their security roles, and these roles will be copied for the Employee’s new position. The Employee selected will retain their security roles and this will leave the old position with the prior security roles in place.
- Remove role assignments. The Employee will inherit whichever security roles are already attached to the new position; all security roles will be removed from the old position and the Employee who takes over that old position at a later time will not hold those security roles.
- None of the above. The Employee will take over the security roles that are already assigned to the new position; all security roles will remain the same with the old position.

- After making your selection, select OK.
- Based upon your selection, the subprocess will provide a full listing of all security roles being moved, copied, and/or erased, for final review and submission.
- New Assignee/Assignees to Add. This should be blank if you want to retain the security role on the previous position. If a Transfer or Copy was done the new Employee’s position should be listed in this box.
- Remove Existing Assignee/Assignees to Remove. This will have the position listed if you no longer wish for that position to hold that security role. Removing the position will make the next Employee who takes over this position, not have that security role.

- Select Submit.
Up Next
- The Assign Roles process will then route to the Organization Partner (hrnetwork@tamu.edu) for review/approval on most security roles. Search Committee Roles will route to the Recruiting Partner (jobs@tamu.edu) for review/approval.
- The HR Contact will receive the To Do Other Onboarding Procedures if the new job has location, company, or supervisory organization changed.
- The Payroll Partner will receive the To Do Assign Pay Group if the worker’s new job position or pay rate type, or company changed.
- The I-9 Processor will receive the To Do Complete Form I-9 in Guardian for Transfer or Additional Job if the business process results in a new Company for the Employee’s position.
Assign Costing Allocation (Budget Contact)
The Budget Contact will receive the Assign Costing Allocation task if the Worker is not changing Supervisory Organizations. Otherwise, the task is routed to the Budget Contact supporting the new Supervisory Organization if the worker is moving to a different Supervisory Organization.
- Navigate to the Assign Costing Allocation for Change Job action item in your inbox.
Important: If no changes to costing allocations are needed, skip this task using the gear icon. When no changes are made and the task is not skipped, the business process then routes to Workday Services causing a delay.
- If changes are needed to costing allocations, select Worker and Position in the Costing Allocation Level field.

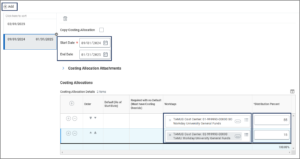
- Select Add to create a new cost set.
- Complete the following fields:
- Start Date. This date indicates the first date that the salary / wages will be charged to the designated cost center. The entire pay period must have a costing allocation(s), regardless of an Employee’s hire date or termination date.
- Monthly employees: Costing allocations should begin on the first calendar day of the month (e.g., 01/01, 02/01, 03/01), not the first business day, regardless of the hire date.
- Biweekly employees: Costing allocations should begin on the first day of the biweekly pay period, which always starts on a Sunday, regardless of the hire date.
- To view pay schedules, refer to the Payroll Processing Calendars.
- End Date (Optional). This indicates the last date that the salary/wages will be charged to the designated account.
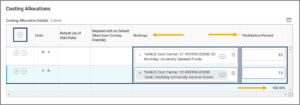
- Worktags. Update the account number (e.g., Business Computing Services) as needed. Projects are searchable from this field, but should not be selected.
- Distribution Percentage. Update as needed. If the position will be paid out of one cost center, the cost center’s Distribution Percent will default to 100.
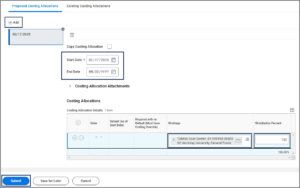 Important: You cannot leave the Worktags field blank. You will not be allowed to continue.
- Start Date. This date indicates the first date that the salary / wages will be charged to the designated cost center. The entire pay period must have a costing allocation(s), regardless of an Employee’s hire date or termination date.
- If the position will be paid out of multiple cost centers, select the Plus Sign (+) icon to create a new row and add additional cost centers as needed. Designate the appropriate percentage for each cost center under the Distribution Percent column, ensuring that the percentages from all cost centers add up to 100%.
- In the event you need multiple cost sets for different time periods, you will need to enter an End Date for the previous cost set(s) so the dates do not overlap with the new cost set. Then select the Add button above the table. For the new cost set, repeat the steps.
Note: Remember that each Cost table needs to add up to 100%.
- Select Submit.
Note: A change to either the Effective Date, Percentage or TAMUS Cost Center must be made in order for the business process to route.
For more in depth information on Assign Costing Allocation, see the Assign Costing Allocation job aid or the Costing Allocation quick reference guide on Workday Help.
Potential To Dos
- The Retiree Partner will receive a To Do Initiate Medical Change Only Benefit Event for Retiree if the Worker is a Retiree enrolled in Medicare A&B.
- The I-9 Partner will receive the To Do Record Form I-9 Completed in Guardian. Refer to the Form I-9 Processing quick reference guide on Workday Help for more details.
- The Payroll Partner on the vacated position may receive the To Do Inactivate Ongoing Payroll Input or Tax Treaty to end date the payroll input for these items and report the termination date for the withholding order to the Attorney General’s office website.
- The Payroll Administrator may receive the To Do Inactivate Withholding Order to end date and report the termination date for the withholding order to the Attorney General’s office website.
- The Budget Contact will receive To Dos to Update Position Restriction Costing Allocation and the HR Contact will receive the Update Position Restriction Default Compensation on the vacated position if the vacated position is left open (Faculty, Staff, or Graduate Assistant worker types).
This completes the Change Job business process.

