Overview
This guide provides a brief overview of the Assign Costing Allocations business process

Overview
Costing allocations are essential within staffing and compensation business processes. These business processes include Create Position, Hire, Change Job, Termination, Add / End Additional Job, Edit Position Restrictions and Request Compensation Change. Assign Costing Allocations can also be initiated as a stand-alone business process.
The purpose of this reference guide is to provide a brief overview of the Assign Costing Allocation business process. The primary focus of this guide is Assign Costing Allocation as a sub process of Hire, Change Job and other business processes and impacts to other systems when the incorrect action occurs. All information is applicable to the stand-alone business process and thus is not discussed as a separate topic in this guide.
Key Points:
- Costing allocations assigned in Workday feed into the A&M System financial system, FAMIS, on a nightly basis for establishing annual budget after payroll processing is completed for each pay period. Encumbrances get auto adjusted at the beginning of each month and members can verified that any costing allocation changes that have occurred in the past month are reflected.
- New accounts need to be created in FAMIS and assigned the Cost Center Approver role and this information is fed to Workday on a nightly basis.
- Blank costing allocations or costing allocations incorrectly set up in Workday as of the payroll deadline will result in salary, wages and fringe benefits posting to a member’s FAMIS default account. If this occurs, a Payroll Cost Transfer must be completed outside of Workday to move the expenses to the correct account(s).
- Retroactive changes to costing allocations in Workday will not correct previously posted salary, wages or benefits.
- Costing allocations require a Start Date but do not require an End Date. If there is a reasonable expectation that the accounts and percentages are applicable for the foreseeable future the End Date can be left blank. Some members may require an end date for costing allocations on contract and grant accounts. If the last interval of costing allocations does not have an end date, FAMIS will encumber the estimated salary and fringe through the end of the fiscal year (August 31) on these accounts.
- Costing allocations do not drive payroll. Employees will be paid if they are employed within a current academic pay period or if a timesheet is approved, even if costing allocations are not set up correctly.
- Costing allocations do not follow the worker. This means that if a worker transfers from one position to another position, worker position costing allocations will need to be assigned for that Employee in their new position.
Costing Allocations Defined
Costing allocations refer to the accounts from which the organization plans to withdraw funds to make a financial transaction. In the case of human capital management, this means the account from where we want salary, wages or fringe benefits paid to an Employee or budgeted for an unfilled position.
Cost Center
Accounts are referred to as cost centers in Workday. The field where the cost center is entered is called Worktag. It is important that this information be correct because this is the account from which funds will be used to pay the Employee. If the Employee is paid out of an incorrect account or a change needs to be made after payment was made, this can be corrected. This correction is called a Payroll Cost Transfer (PCT). Payroll Cost Transfers are done in Canopy, not Workday.
Cost Set
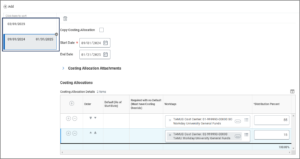
A cost set is one or more cost centers that will be used to pay employees during a specific time frame. This can be only one account or as many as is needed. For example, we may pay the Employee from Account 1 and Account 2 from January until June for the year. This would represent a cost set. Figure 1 shows an example of one cost set with multiple cost centers. The sum of Distribution Percent for all cost centers in a cost set must equal 100%.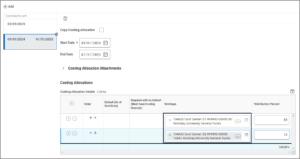
Figure 1. Example of one cost set using multiple cost centers
Costing Allocation Levels
Costing allocations can be assigned on three levels: Position Restrictions, Worker Position, and Worker, Position, Earning. Assigning costing allocations to the Position Restrictions tells Workday only the intended account(s) for paying any Employee that would fill the position. Assigning costing allocations to the Worker Position, establishes the designated account(s) from which an Employee who currently fills a position will be paid. Finally, costing allocations assigned to Worker, Position, Earning will only specify which account(s) to use for paying an Employee for an allowance (e.g. cell phone).
IMPORTANT: Worker, Position, Earning should never be used to assign costing allocations for base pay.
Figure 2. Example of multiple cost sets
Guidelines for Assigning Costing Allocations
Position Restrictions
When assigning costing allocations on the Position Restrictions, we are designating from which account we plan to pay the Employee. Select the appropriate Start Date and leave the End Date blank if the accounts and percentage will not change over time. Enter the cost center(s) that should be associated with the position into the Worktag field(s). Enter the appropriate distribution percentage for the cost centers if more than one is used. If edits are needed later, the user can initiate the Assign Costing Allocations business process as a stand-alone process and make those changes.
Note: Costing allocations assigned to Position Restrictions would not typically be a contract and grant account. This is because contract and grant accounts may have end dates and are eventually deleted from FAMIS.
Worker Position
When assigning costing allocations to the Worker Position, we are designating from which account(s) the Employee will actually be paid. Many employees are paid from one cost center for the duration of employment. However, there are instances where multiple cost centers and/or cost sets (See Figure 2) are required for portions of the year. As shown in the figure, we might have different time frames from different funding sources. In these cases, Start Date and End Date become important and are required to designate the period to use specific cost centers.
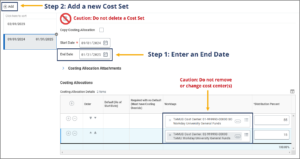
IMPORTANT: When prompted to assign costing allocations during a business process for an Employee, NEVER remove the cost center(s) in the Worktag field from an ‘active’ cost set. An active cost set is one where payroll has already occurred using the information. Instead, close out the existing cost set by entering / editing the End Date to be the last day the cost set is used. Then create a new cost set using a Start Date of one day after the previous End Date just entered for the prior cost set. See Figure 3 for how to close out costing allocations for a Worker.
Making Changes to Worker Position costing allocation
Below is a typical Worker Position costing allocation: one cost center with a Start Date and no End Date. When we need to change these costing allocations, and they have already been used to pay the Employee in the past, be sure to follow the recommendations in Figure 3 below.
Figure 3. Costing allocations task during Create Position business process
IMPORTANT: When a new cost set is added, Start and End Date should cover the entire pay period. To see if the employee is salaried or hourly, click on the graph icon on the top right corner to see this information specific to the position. End Date is not always required, but when adding it, it is recommended to end date on the pay period end date.
For more information on pay period dates, visit the Payroll Schedules page.
Related Business Processes
Create Position
During the Create Position business process, there is a sub process to assign costing allocations for the Position Restriction. This represents the intended account from which the Employee who fills the position would be paid. These costing allocations will remain on the Position Restriction even if there are different costing allocations assigned to the Worker Position when you fill the position.
Costing Allocation for Create Position
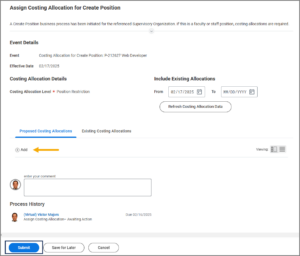
The Budget Contact receives an inbox task called Costing Allocation for Create Position. Because this is a new position, there are no existing costing allocations to view and or edit. Therefore, this is when the Budget Contact will use the button to add a cost set for the position based on the intended account that will be used.
Figure 4. Costing allocations task during Create Position business process
Remember: This costing allocation is for the Position Restriction, not the Worker Position. Remember, this position is not filled at this time.
The Budget Contact is required to complete this step for budgeted positions. This allows for encumbrance in FAMIS.
Encumbrances
An encumbrance in FAMIS will not be established on a new position (Position Restriction) until the position is filled, the position later is vacated, or the unfilled position is still vacant at the beginning of the very next fiscal year. A member can designate to not encumber unfilled positions through FAMIS Screen 842. FAMIS Screen 842 is a member decision for all unfilled faculty, staff and graduate assistant positions. Student worker and temporary/casual positions are not encumbered.
When the position is filled, encumbrances will be determined by Worker Position costing allocations, not Position Restriction costing allocations. When the position is later vacated, if left open, encumbrances will revert to the costing allocations assigned to the Position Restriction.
Hire
During the Hire business process, the Budget Contact receives the inbox task Costing Allocation for Hire to assign costing allocations to Worker, Position now that the position is filled. By completing this step, they are identifying from which account the Employee will be paid.
Costing Allocation for Hire
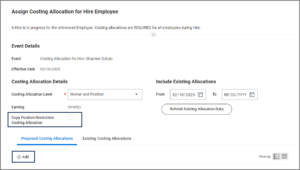
When completing this task, it is important that only Worker and Position be selected as the Costing Allocation Level. During the Hire business process, an optional check box is provided to allow the user a starting point by which they can copy the existing costing allocations from Position Restriction and apply those same costing allocations to the Worker Position.
Displayed in Figure 5 is the most efficient method for completing the task when costing allocations for the Employee do not need to differ from those assigned to the Position Restrictions.
Figure 5. Copying position restriction costing allocations to worker and position costing allocations
IMPORTANT: If Worker, Position, Earning is selected, the cost center will ONLY be used for allowances assigned to the Employee and NOT the salary, wages or fringe benefits. This means payroll will be posted to the member’s default account in FAMIS instead of the intended cost center(s).
Change Job
When the Change Job business process is initiated, the Budget Contact receives an inbox task to Assign Costing Allocation for Change Job. Not all Change Job reasons require a change to the costing allocations for the Employee, but the user should consider if the change does impact the accounts, budget or encumbrance. For example, the Employee’s position may be reclassified, but the Employee will be paid from the same accounts and/or cost sets.
Assign Costing Allocation for Change Job
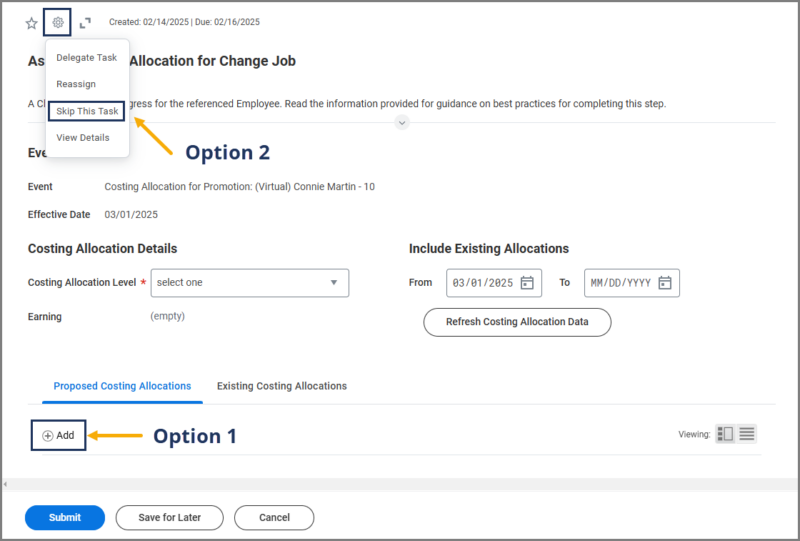
The inbox task will allow the user to evaluate whether the Employee’s costing allocations (i.e. Worker, Position) need to be updated and take one of two actions shown in Figure 6. Option 1 is to make changes and submit the task. Option 2 is to determine no changes are needed and skip the task.
Figure 6. Options for determining costing allocations during the Change Job business process
Option 1: If costing allocations DO need to be changed, the user can select Add, view the Employee’s existing costing allocations and add a new cost set that reflects changes needed.
IMPORTANT: Active costing allocations (those that have already been processed through payroll) should not be changed. Instead, the user should close out the existing cost set with the appropriate End Date and open a new cost set with the appropriate Start Date leaving no gap of time in between.
OR
Option 2: If costing allocations DO NOT need to change, the user should SKIP the task.
IMPORTANT: If the user selects Submit when no changes are made, Workday will assume that costing allocations have been updated and the business process will initiate and incorrectly route to the Workday Services Business Process Administrator role to handle, causing a delay in the business process.
Add Additional Job
When the Add Additional Job business process is initiated, the Budget Contact will receive the inbox task: Assign Costing Allocation for Start Additional Job.
Assign Costing Allocation for Start Additional Job
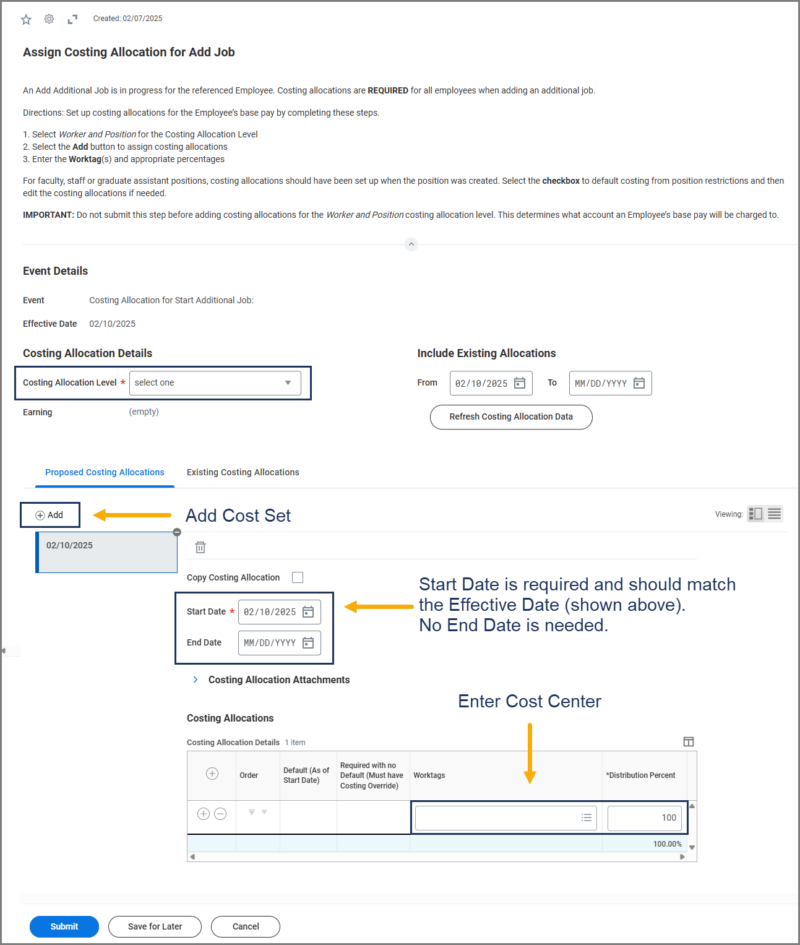
The user will need to select the costing level for Worker and Position and create a cost set for the Employee’s additional position. There is no option to copy the existing costing allocations from the Position Restrictions during Add Additional Job. The user must select Add to create a cost set specific to the Employee and this additional position as displayed in Figure 7.
Figure 7. Assigning costing allocations for worker and position during the Add Additional Job business process
Termination
When an Employee is terminated and the position is not closed, the Budget Contact receives the To Do: Update Position Restrictions Costing Allocation for the vacant position. The purpose of this step is to evaluate whether an update is needed to cost centers assigned to the Position Restrictions for the unfilled position. This is important, because these accounts will be used for updating the budget and/or encumbrance in FAMIS once the position is unfilled and left open. To complete this To Do, there are three things to do.
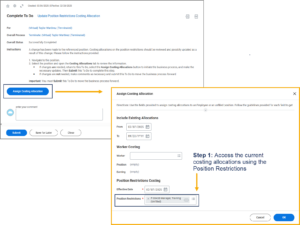
First, determine if changes are needed based on what is currently in Workday by reviewing the position’s existing costing allocations. If changes are not needed, make comments as necessary and submit this To Do to move the business process forward. If changes are needed, navigate to the existing costing allocations using the Position Restrictions option shown in Figure 8.
Figure 8. Completing the To Do for Assign Costing Allocations during the Termination business process
IMPORTANT: Selecting the Assign Costing Allocation button initiates the Assign Costing Allocation business process.
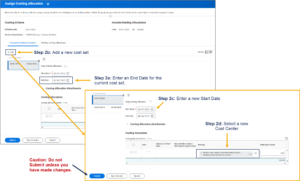
Second, when changes to costing allocations are needed, it is best practice to close out the current cost set by adding the appropriate End Date. Add a new cost set using a Start Date that does not allow for gaps in between the old and new cost set (e.g. day immediately following End Date). See Figure 9. Then Submit.
Figure 9. Assign costing allocations page used to close out existing costing allocations and start a new set
IMPORTANT: Do NOT select Submit on this page unless changes are made to the account, dates or percentages. Instead, select Cancel to cancel the business process that was initiated. If you select Submit on this page, and no changes were made, the business process will route to the Workday Services Business Process Administrator role instead of your member and delay the process.
Finally, return to your inbox and submit the original To Do to move the business process forward. The To Do inbox item must always be submitted to move the process forward, but the Assign Costing Allocations should only be submitted if changes were made to the accounts, dates or percentages.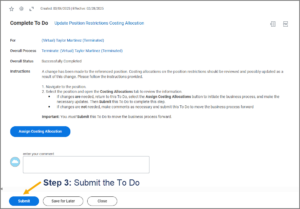
Figure 10. To Do that needs to be submitted during Termination to move the business process forward
Edit Position Restrictions
When the Edit Position Restrictions business process is initiated, the Budget Contact will receive a To Do for Assign Costing Allocations on the Position Restrictions just as was the case when leaving the position open during Termination. Therefore, the process for completing this step is the same as that for Termination. 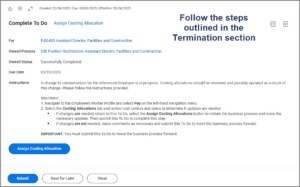
Figure 11. To Do that needs to be submitted to move the Edit Position Restrictions business process forward
IMPORTANT: Selecting the Assign Costing Allocation button on this To Do initiates the Assign Costing Allocation business process.
If you know that no changes are needed to the accounts, dates or percentages, you can submit the To Do inbox item without taking further action. If you need to determine if changes are needed or make changes, follow the same process outlined in the previous section on Termination of this guide to view the existing costing allocations.

