This job aid outlines the process for the Benefits Partner, and UIN partner to add an Employee who is returning to retire and does not have a record in Workday.
Return to Retire (Worker Not in Workday)
Last updated on June 6, 2024
Page Loading...
Checking SSO...
Prerequisites
The Individual returning to retire was terminated prior to implementing Workday. (Terminated workers back to May 2017 were converted to Workday.)
Important Information
- All returning to retire former employees will be members of the Non-Employee Benefits Administration Supervisory Organization for the respective member. The Manager of this Supervisory Organization cannot initiate the Hire business process.
- If the former Employee is in Workday, do not use this Return to Retire process. Refer to the job aid Return to Retire (Worker Already in Workday).
- This entire process is comprised of four business processes/steps: Hire and Onboarding, Terminate, Add Retiree Status, and Change Benefit Elections.
- The Hire Date and the Termination Date can be the same. When adding Retiree status, the Retirement Date must be one day after the Termination Date.
Important: If you use a future Hire Date, you will not be able to begin the termination process until that date comes to pass. Therefore, it is not recommended to use a Hire Date that is in the future.
Getting Started
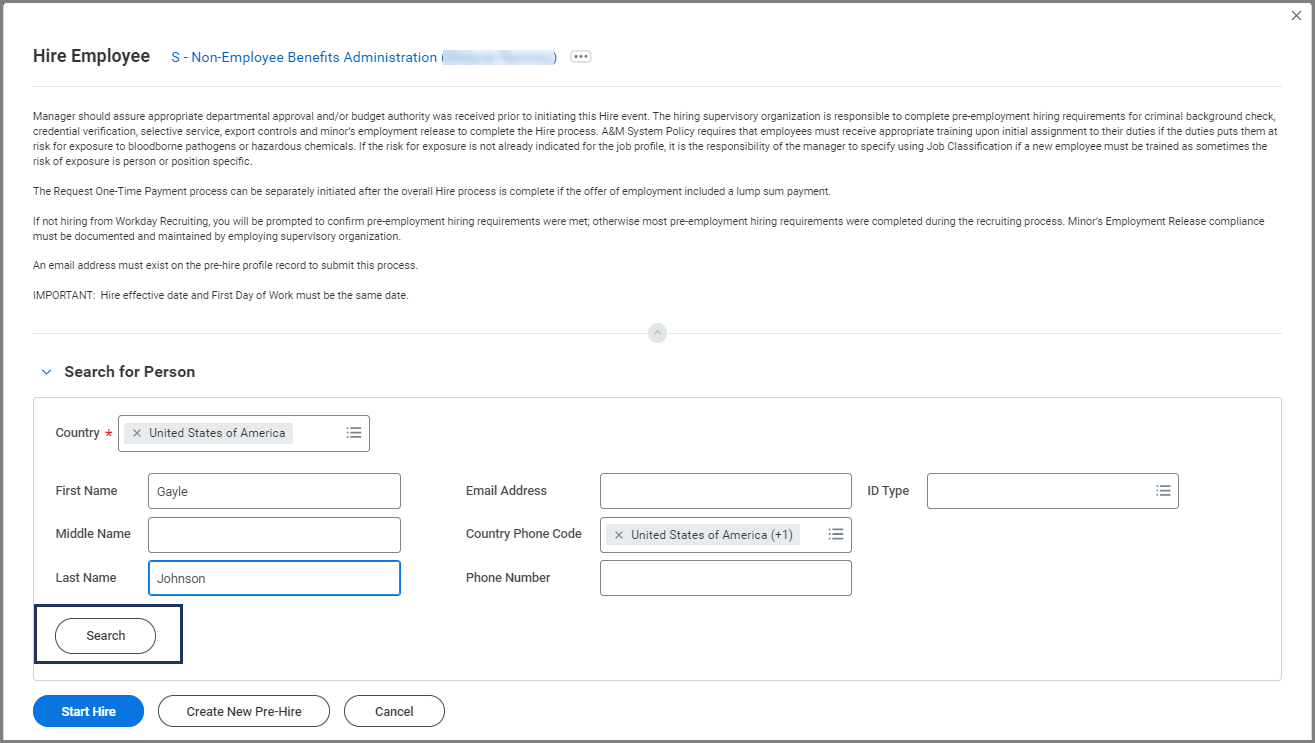
- Search for the Non-Employee Benefits Supervisory Organization for your member.
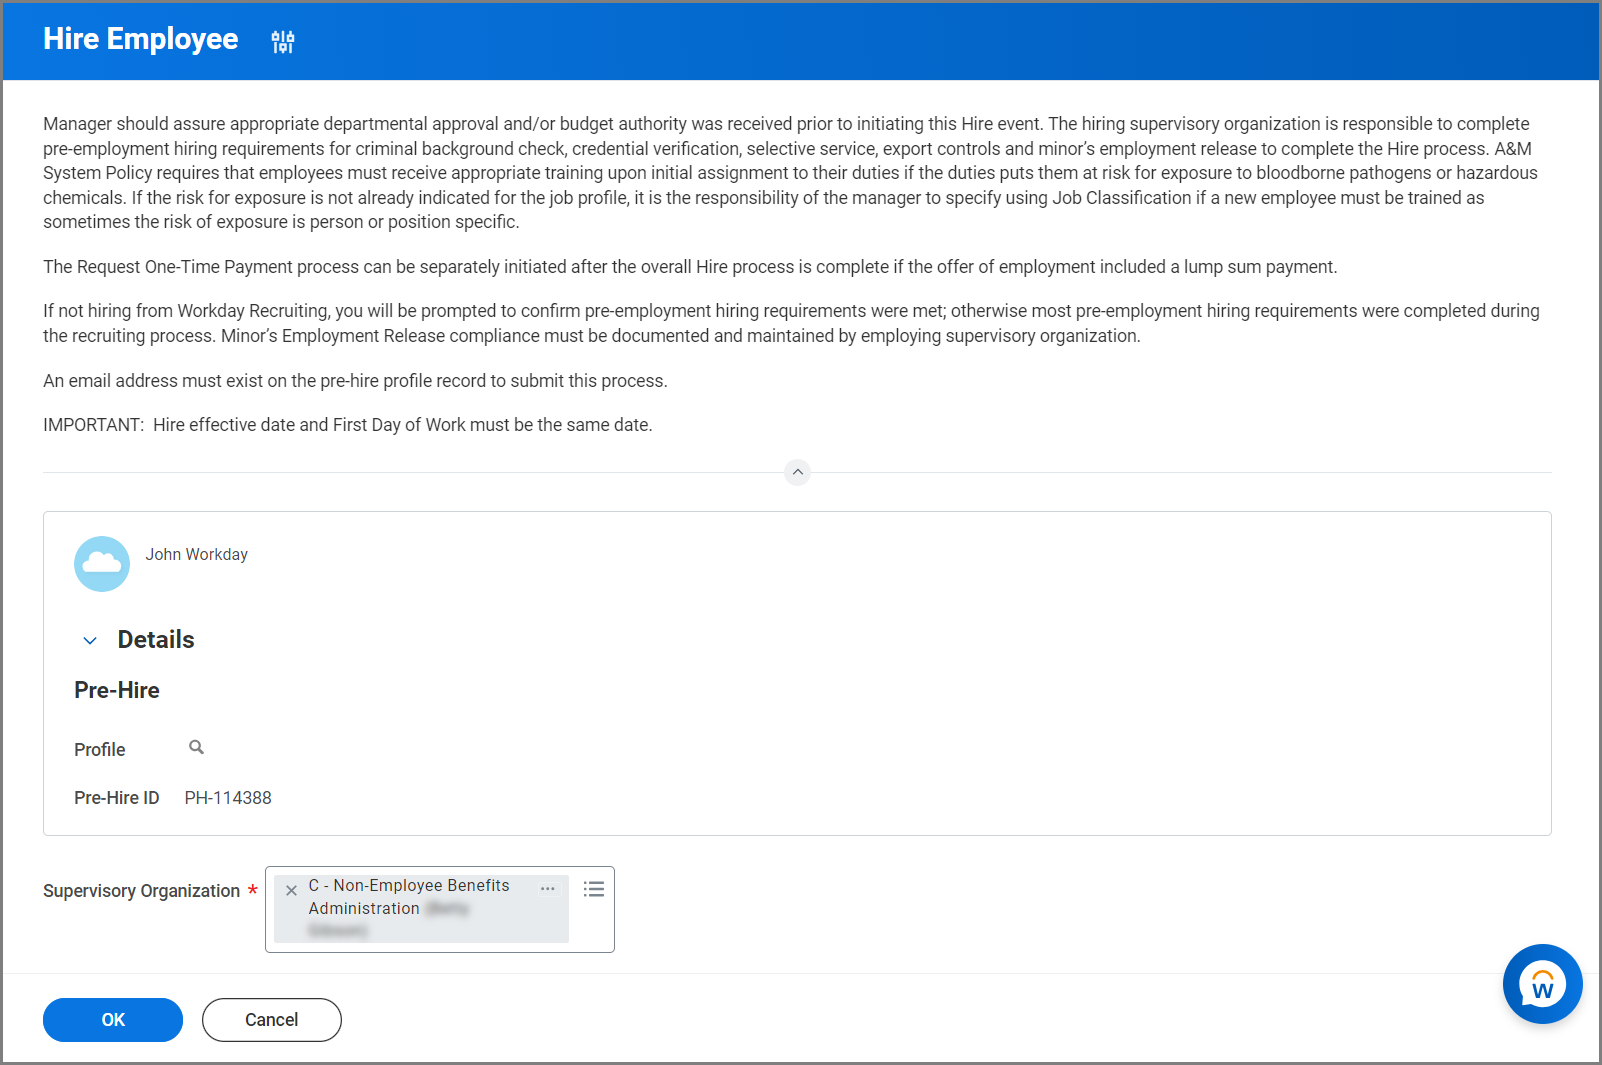
- Select the Supervisory Organization’s Related Actions icon and select Hire > Hire Employee.
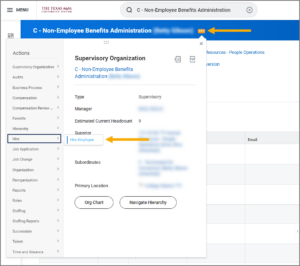
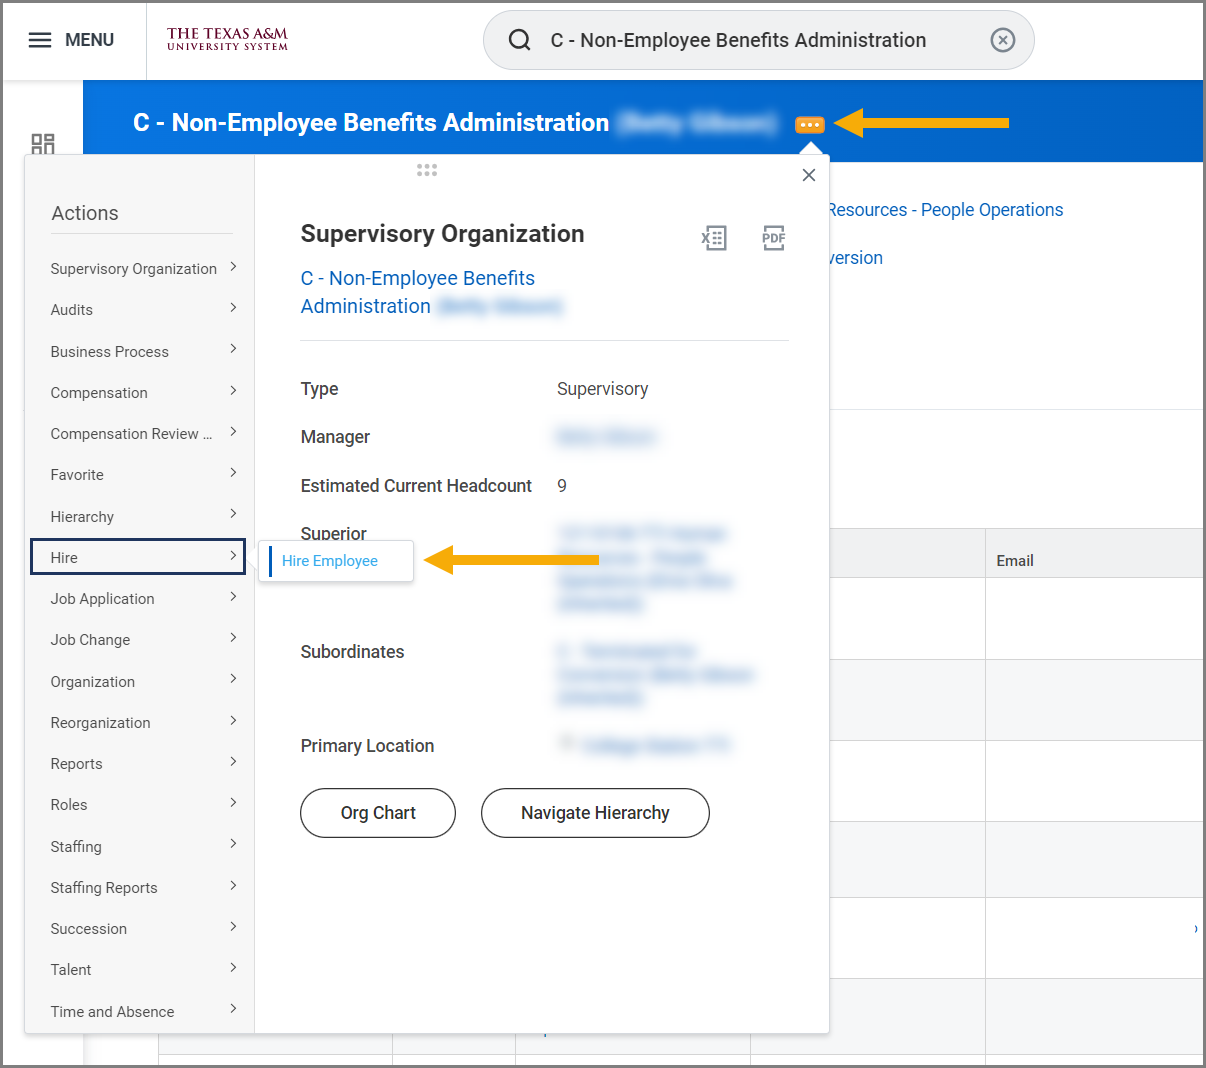
Note: Alternatively, you can search for Hire in the Search Bar and select the Supervisory Organization.
Locate/Create Pre-Hire Record
A pre-hire record is required to hire an Employee in Workday.
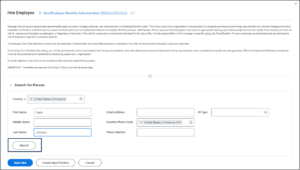
Search for Existing Pre-Hire Record
First you will search Workday for an existing pre-hire record. If none exists, you will create a pre-hire record for the Employee.
- Enter the First Name and Last Name. Then select Search.
- Review a pre-hire’s information by selecting Details.

- Select the Related Action icon next to Profile to view more details.
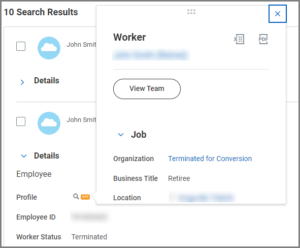
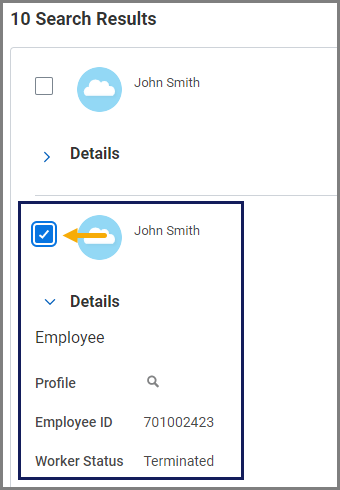

Important: If you have located the correct Pre-Hire record as a terminated Worker, stop and refer to the Return to Retire (Worker Already in Workday) job aid.
Pre-Hire Record Not Found
If there are 0 results and you have exhausted all possibilities, or if the results do not include the individual you are looking for and you have exhausted all possibilities, select Create New Pre-Hire.
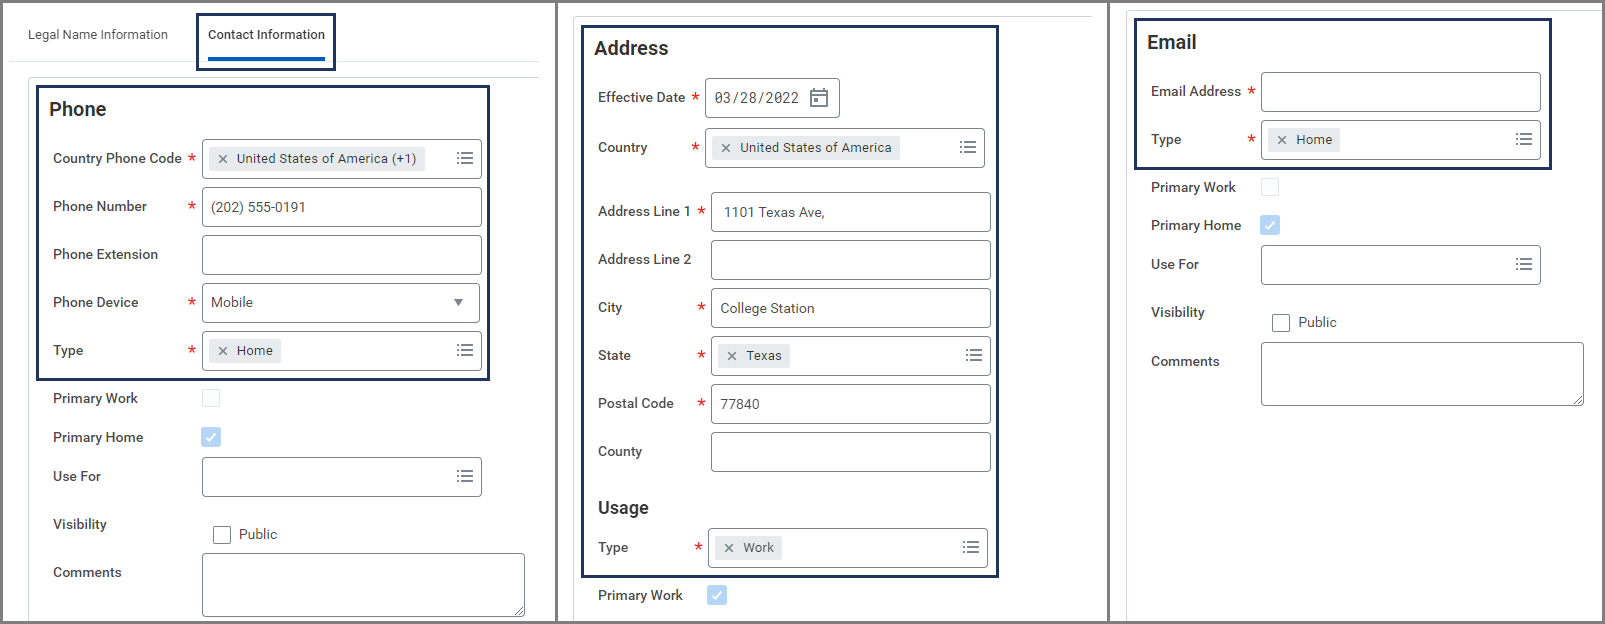
- On the Legal Name Information tab, add the Employee’s First Name and Last Name.
- On the Contact Information tab, enter the Employee’s phone number, address, and email.
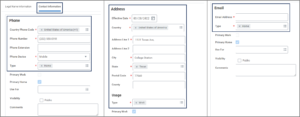
- Select OK.
- Select OK again to continue.


Hire Details
- On the next page, complete the following hire and job details.
- Hire Date. This date must be 1 day before the effective Retirement Date.
- Reason. Select Use for Benefits Purposes Only (Return to Retire).
- Employee Type. Select Non-Employee Benefits Only.
- Job Profile. Select Retiree.
- Time Type. Select Part Time.
- Location. Enter the physical location of the member from where the individual will retire.
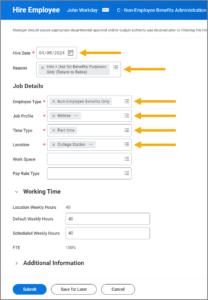
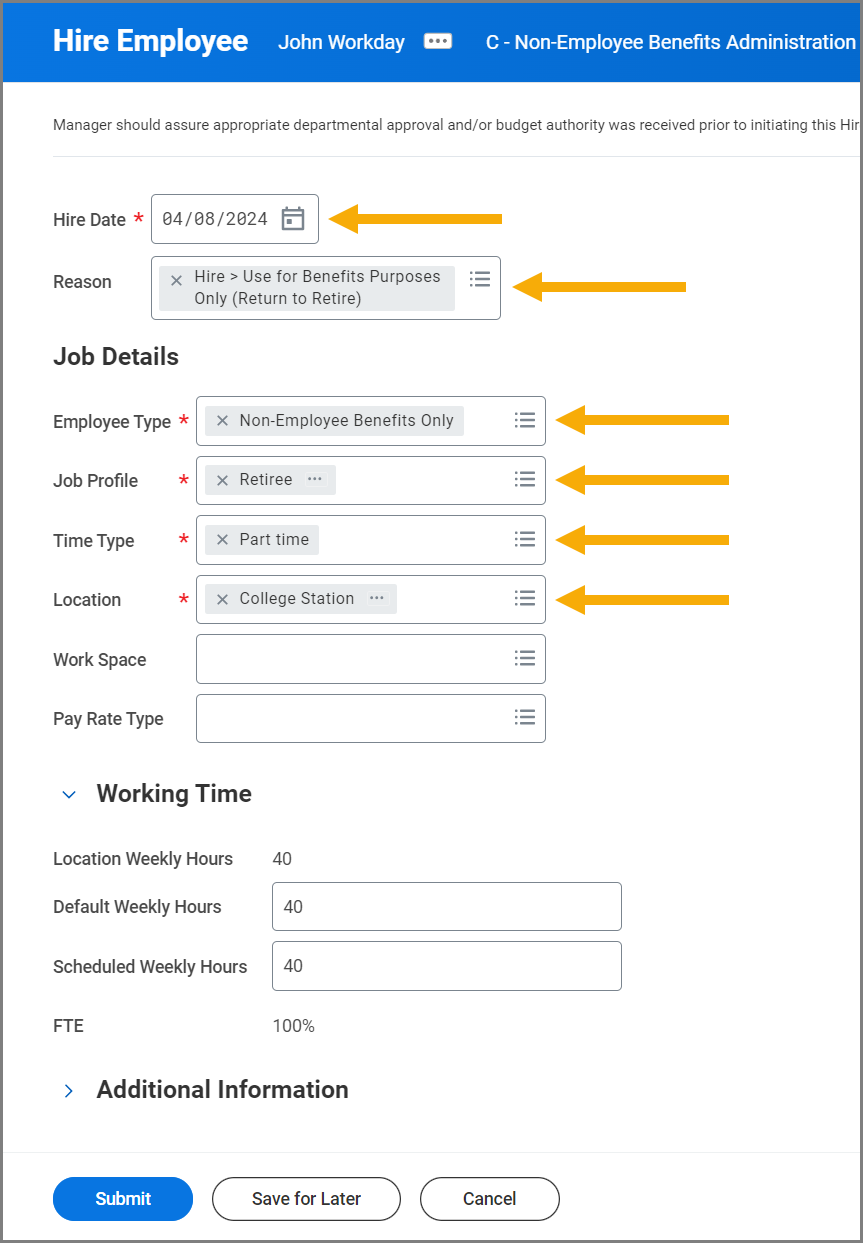
Note: If a member has more than one location, select the member’s headquarters for their institution or agency.
- Enter any comments, as needed.
- Select Submit.
The request will be routed to the Benefit Partner to Change Organization Assignments.
Navigate to the Up Next tab for the next steps in the process.
Up Next
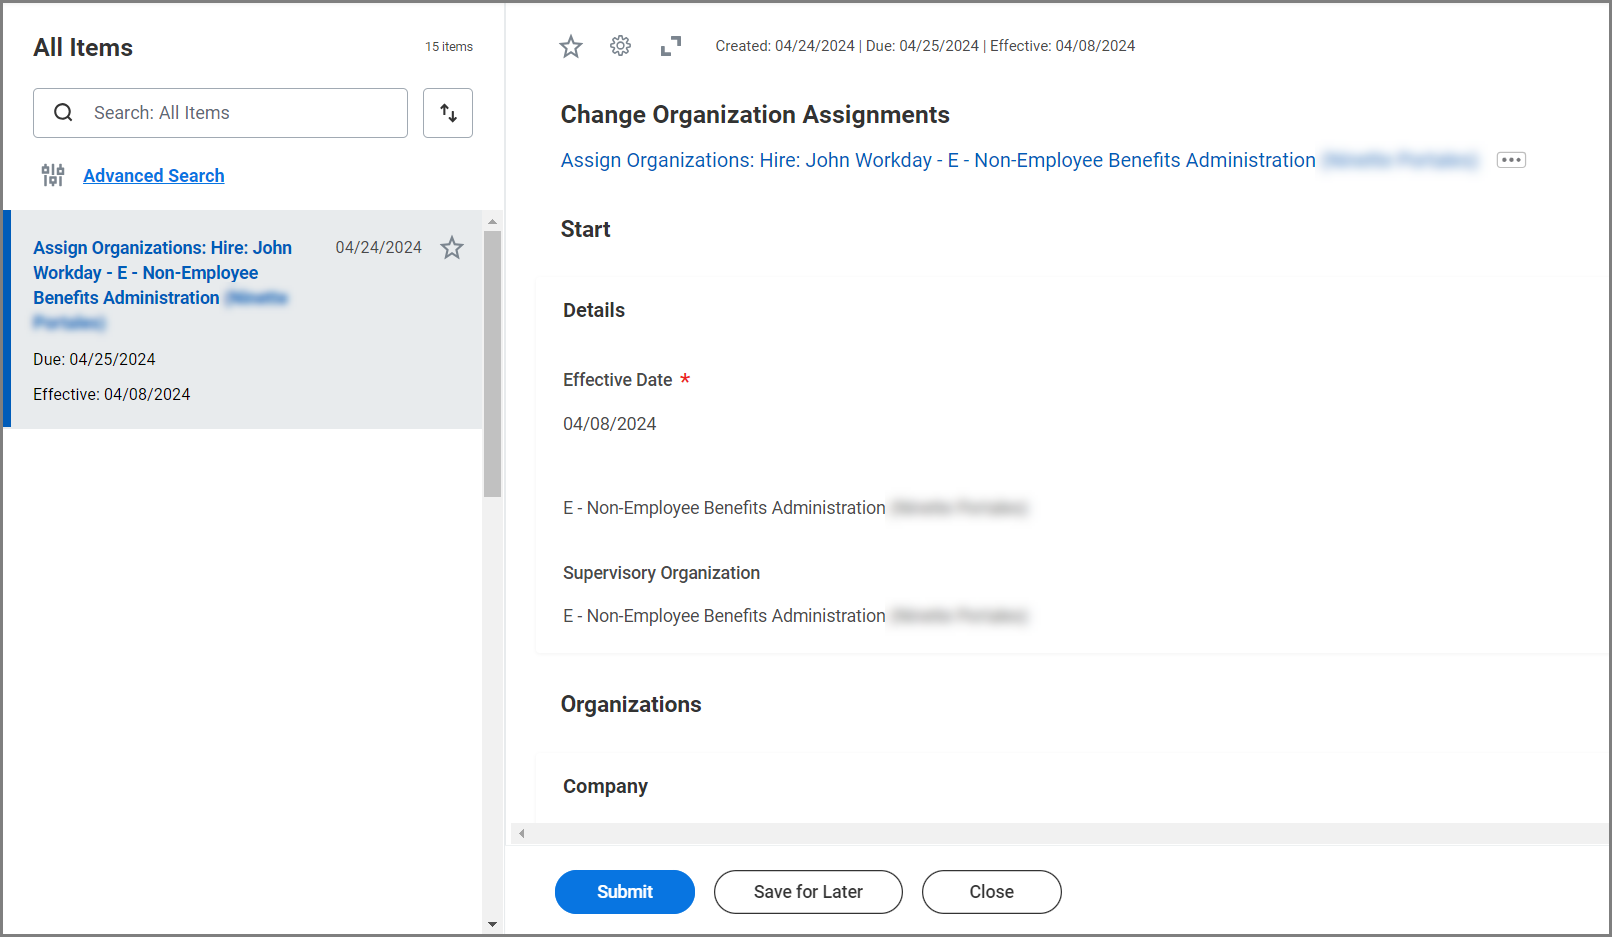
Assign Organizations (Benefits Partner)
- Navigate to your Inbox and select the the Change Organization Assignments action item.
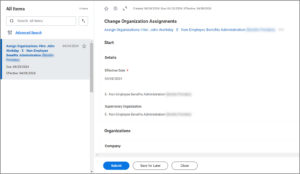
- Review and edit the Company and TAMUS System Member Part fields, if needed.
- Select Submit.
To Do: Confirm New or Rehire Worker (UIN Partner)
- Navigate to your Inbox.
- Select the To Do Confirm New or Rehire Worker Record for Non-Employee Benefits Only.
- Follow the instructions of the To Do. Search for the Retiree in Workday to confirm whether no record other than the pre-hire record you created exists.
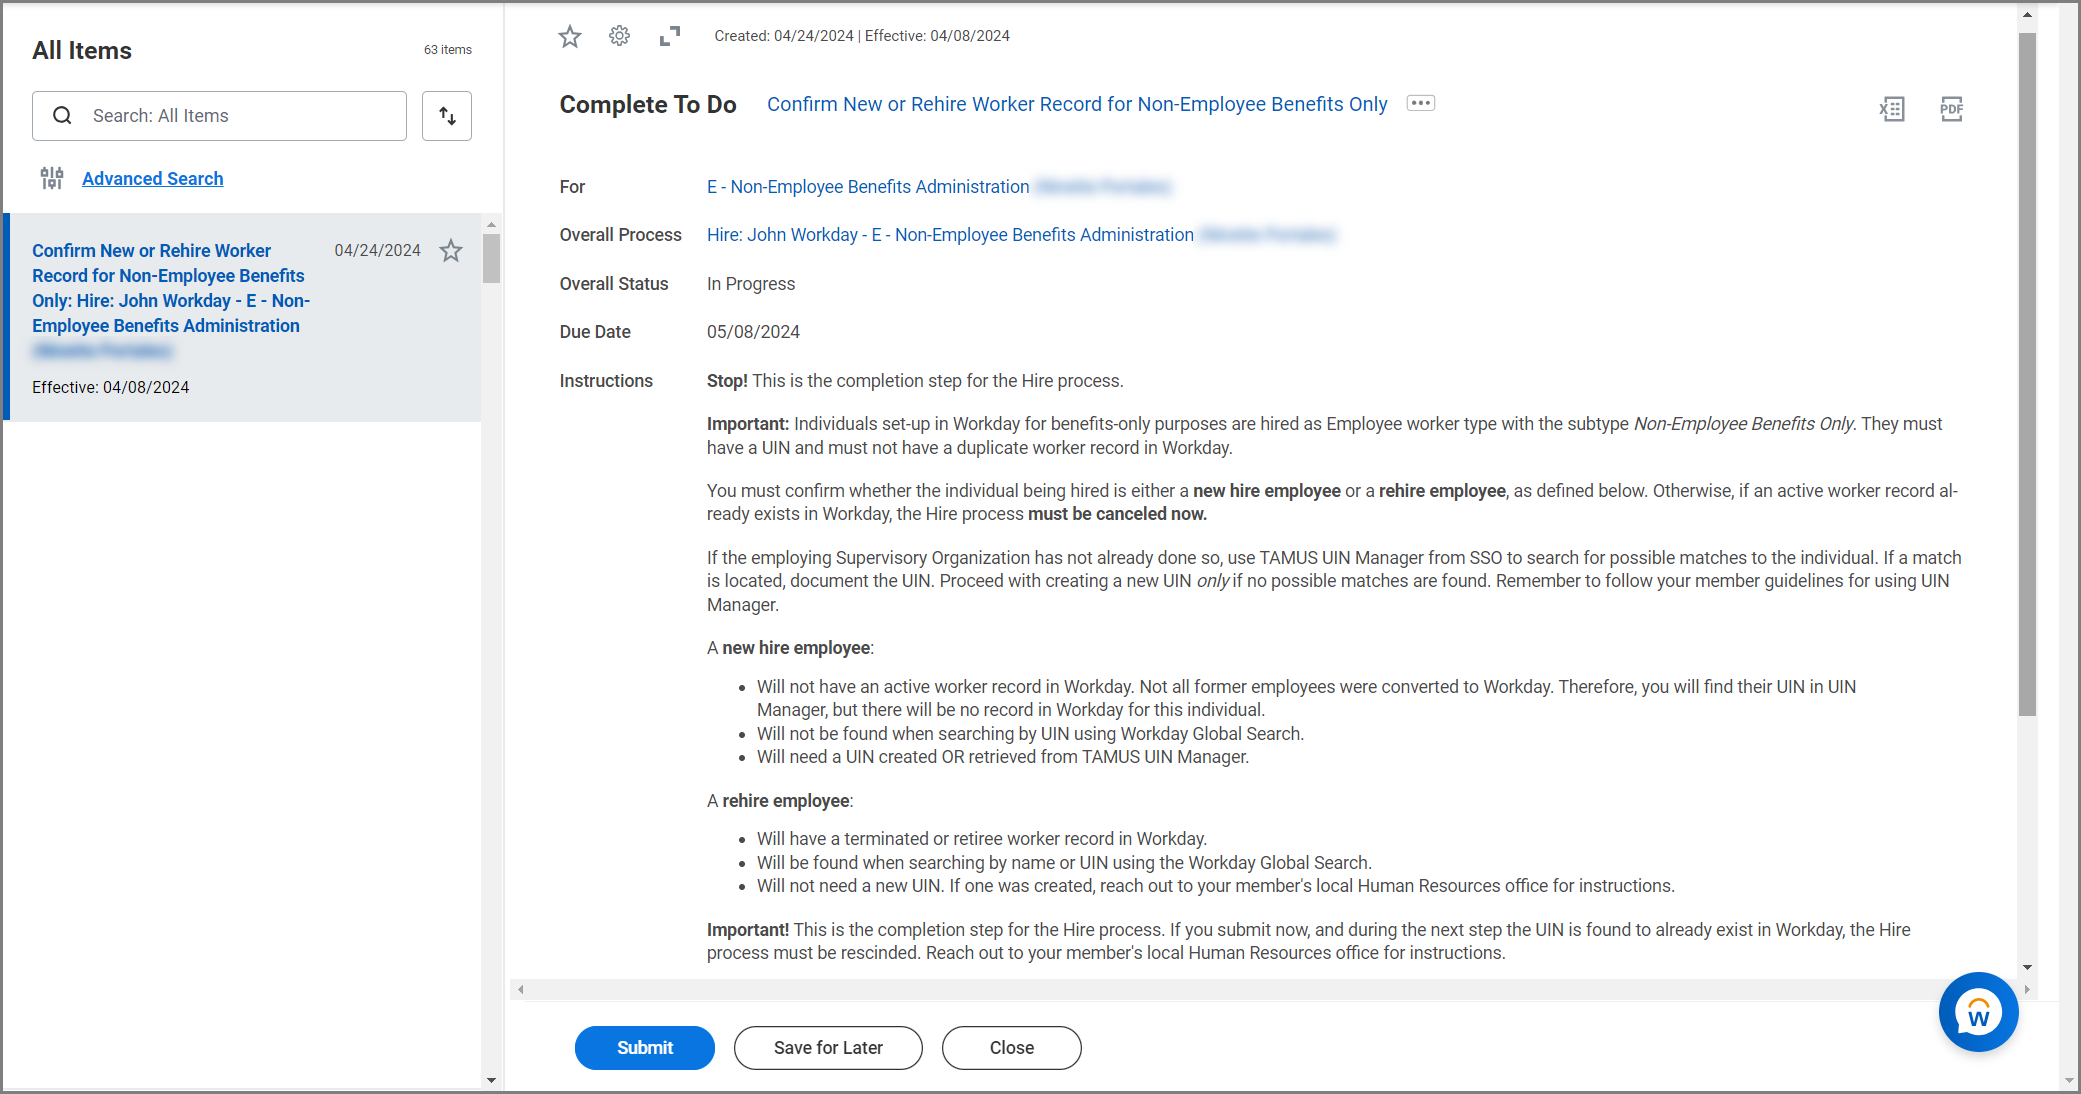
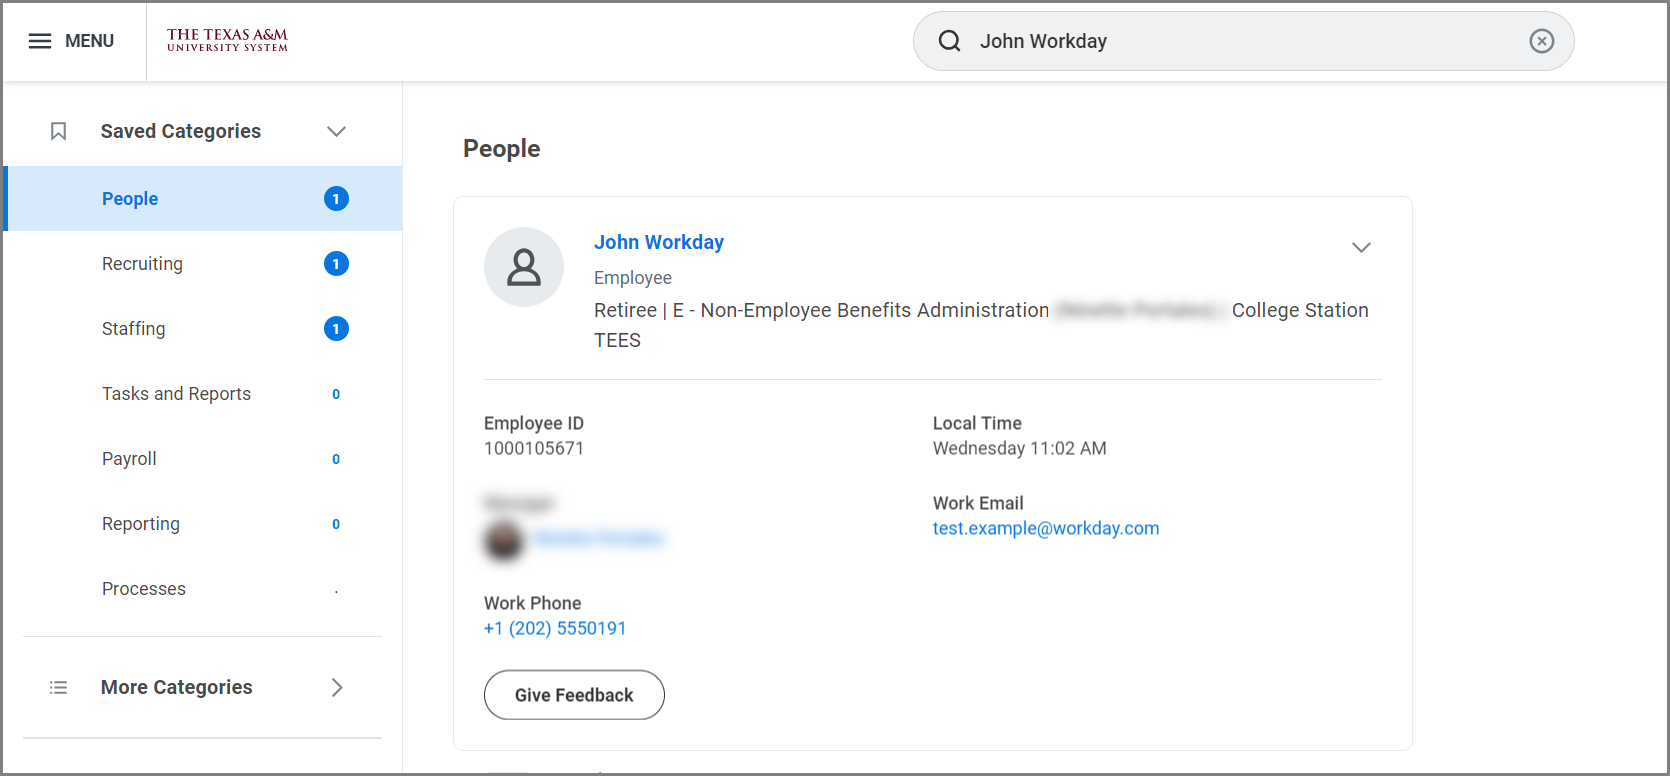
Important: A New Hire does not have an active worker record in Workday and cannot be found when searching by UIN using Workday Global Search. If you find the individual in Workday, stop and follow the instructions provided in the job aid, Return to Retire (Already in Workday).
- Return to your inbox and Submit the original To Do.
To Do: Get the UIN and Edit the Employee ID (UIN Partner)
The UIN Partner receives an Inbox item to Get the UIN and Edit the Employee ID.
- Navigate to your Inbox.
- Select the To Do Get the UIN and edit the Employee ID for Non-Employee Benefits Only.


Note: This To Do directs you to edit the System ID for the Employee and replace it with the UIN.
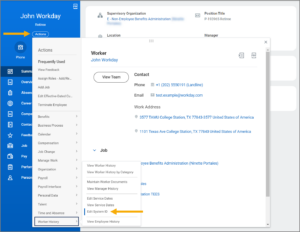
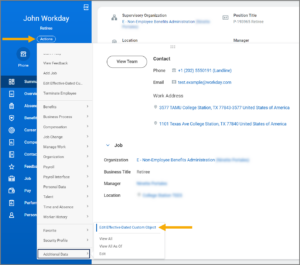
- Navigate to the Retiree’s Worker Profile.
- Select Actions > Worker History > Edit System ID.
- Enter the UIN you retrieved from the UIN Manager.
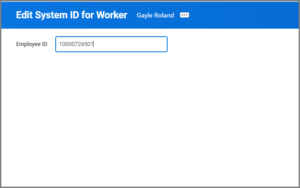
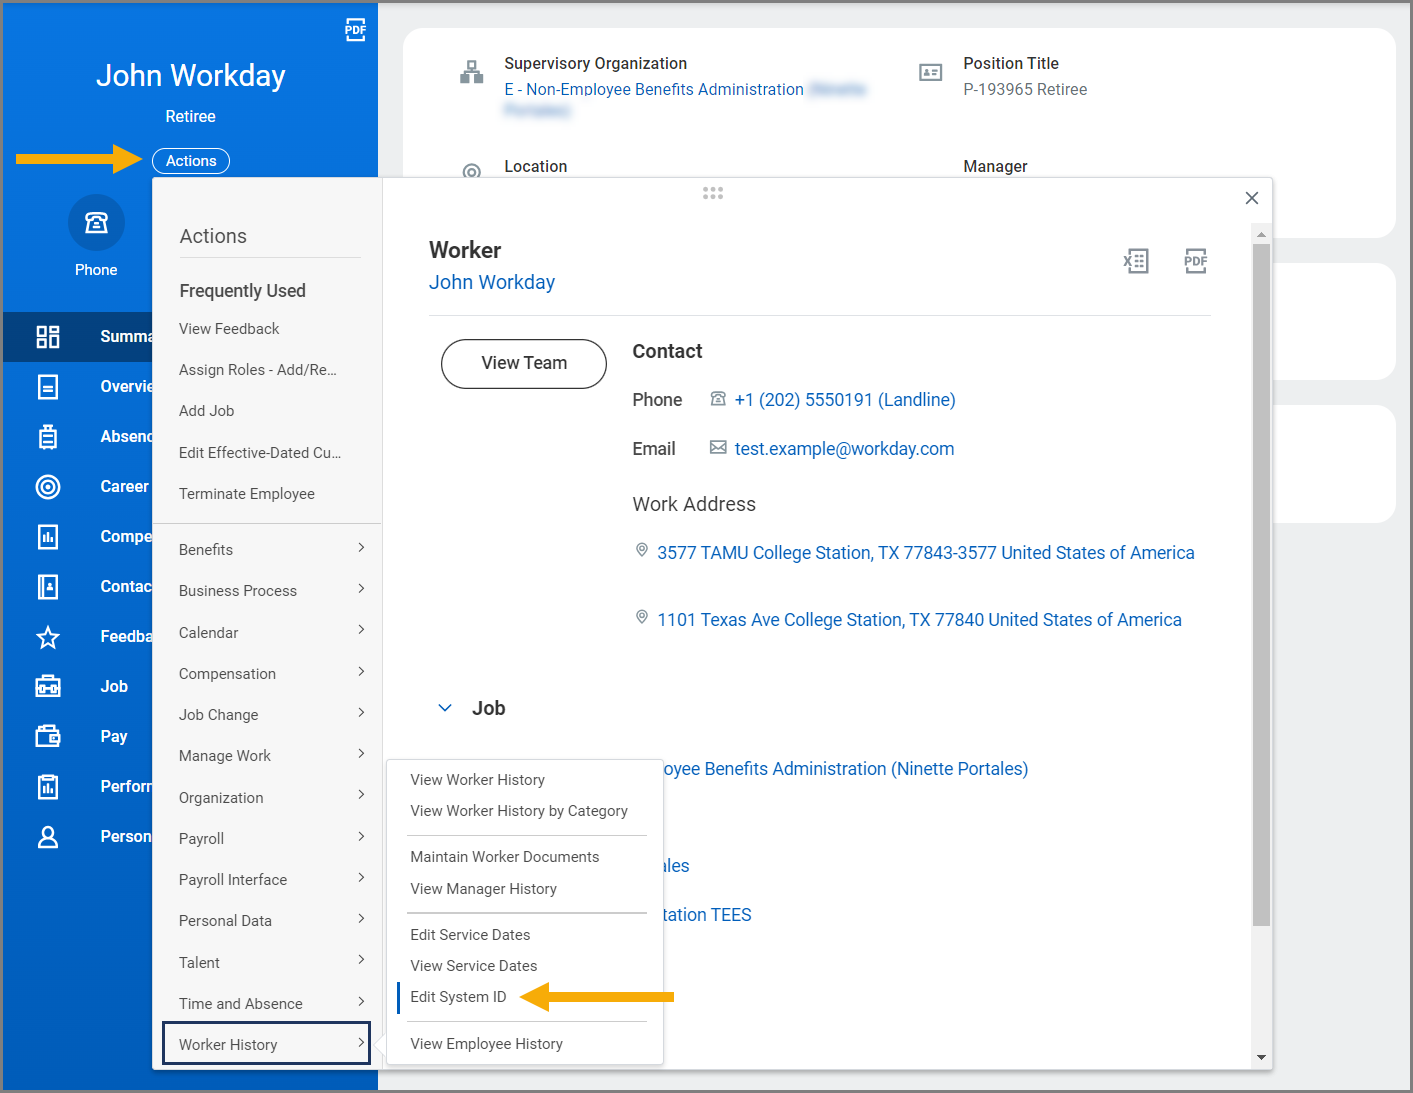

Important: A former Worker will already have a UIN; DO NOT generate a new UIN. You need to locate the former Retiree’s UIN using UIN Manager.
- Select OK and Done.
- Navigate back to the To Do in your Inbox.
- Document the UIN in the Comments section.
- Select Submit.

Onboarding Tasks (Benefits Partner)
The Benefits Partner will now need to complete some onboarding tasks on behalf of the Individual.
Enter Personal Information
- Navigate to your Inbox.
- Select the Enter Personal Information action item.
- Enter any available personal information for the Retiree.

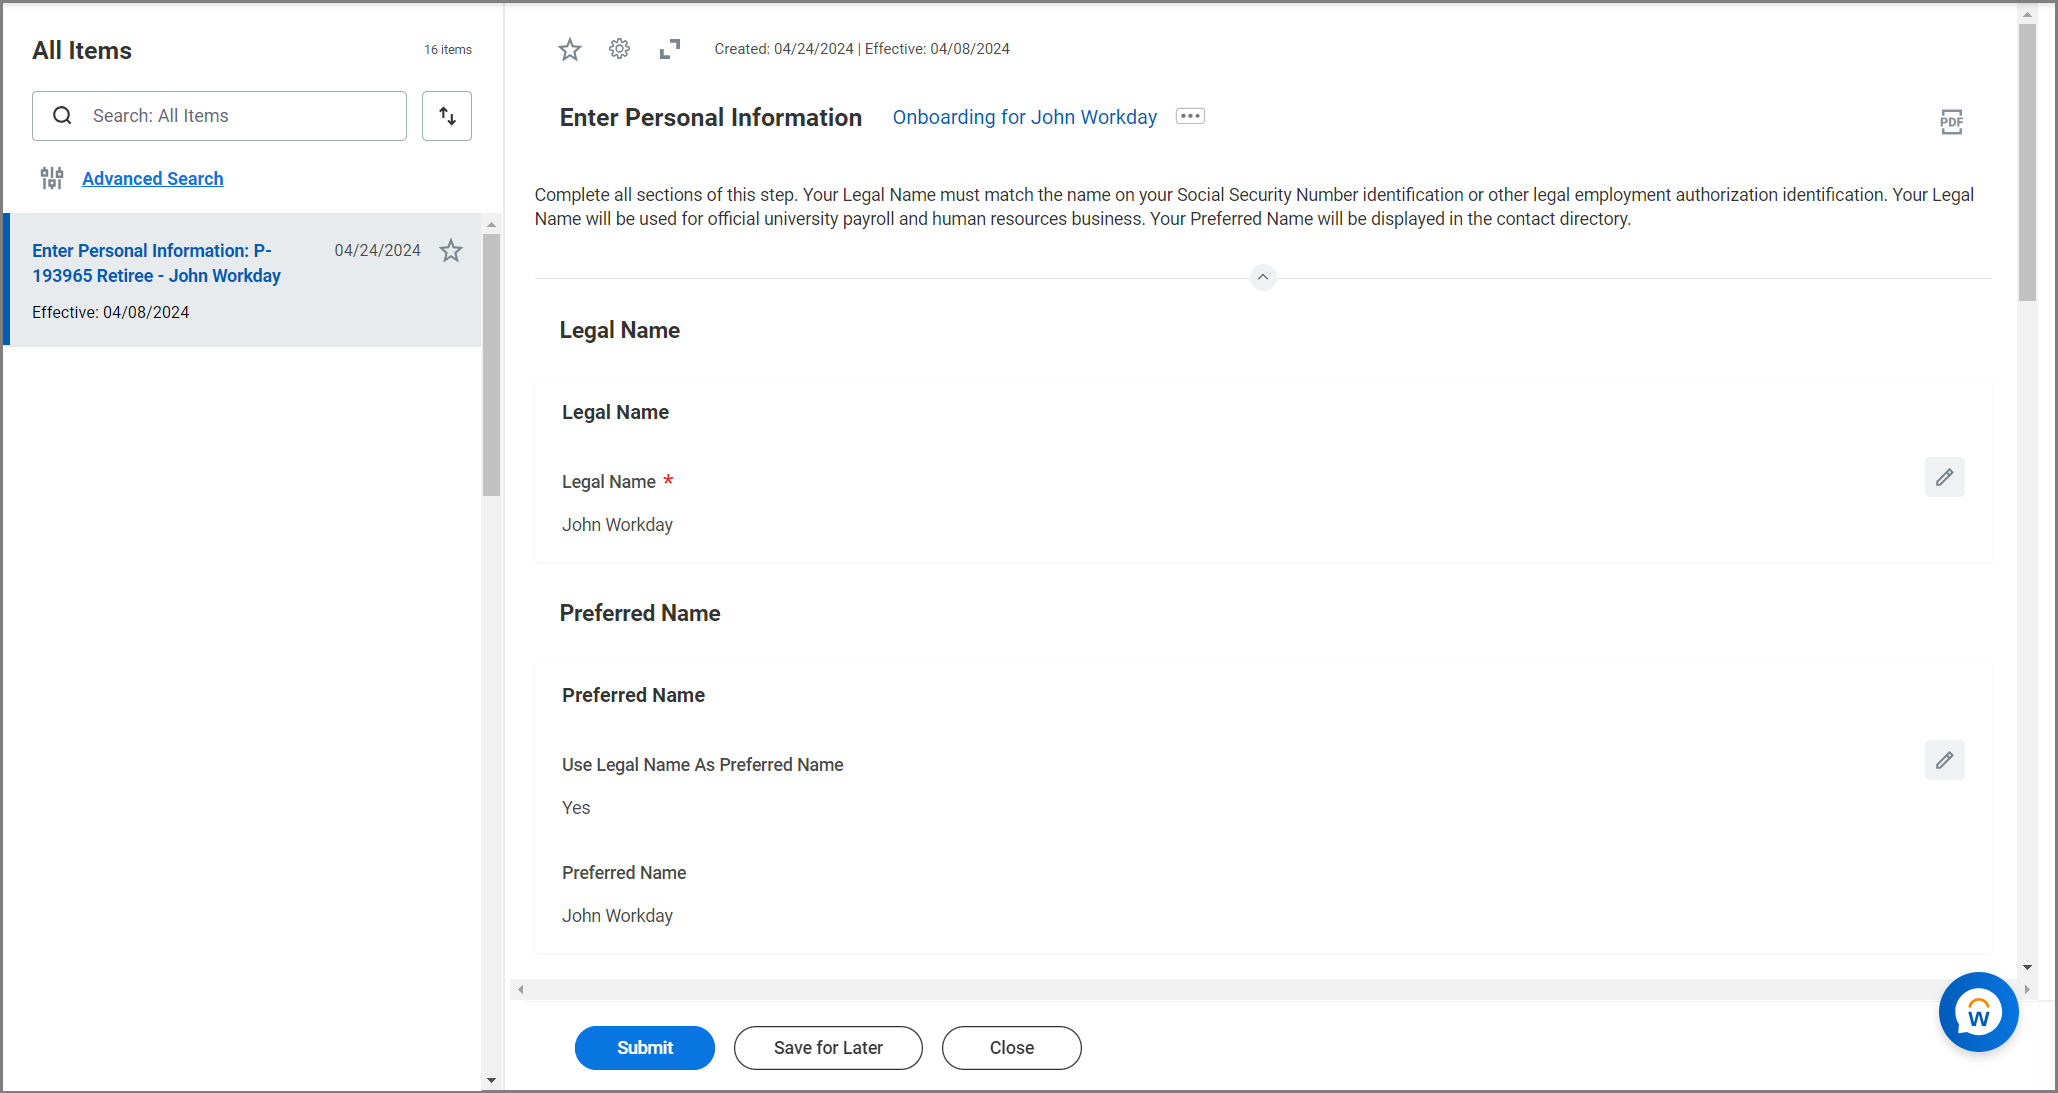

Note: The Date of Birth and Gender are required fields.
- Select Submit.
Enter Contact Information
- Navigate to your Inbox.
- Select the Enter Contact Information action item.
- Enter any available personal information for the Retiree.
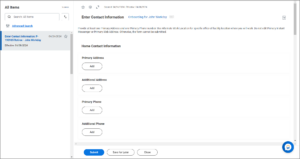
Note: Primary Address, Primary Phone and Primary Email are required fields.
- Select Submit.
To Do: Update Insurance and Retirement Benefits Eligibility Questions (Benefits Partner)
This To Do requires you to initiate an Edit Additional Data Event that will generate one task in your inbox. You will complete the task for the Retiree on their behalf. You will then navigate back to this To Do and Submit after completing the tasks.
From the Workday Home page:
- Navigate to your Inbox.
- Select the To Do Update Insurance and Retirement Benefits Eligibility Questions.
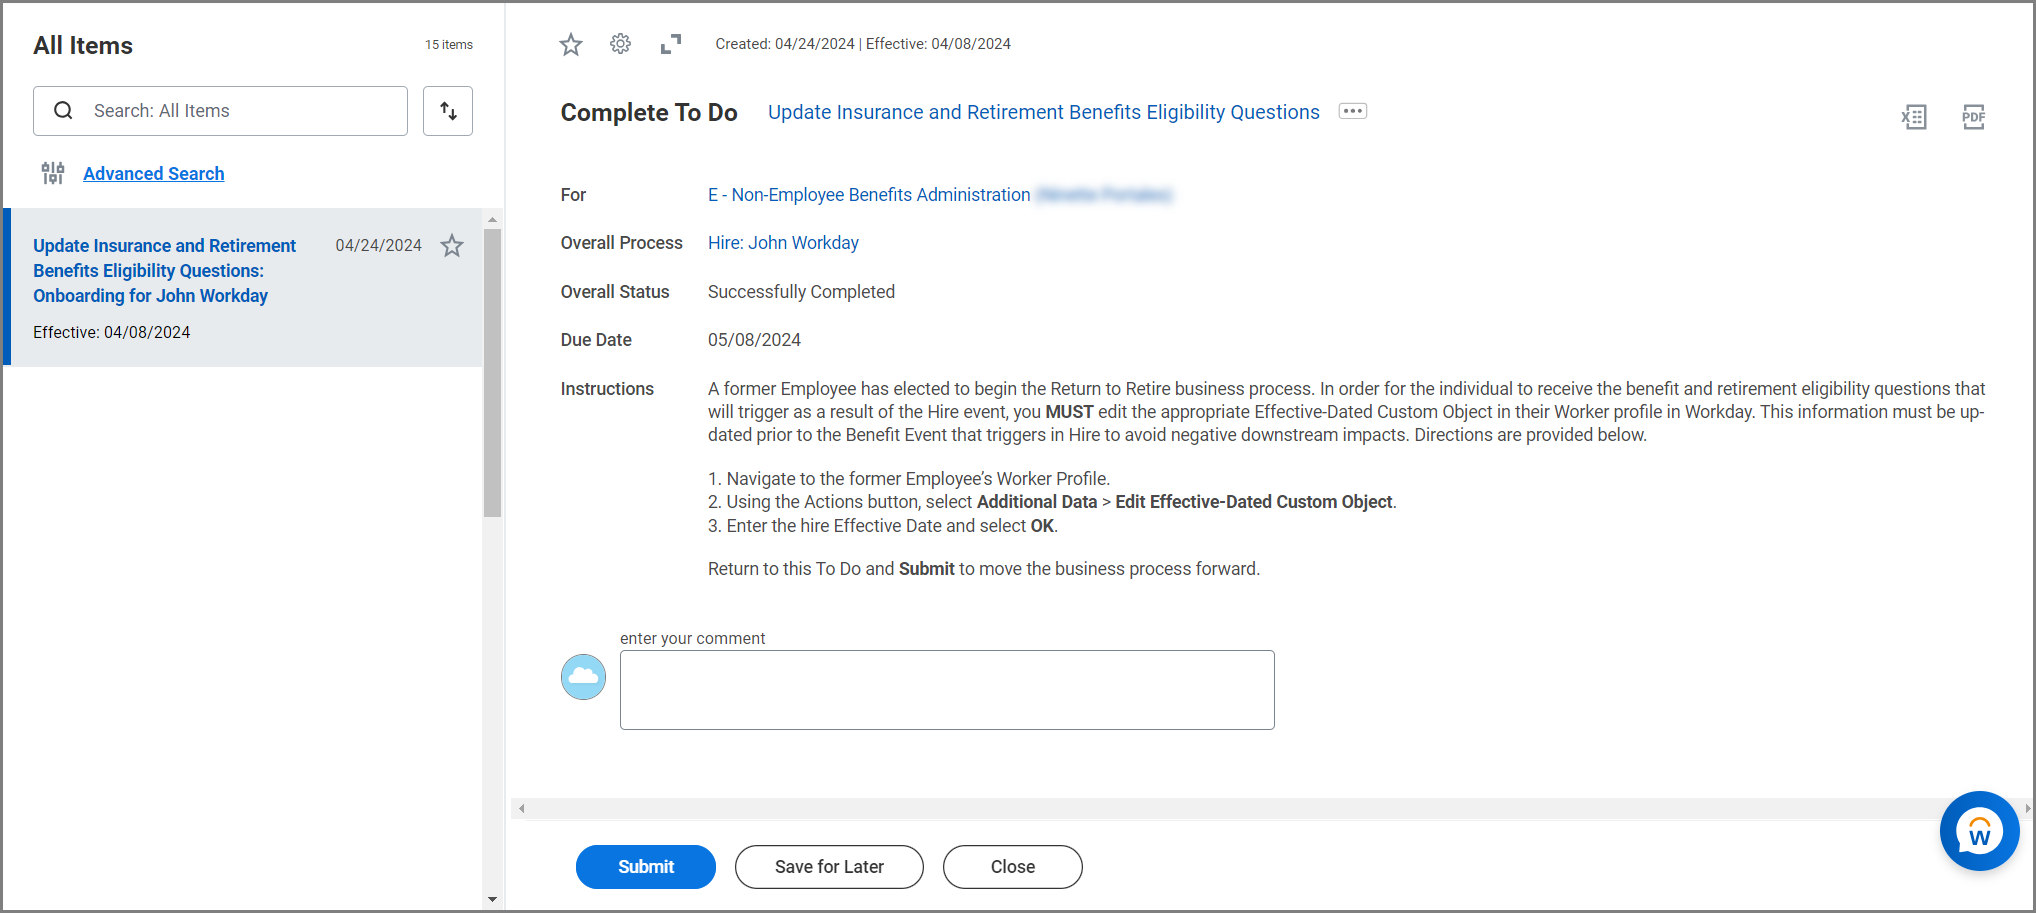
Note: Follow the instructions in this To Do before selecting Submit.
- Follow the instructions provided to initiate the Edit Additional Data Event.
- Enter the Hire Date as the Effective Date and Select OK. This will send one Edit Additional Data task to your inbox.


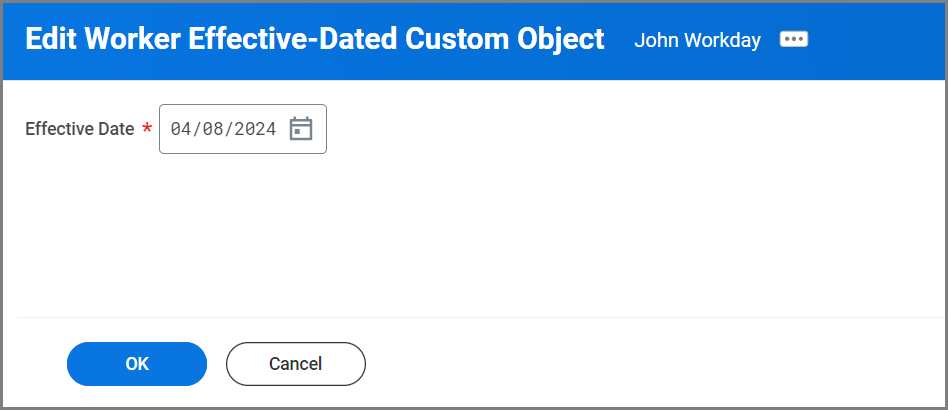
Important: You will need to return to this original To Do and Submit after you complete the Edit Additional Data tasks.
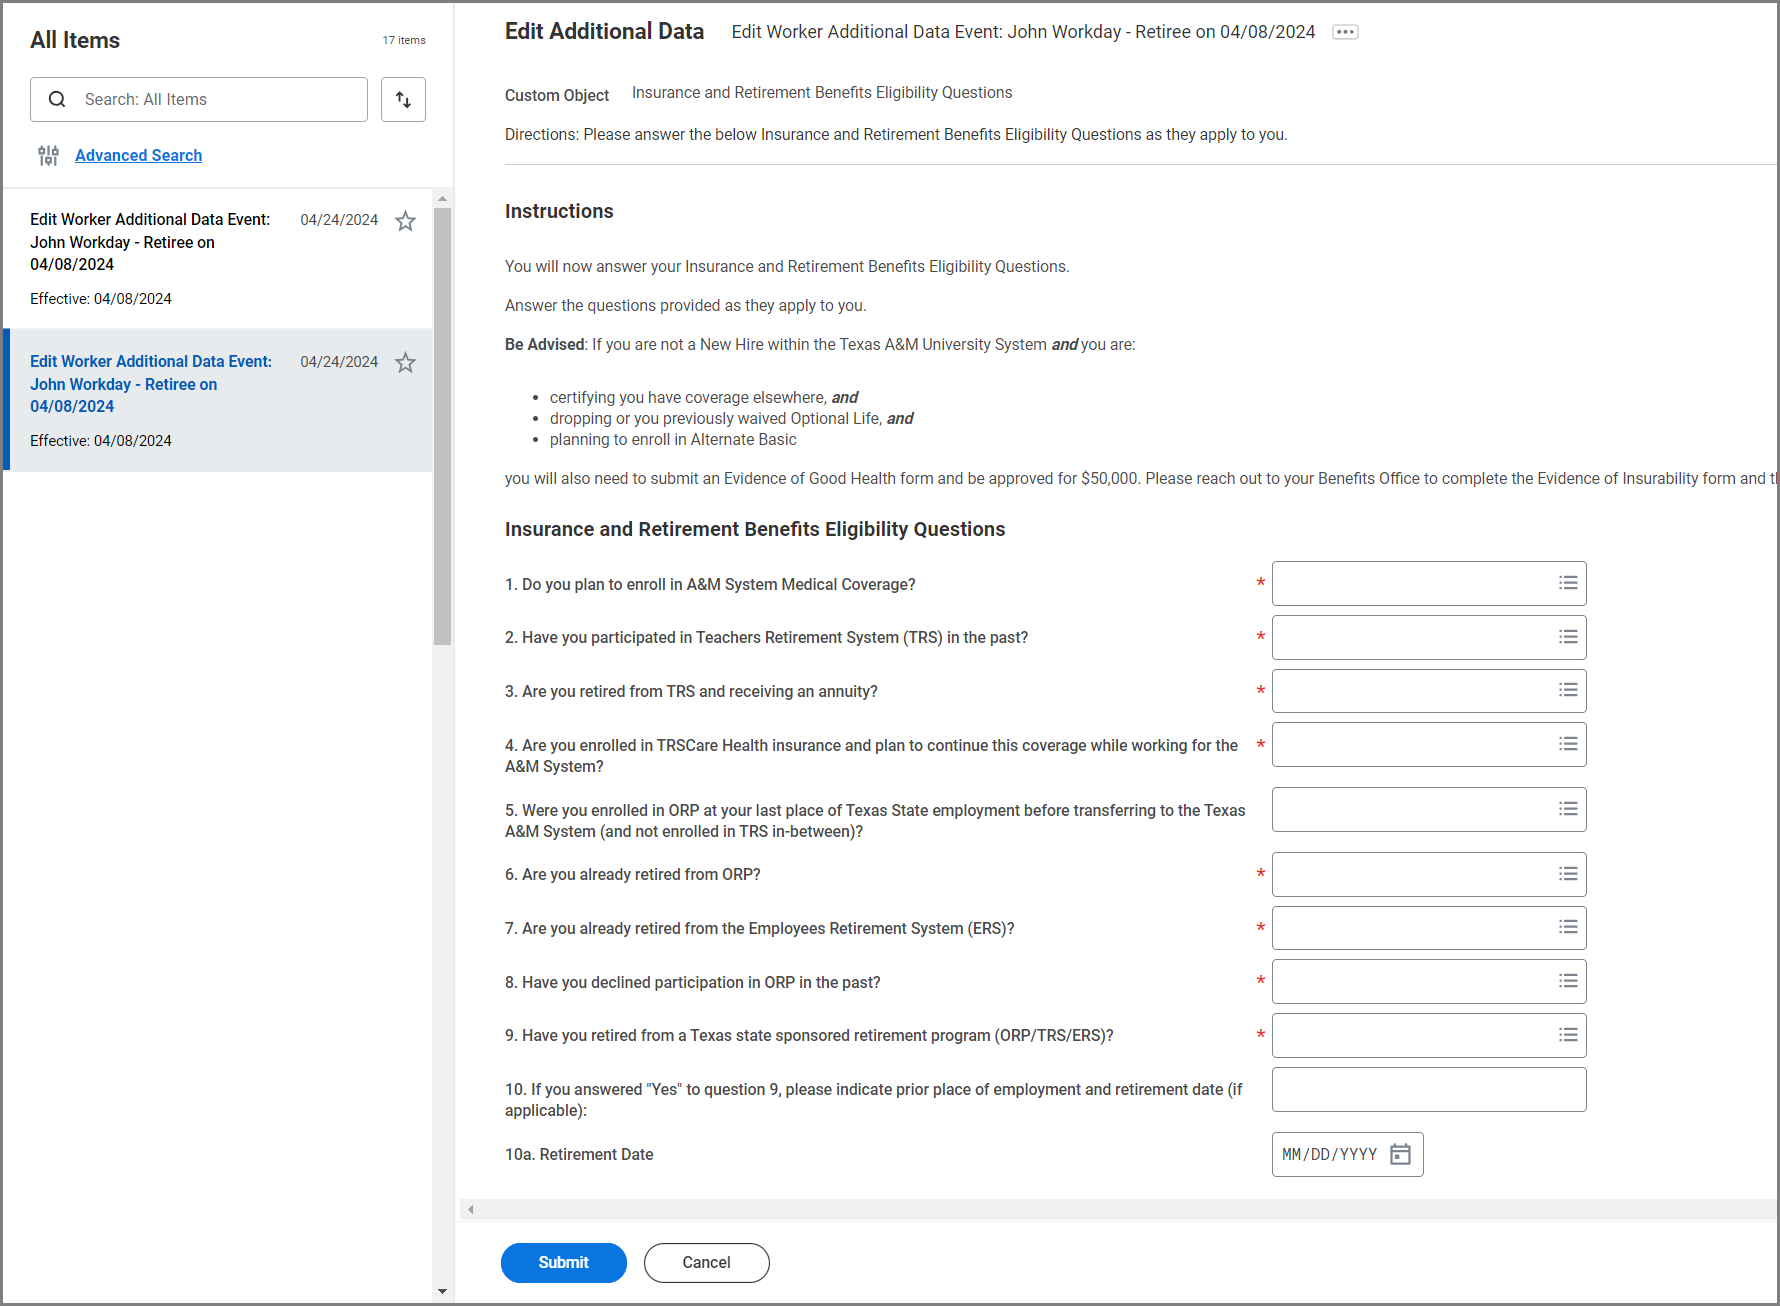
Insurance and Retirement Benefits Eligibility Questions
- Select the Edit Additional Data task in your inbox to update the Retiree’s Insurance and Retirement Benefits Eligibility Questions.
- Answer the Insurance and Retirement Benefits Eligibility Questions for the Retiree in the fields provided.

- Enter any comments, as needed.
- Select Submit.
Change Emergency Contacts (Benefits Partner)
- Navigate to your Inbox and select the To Do Change Emergency Contacts for Onboarding.
- Enter information for the Retiree’s Primary Emergency Contact.
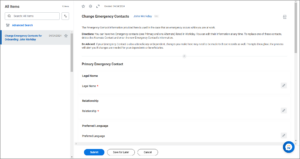
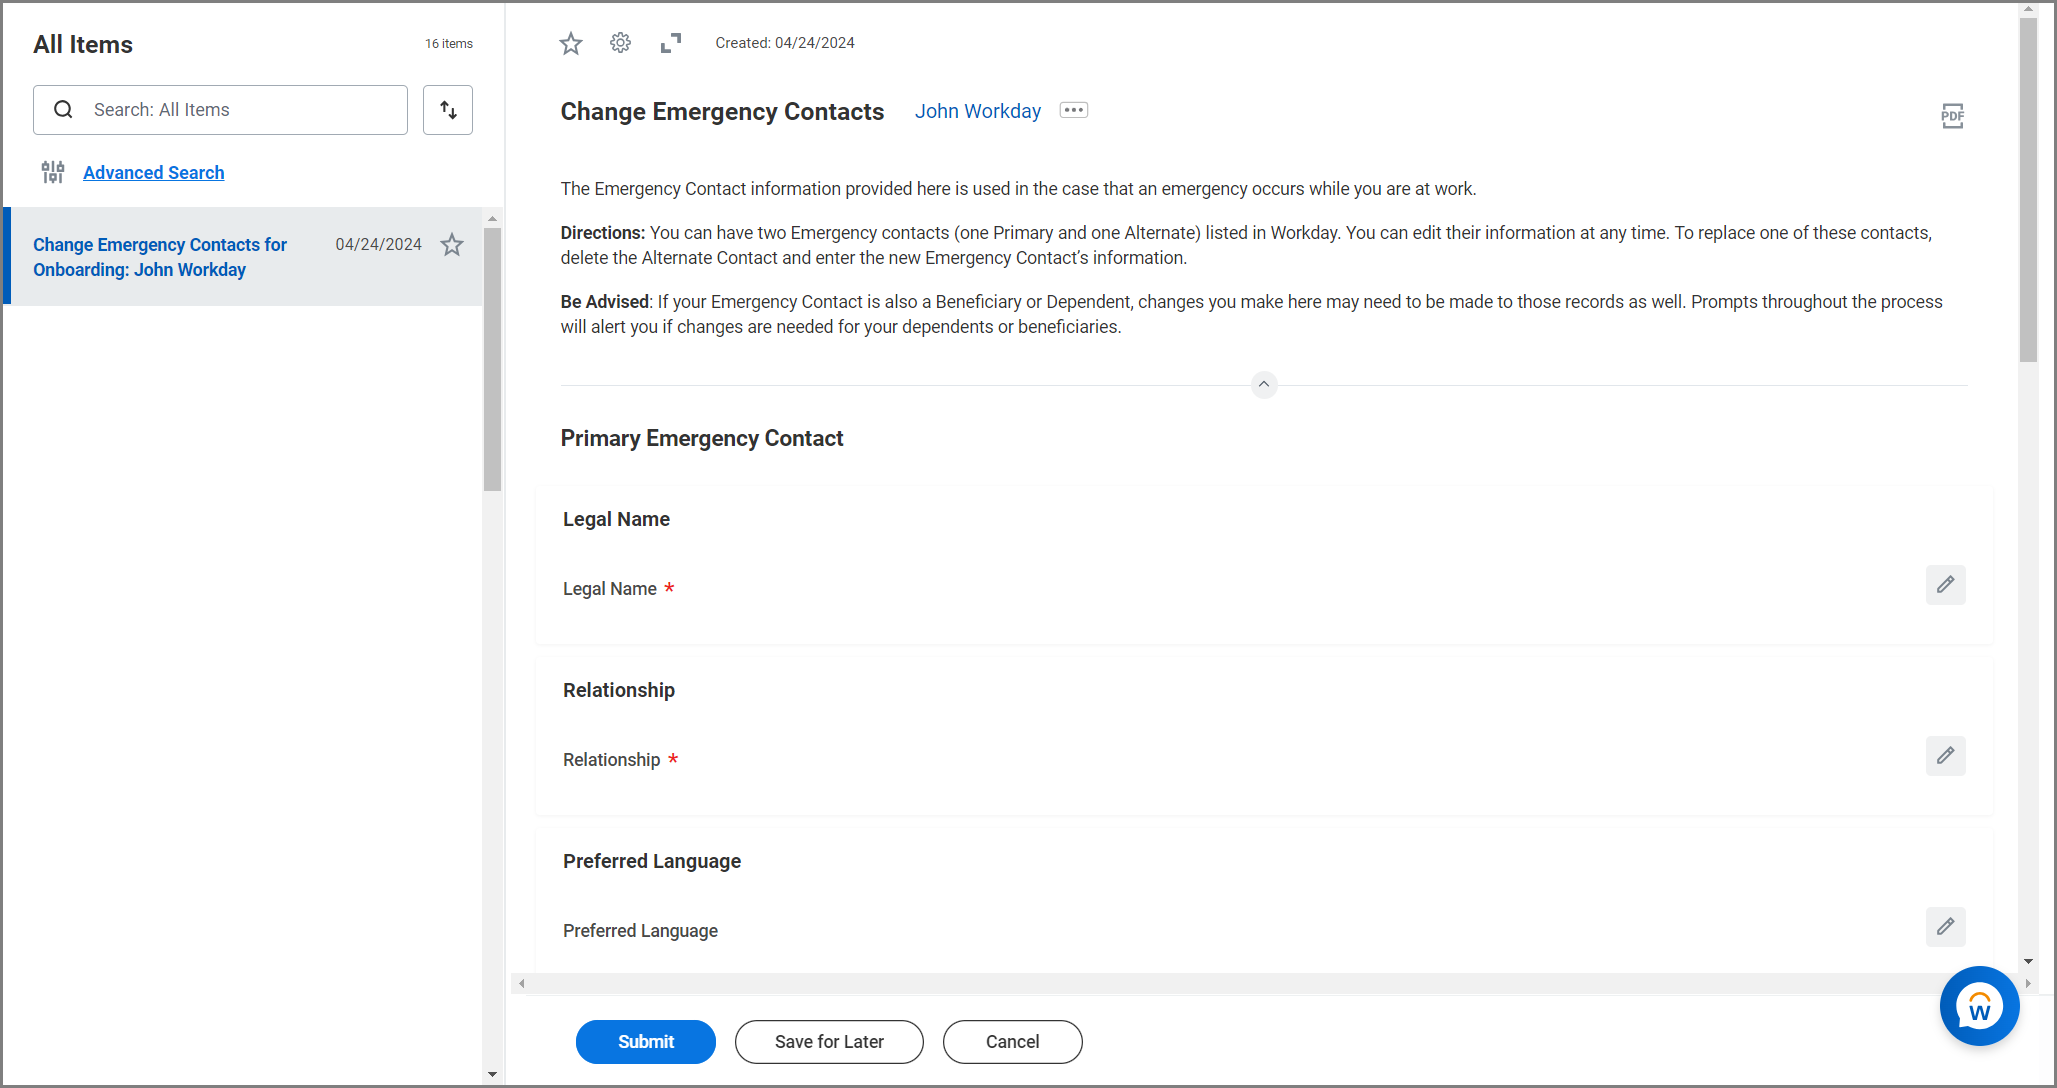
Note: Legal Name, Relationship and Primary Phone Number are required fields
- Select Submit.
Important: You will receive the To Do Review Insurance and Retirement Benefits Eligibility Questions, SGIP Date Driver and BARs at this time. As a Benefits Partner, you need to review and ensure that all Insurance and retirement benefits eligibility questions have been answered. Then select Submit.
To Do: Review Insurance and Retirement Benefits Eligibility Questions, SGIP Date Driver and BARs (for Benefits Partner Only)
- Navigate to your Inbox.
- Select the To Do Review Insurance and Retirement Benefits Eligibility Questions, SGIP Date Driver and BARs.
- Ensure that all insurance and retirement benefits eligibility questions have been answered, and that the Other IDs have been set correctly.

Note: Perform the actions above before submitting this To Do step.
Important: If the Employee would like to begin coverage prior to their SGIP date, follow these instructions in this order. First, change the Retiree’s SGIP Date Driver Other ID to a “C” and confirm that the Issue date is equal to the SGIP date. Next, cancel the Hire Benefit event that will be automatically triggered after submitting this To Do step. Finally, create a new Benefit event with the desired coverage begin date.
- Select Submit.
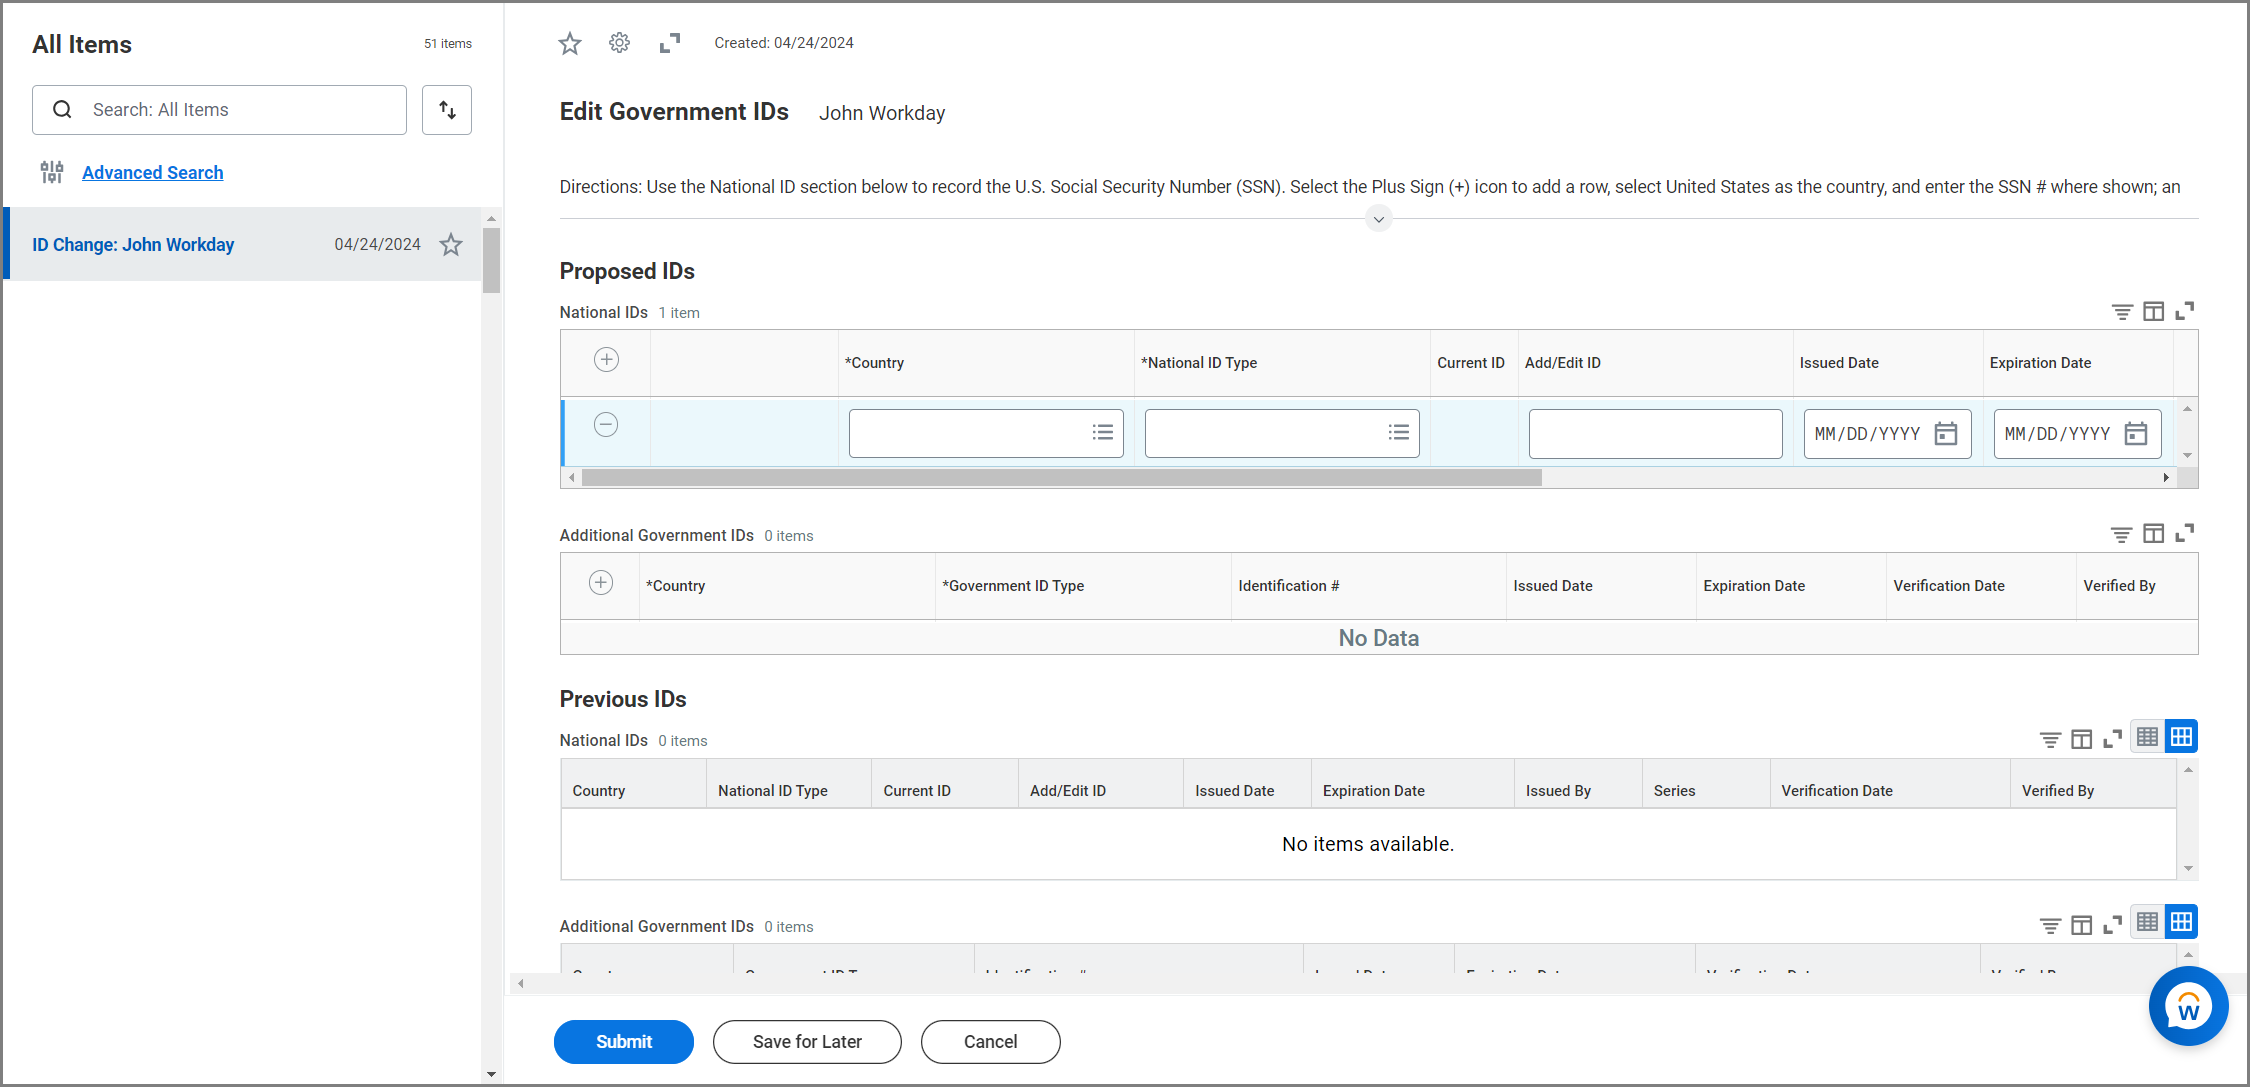
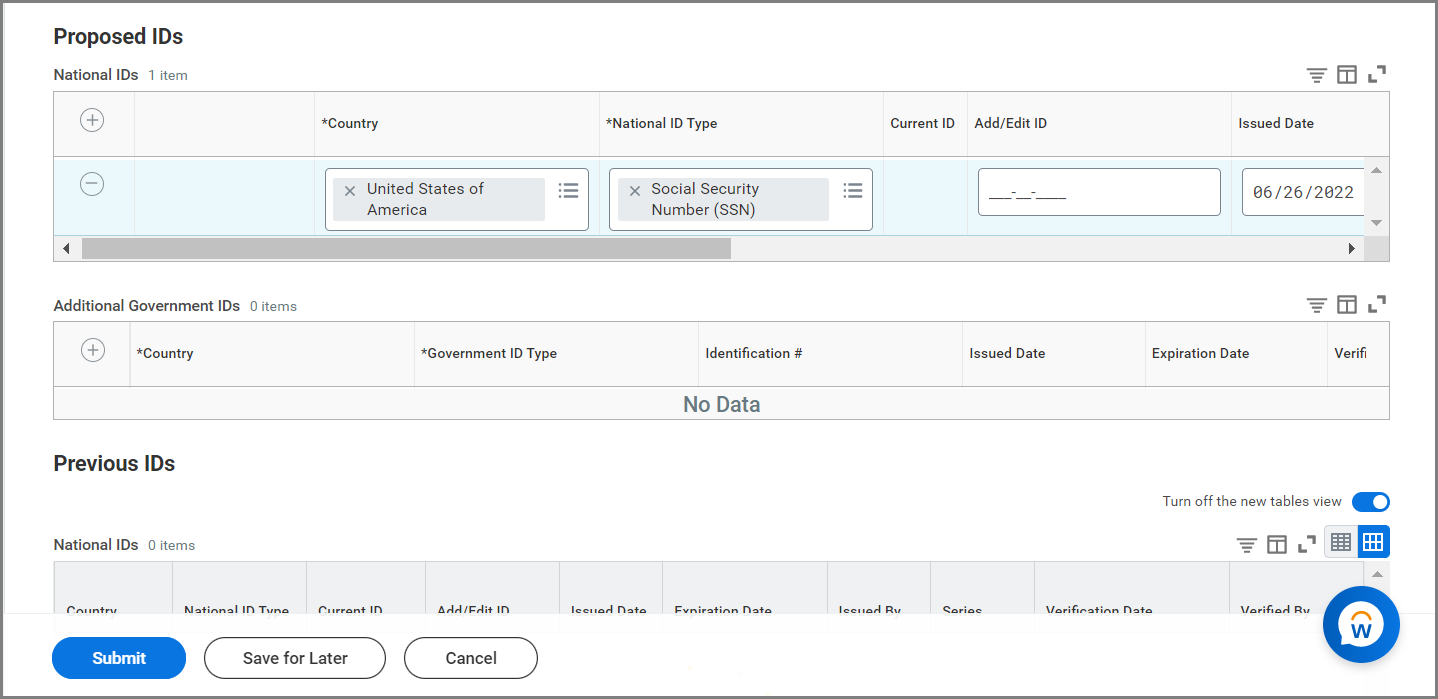
Edit Government IDs (Benefits Partner)
- Navigate to your Inbox and select the ID Change action item to Edit Government IDs for the Retiree.
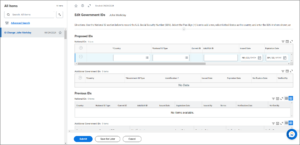
- In the National IDs section, add information by selecting the Plus Sign (+) icon and entering information, including:
- Country
- National ID Type
- Add/Edit ID #. Enter the identification number.
- Verification Date. This field will auto-populate with today’s date.
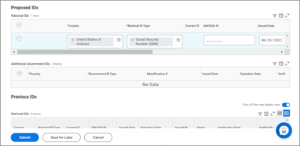
- Enter any comments, as needed.
- Select Submit.
Terminate Employee (Benefits Partner)
You will now terminate the Worker.
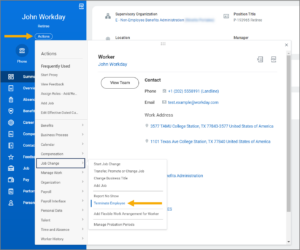
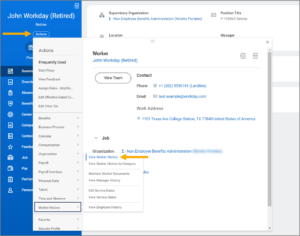
- Navigate to the Retiree’s Worker Profile.
- Select Actions > Job Change > Terminate Employee.
- On the Terminate Employee page, enter the following information:
- Reason. Select Voluntary > Retirement.
- Termination Date. Enter the Hire Date.
- Last Day of Work. Enter the Hire Date again.
- Pay Through Date. Enter the Hire Date again.
- Eligible for Rehire. Select Yes.
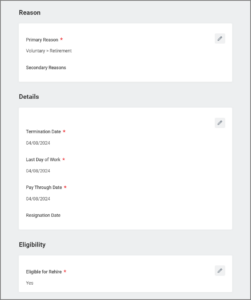

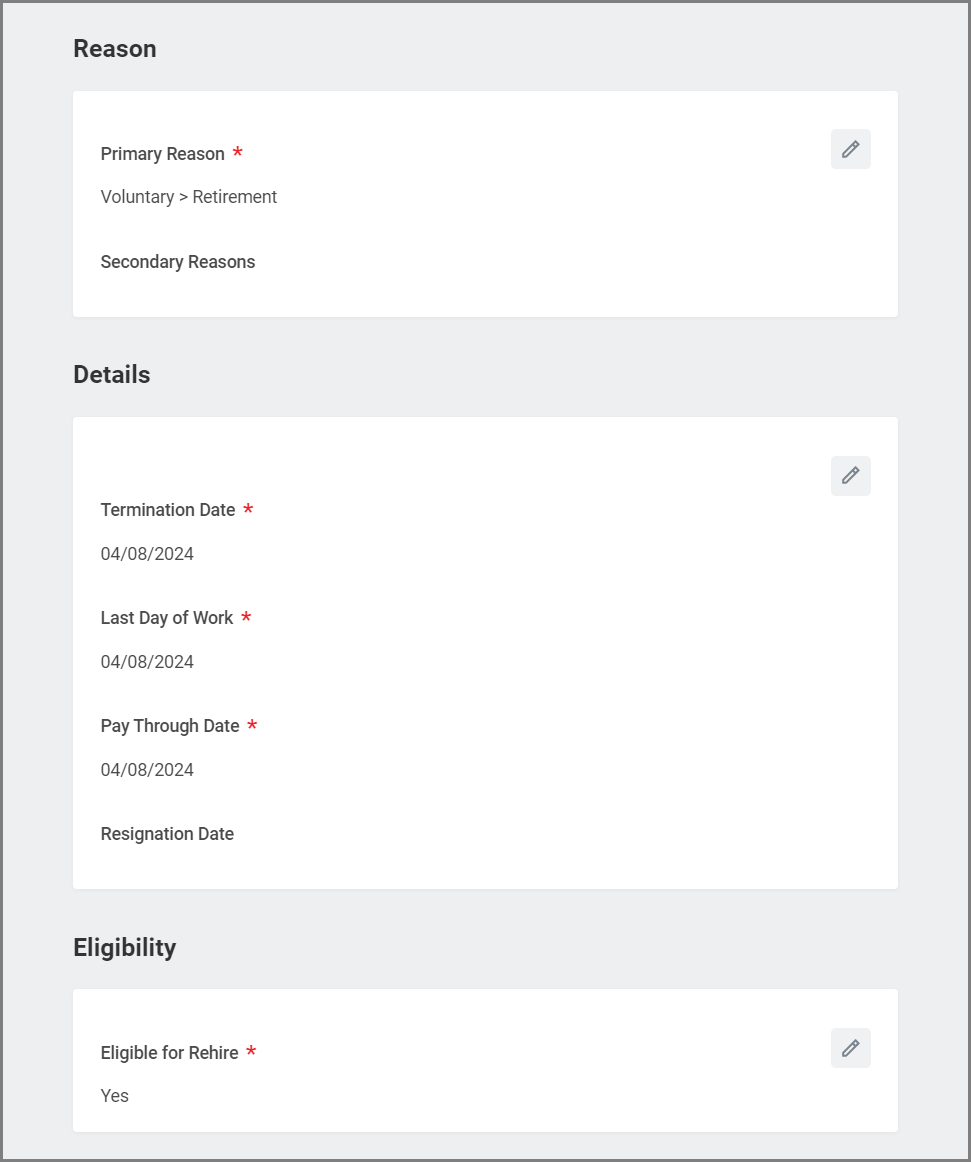
Note: If a Reason other than Voluntary > Retirement is selected, the Add Retiree Status will not trigger.
- Select Submit.
Add Retiree Status
You will now Add Retiree Status to the returning Employee.
Because the former Worker is now deciding to retire and the Termination reason selected was Voluntary > Retirement, the Benefits Partner will receive an Inbox item to Add Retiree Status.
- Navigate to your Inbox.
- Open the Inbox item Add Retiree Status.
- Enter the following information:
- Effective Date. Enter the Retirement date which is one day following the Termination Date.
- Reason. Select Voluntary > Return to Retire.
- Retiree Organization. Select the member.
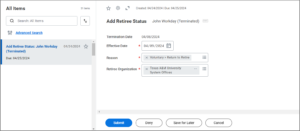
- Enter any comments, as needed.
- Select Submit.
Important: You will receive an Inbox item Benefit Change – Retirement for the Retiree. Do not start or complete this task at this time.
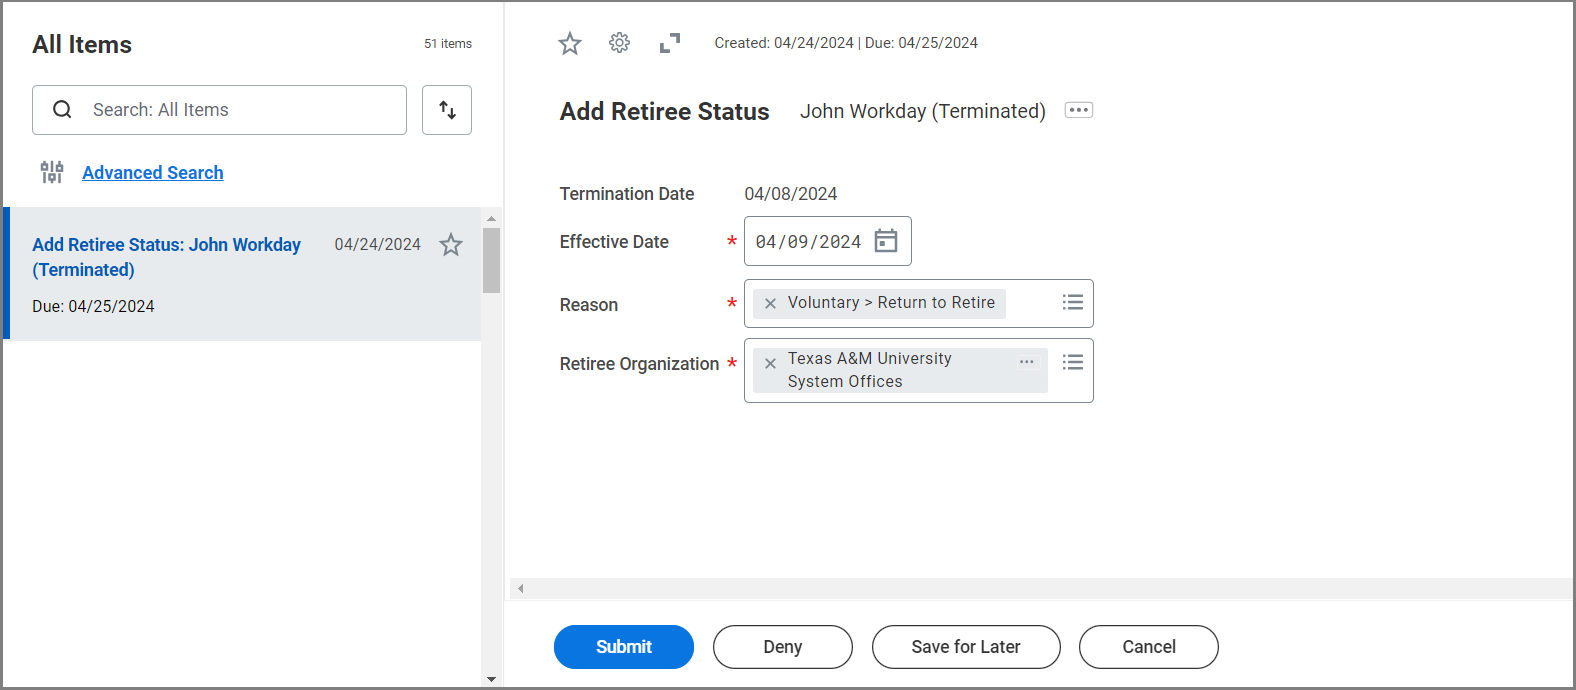
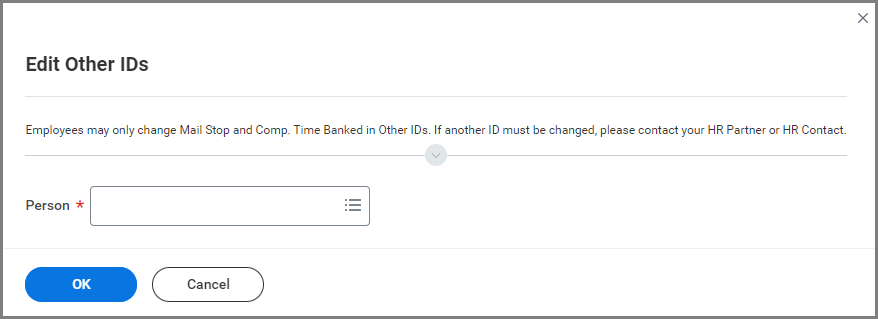
To Do: Retirement Other IDs
After adding the Retiree Status, the Benefits Partner will receive a To Do to add three Other IDs for the Retiree using the the Edit Other IDs business process.
- From your Inbox, open the To Do Update Retirement Other IDs.
- Select the Edit Other IDs button.

Note: Alternatively, you can do this by navigating to the Worker’s Profile and selecting Actions > Personal Data > Edit Other IDs.
- Enter the Employee’s UIN or name in the Person field and select OK.

On the Edit Other IDs page, you will enter three additional Other IDs: Organization for Billing, Retiree Percent Local, and Retiree Retirement Program. Follow the directions below for each Other ID.
Organization for Billing
The first step is to enter the Organization for Billing Other ID. This Other ID maintains the identification of the Supervisory Organization from which the Employee retired in a format that will drive reporting requirements to legacy systems to assist in determining the organization that will pay the SGIP.
- On the Edit Other IDs page, select the Plus Sign (+) icon to add a new row and enter the following information.
- Other ID Type. Select Organization for Billing from the drop-down menu.
- Organization. Select the member.
- Description. Enter if needed.
- Identification #. Enter in the following format: M_01222333, using these guidelines:
- M = Workstation
- 01 = Adloc
- 222333 = Department number
- Issued Date. Enter the retirement date.
- Expiration Date. Leave blank.

Retiree Percent Local
The next step is to enter the Retiree Percent Local Other ID. This Other ID maintains a percentage amount representing what portion of the SGIP is paid from local funds versus state funds and will drive reporting requirements to legacy systems.
- On the Edit Other IDs page, select the Plus Sign (+) icon to add a new row and enter the following information.
- Other ID Type. Select Retiree Percent Local.
- Organization. Select the member.
- Description. Enter if needed.
- Identification #. Enter the amount that represents the portion of the SGIP paid from local funds versus state funds. Use whole numbers and do not include a “%” sign (e.g., 75% would be entered as 75).
- Issued Date. Enter the Retirement Date.
- Expiration Date. Leave blank.
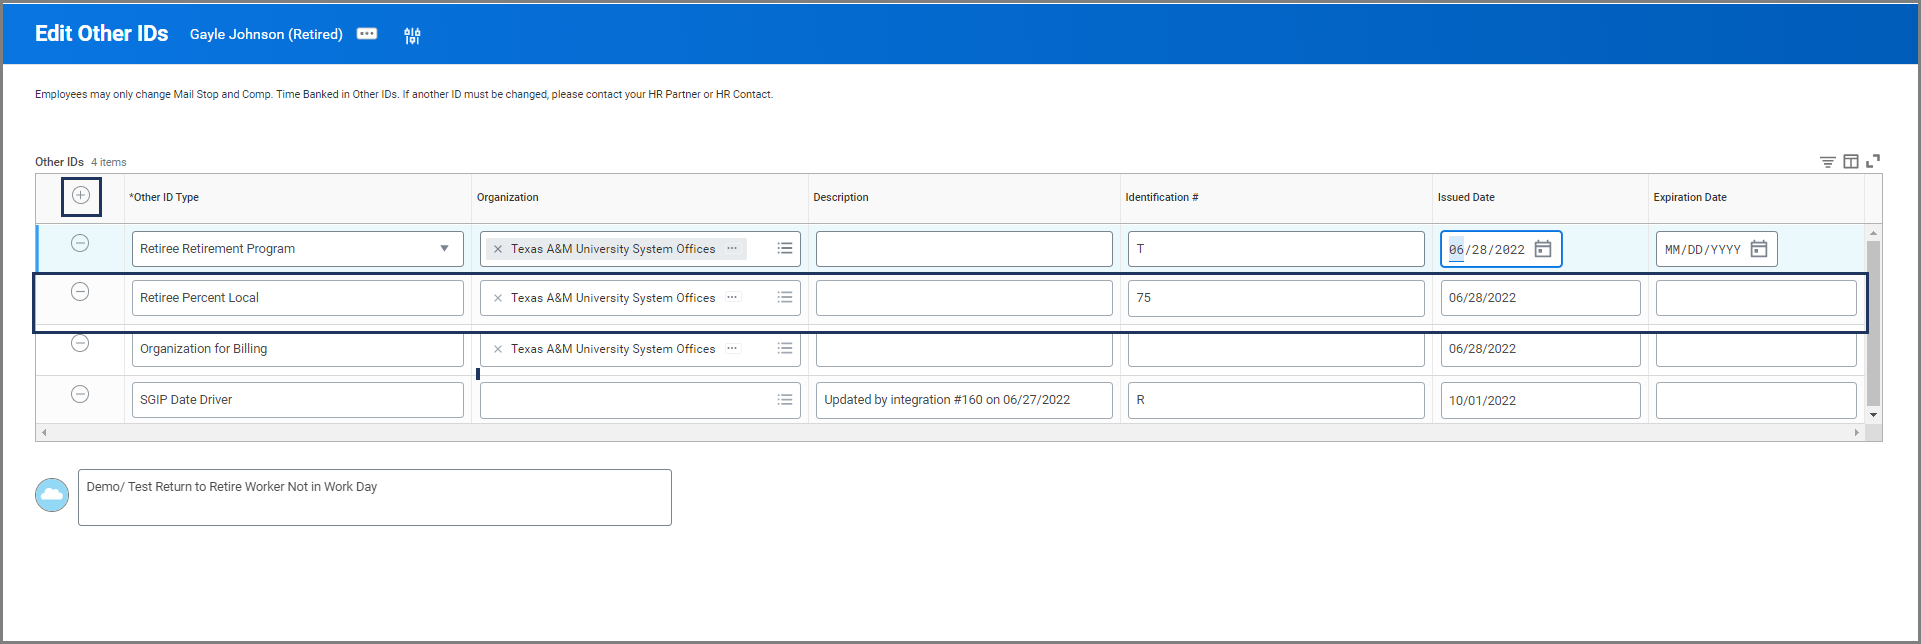
Retiree Retirement Program
The last step is to enter the Retiree Retirement Program Other ID. This Other ID maintains the type of retirement and is used for billing insurance premiums.
- On the Edit Other IDs page, select the Plus Sign (+) icon to add a new row and enter the following information.
- Other ID Type. Select Retiree Retirement Program.
- Organization. Select the member.
- Description. Enter if needed.
- Identification #. Enter either T, O, or E, using these guidelines:
- T = TRS
- O = ORP
- E = ERS
- Issued Date. Enter the Retirement Date.
- Expiration Date. Leave blank.

- Enter any comments, as needed.
- Select Submit.
- Navigate back to the To Do Update Retirement Other IDs
- in your Inbox and select Submit.

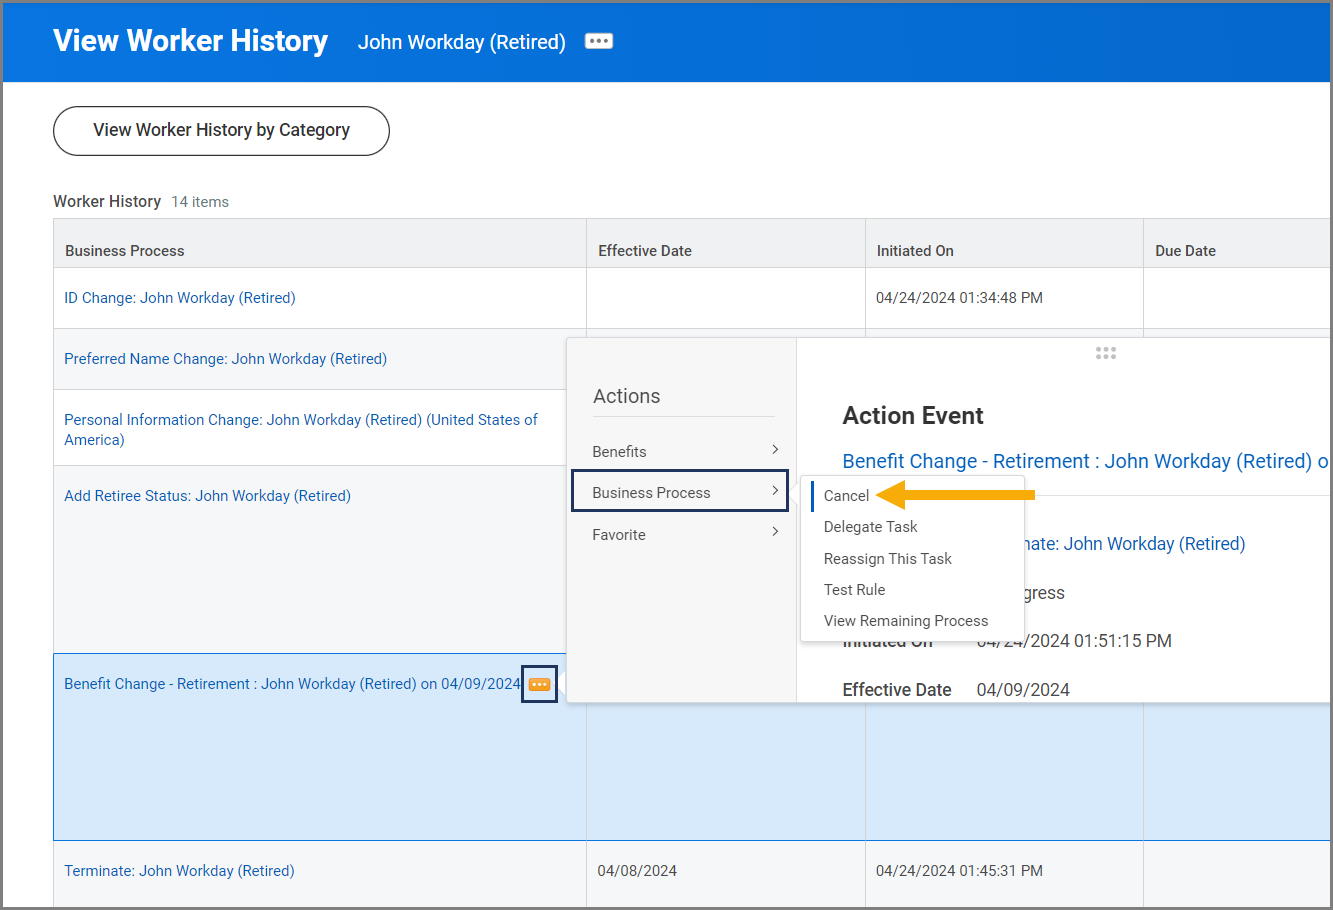
Change Benefits (Benefits Partner)
The Retiree’s benefits elections need to be made.
- The default Inbox Item Benefit Change – Retirement must be canceled in order to trigger the specific benefits event for a former Worker returning to retire.

- Navigate to the Retiree’s Worker Profile and select Actions > Worker History > View Worker History.
- Select the Related Actions icon next to the Benefit Event. Then select Business Process > Cancel.
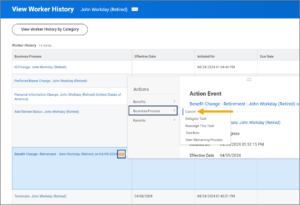
- Enter a comment (which is required) and select Submit.
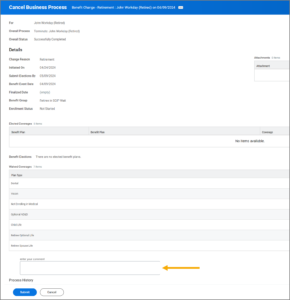
- Select Submit.
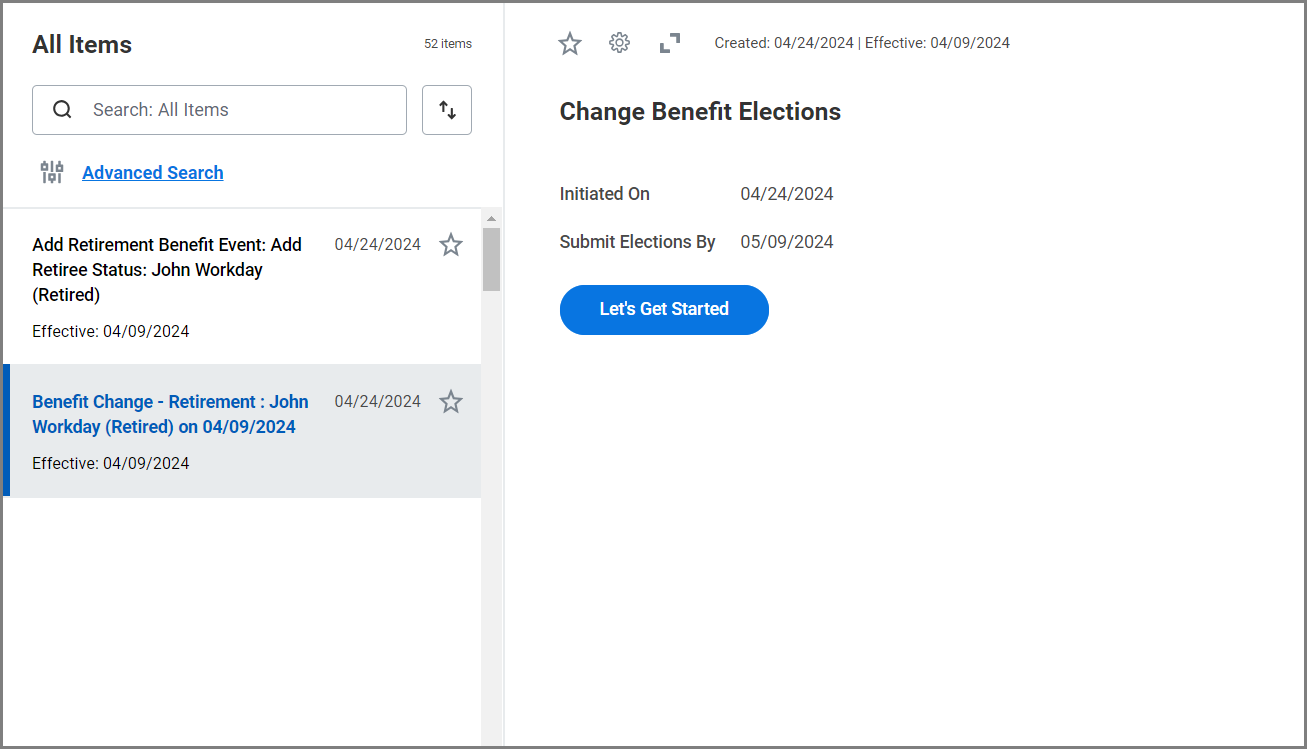


To Do: Add Retirement Benefit Event
- Navigate to your Inbox.
- Select the To Do Add Retirement Benefit Event: Add Retire Status.
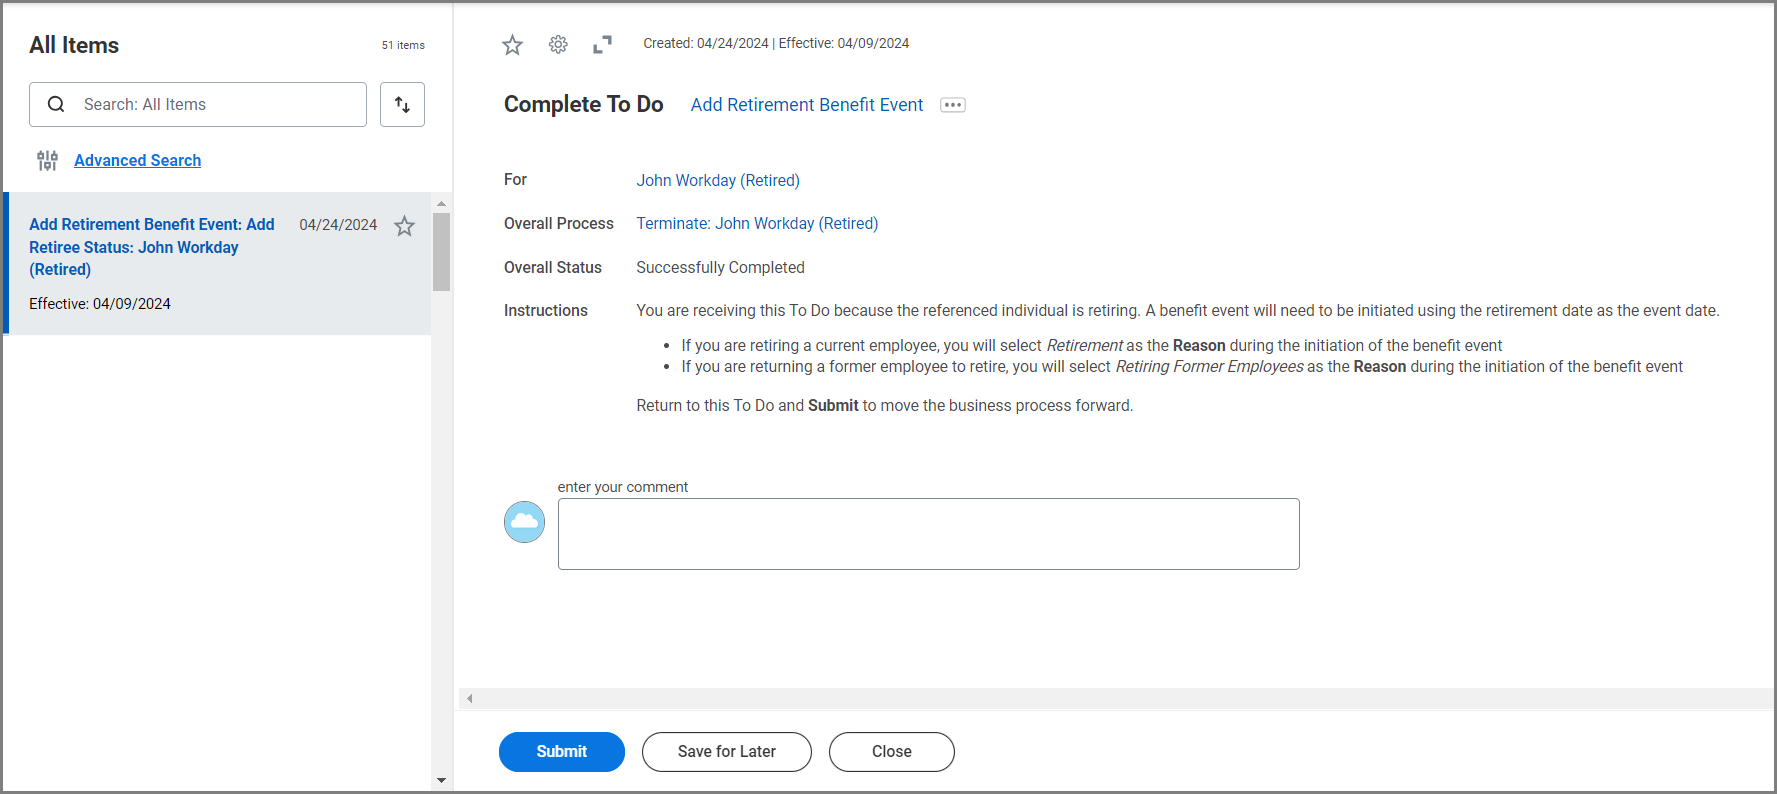
Important: Read the instructions on the action item. Do NOT submit it before you complete the steps in Workday.
- Navigate to the Retiree’s Worker Profile and Select Actions > Benefits > Change Benefits.

- Enter the required information:
- Change Reason. Select Retiring Former Employees.
Note: There is an alternative option Retiring Former Employees > Coverage on Event Date, which allows the Retiree to begin benefits at hire instead of waiting the usual 90 days. - Benefit Event Date. Enter the Retirement Date.
- Submit Election by. This date will auto-populate.
- Attachments. Do not upload documents here.

- Change Reason. Select Retiring Former Employees.
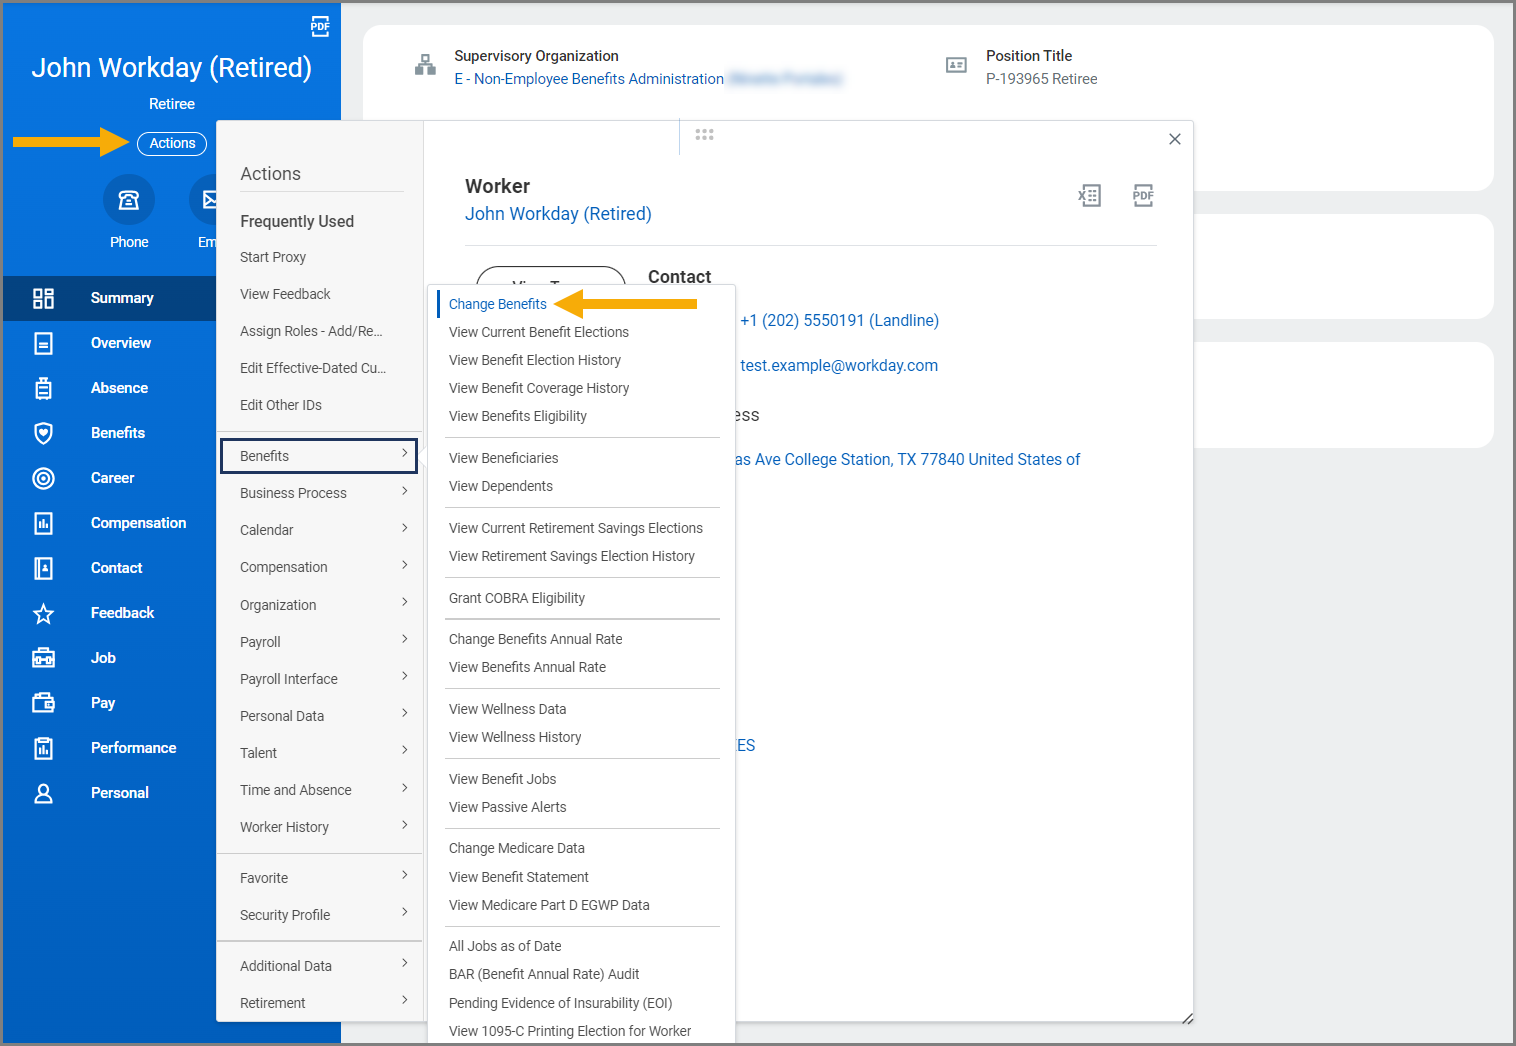
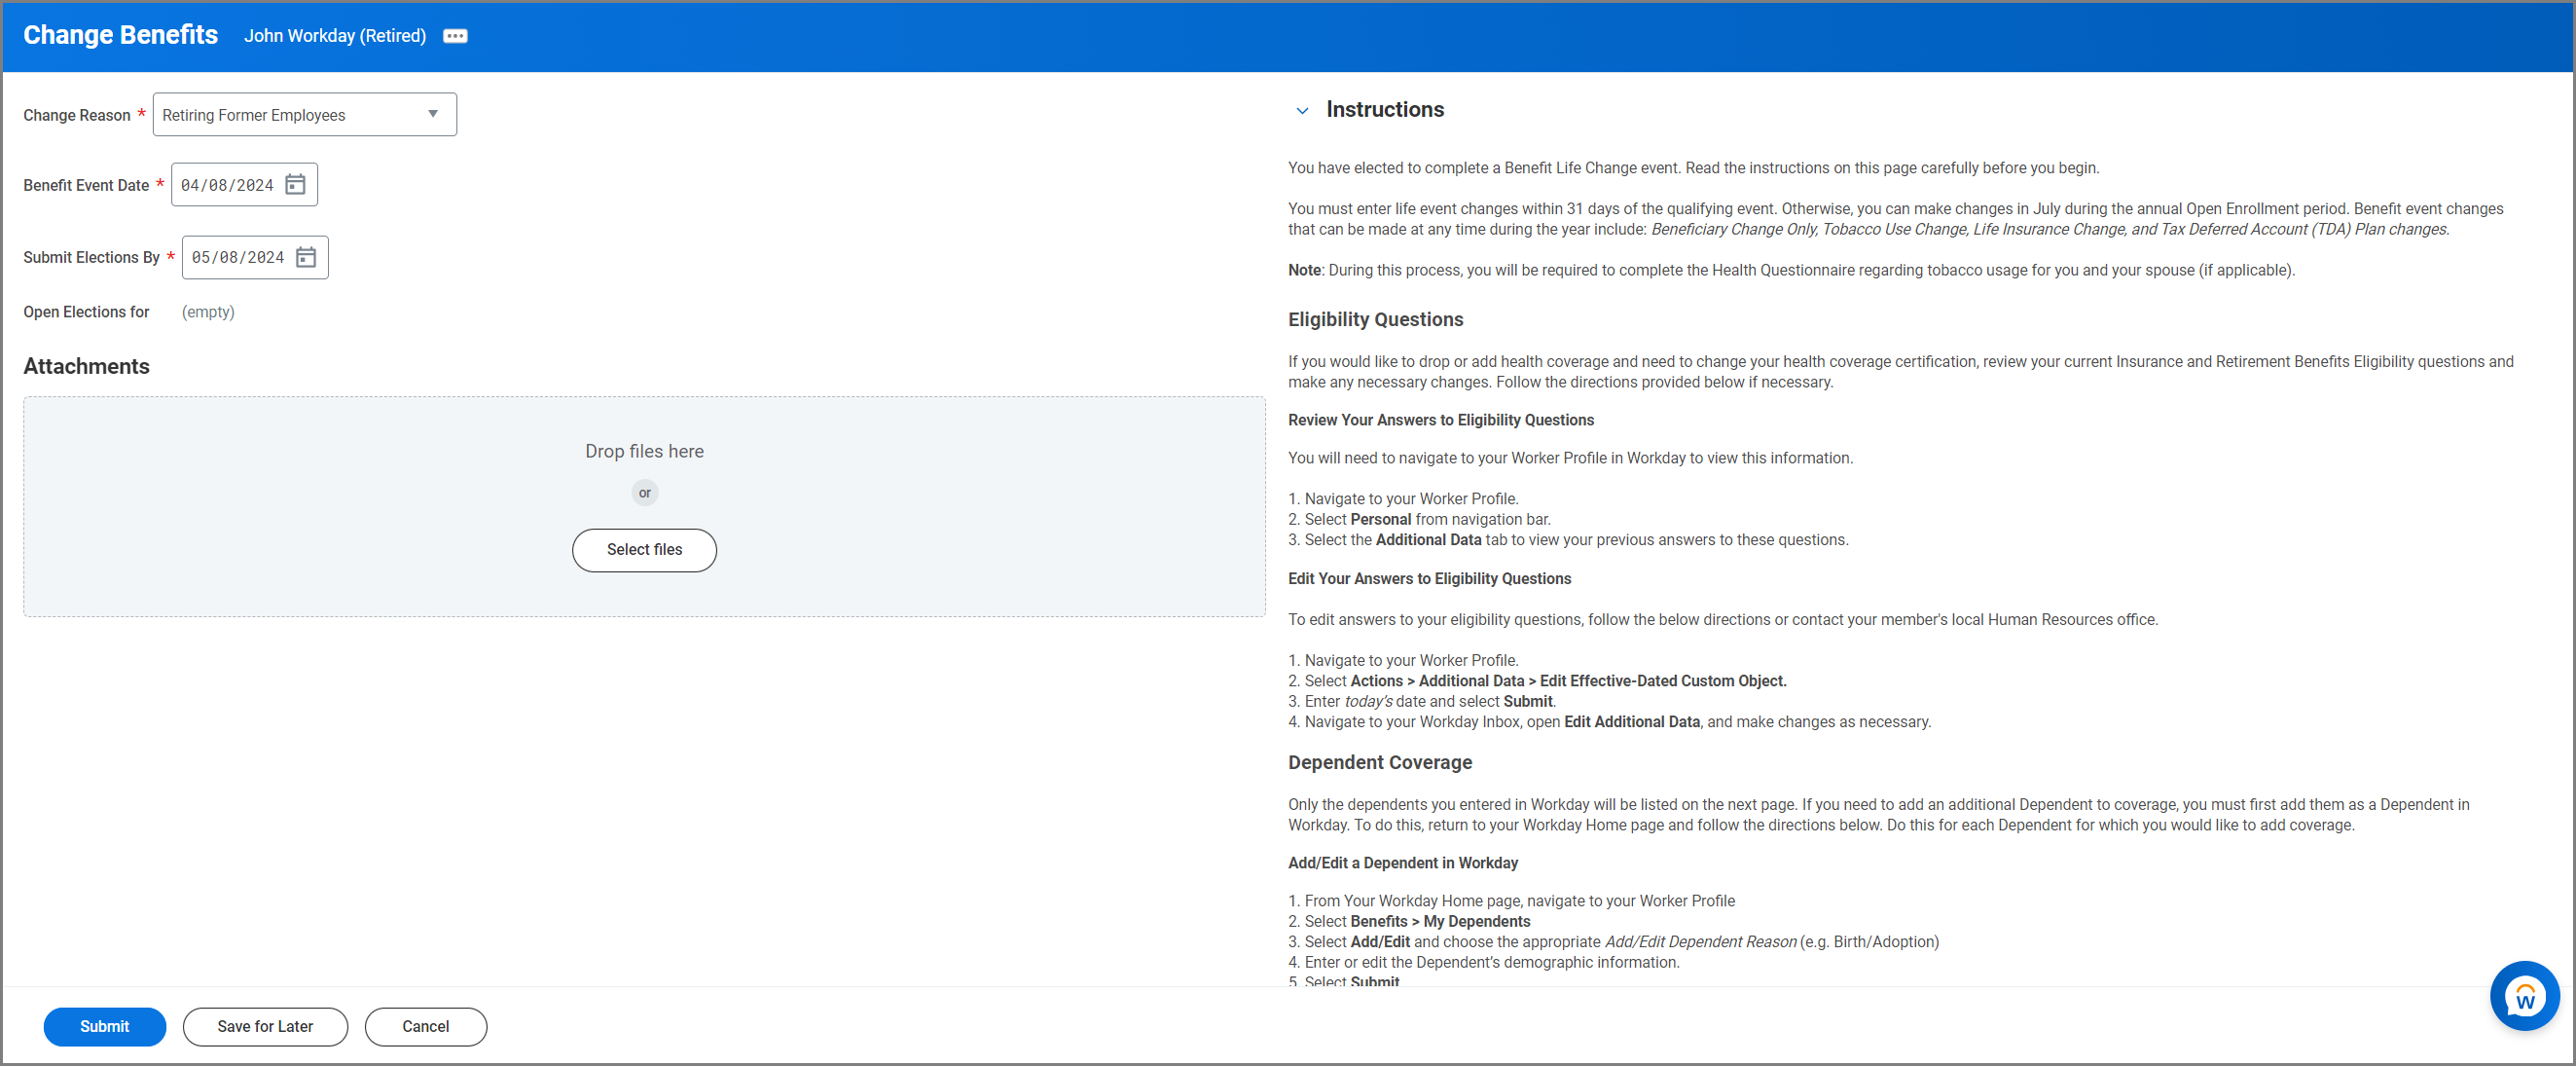
- Select Submit.
- Return to your Inbox and Submit the To Do Add Retirement Benefit event.
Up Next
The Retiree will need to take action in their Workday inbox.
The business process will next route to the Retiree to change their benefits elections. The Retiree will also receive the To Do Update Year End Tax Form Printing Elections. After you have approved the Retiree’s benefit event, the Retiree will receive the To Do Update Electronic Communication Flag to choose the preferred method to receive information from the A&M System about retirement and insurance benefits.
Note: The Benefits Partner can make this election on behalf of the Retiree. Refer to the job aid Update Retiree Electronic Communication (Benefits Partner).
This completes the Return to Retire business process.