• Skip to primary navigation
  • Skip to main content
Workday Services
Logo, Texas A&M University System, Office of Information Technology
  • Home
  • About
    • Workday
    • Governance
    • Key Performance Indicators
  • News and Updates
    • Alerts
    • Release Notes
    • Schedules
    • Upcoming Webinars
    • Monthly User Meetings
    • Biannual Workday Releases
  • Reporting
  • Training
    • Job Aids
    • Reference Guides
    • Video Help
    • Curriculum Guides
    • About Security Roles
    • Online Courses
    • Webinars
    • Learning Hubs
    • Glossary
  • Support
    • Frequently Asked Questions
    • Common Tasks
    • Request Forms
    • Get Help
  • Office of Information Technology
    • Services
    • Contact the Office of Information Technology
    • Search OIT
Home / Job Aids / Onboarding

Onboarding

Print

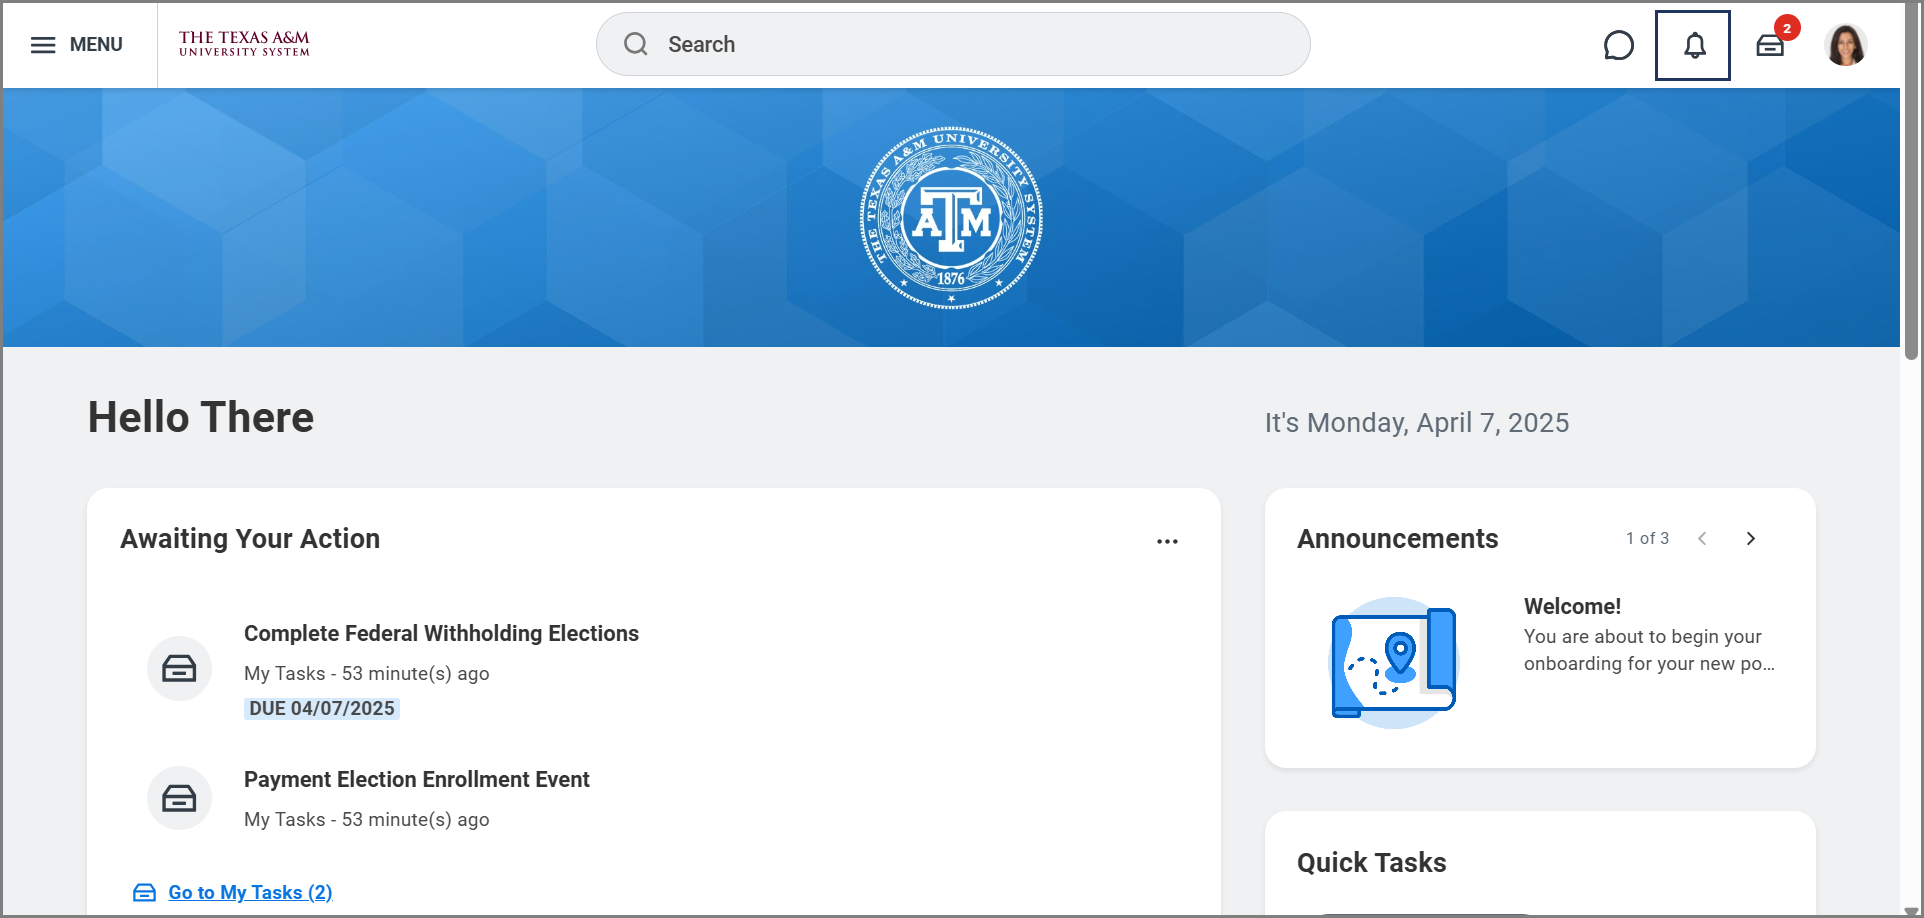
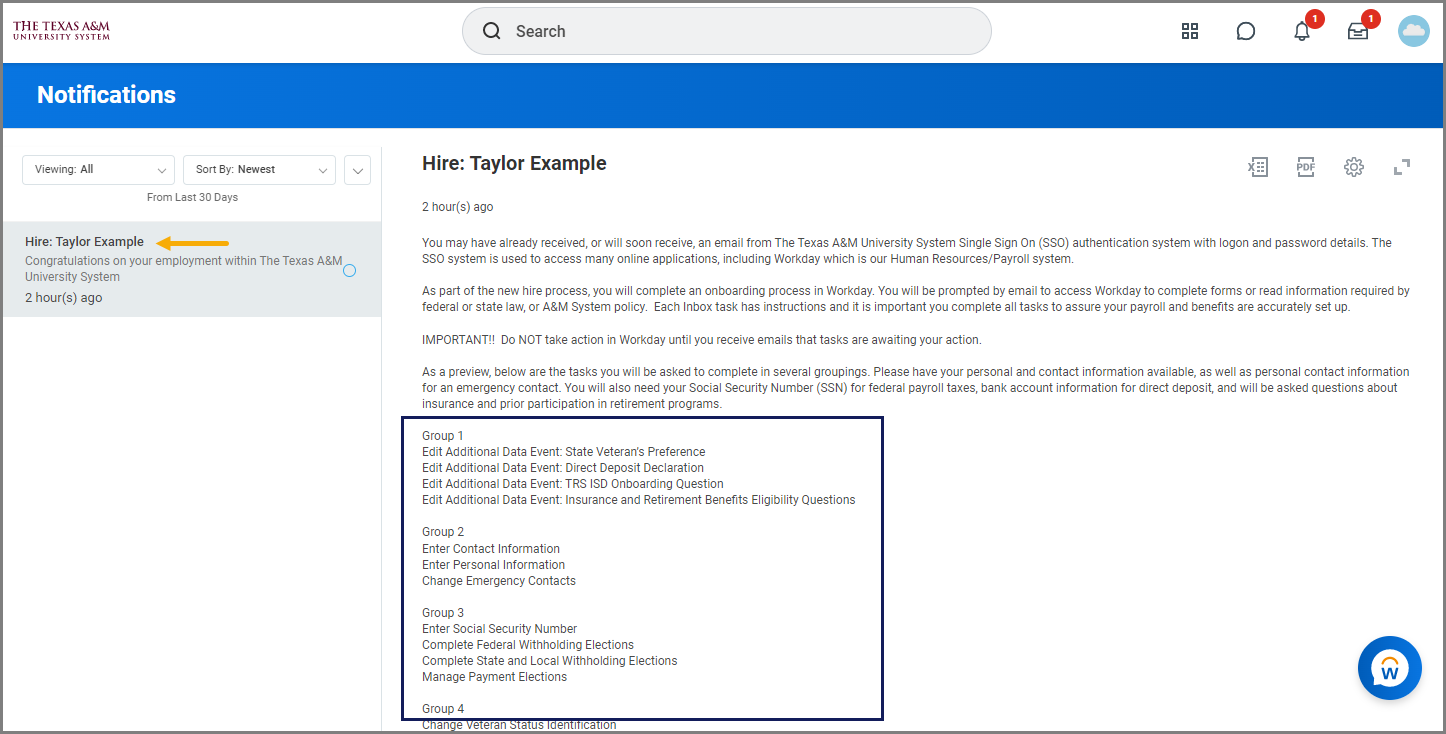
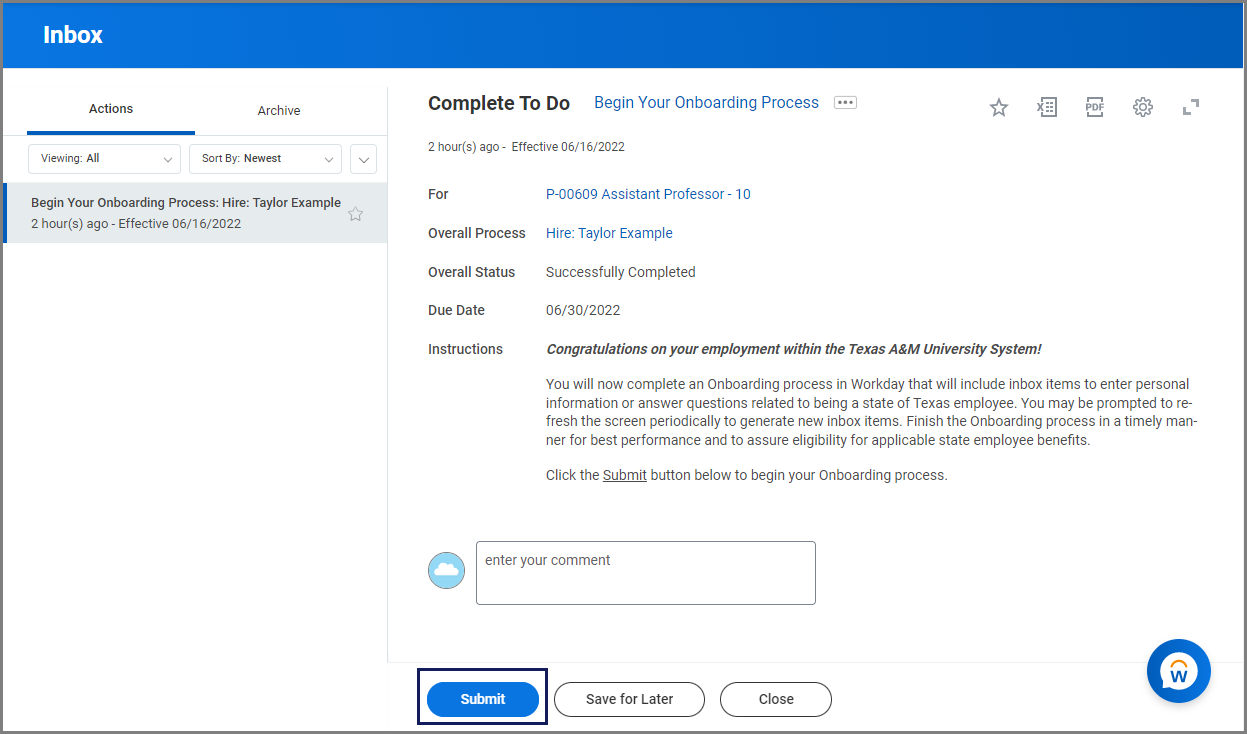
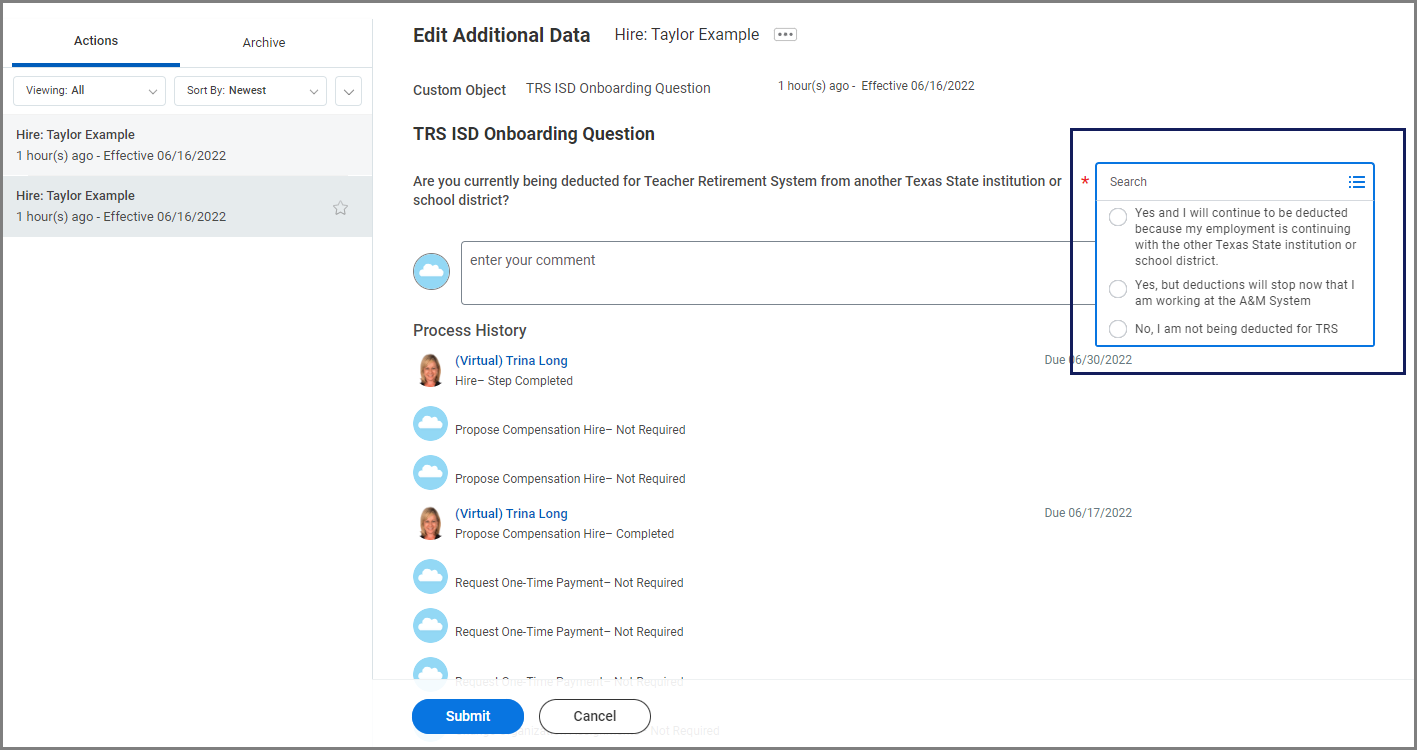
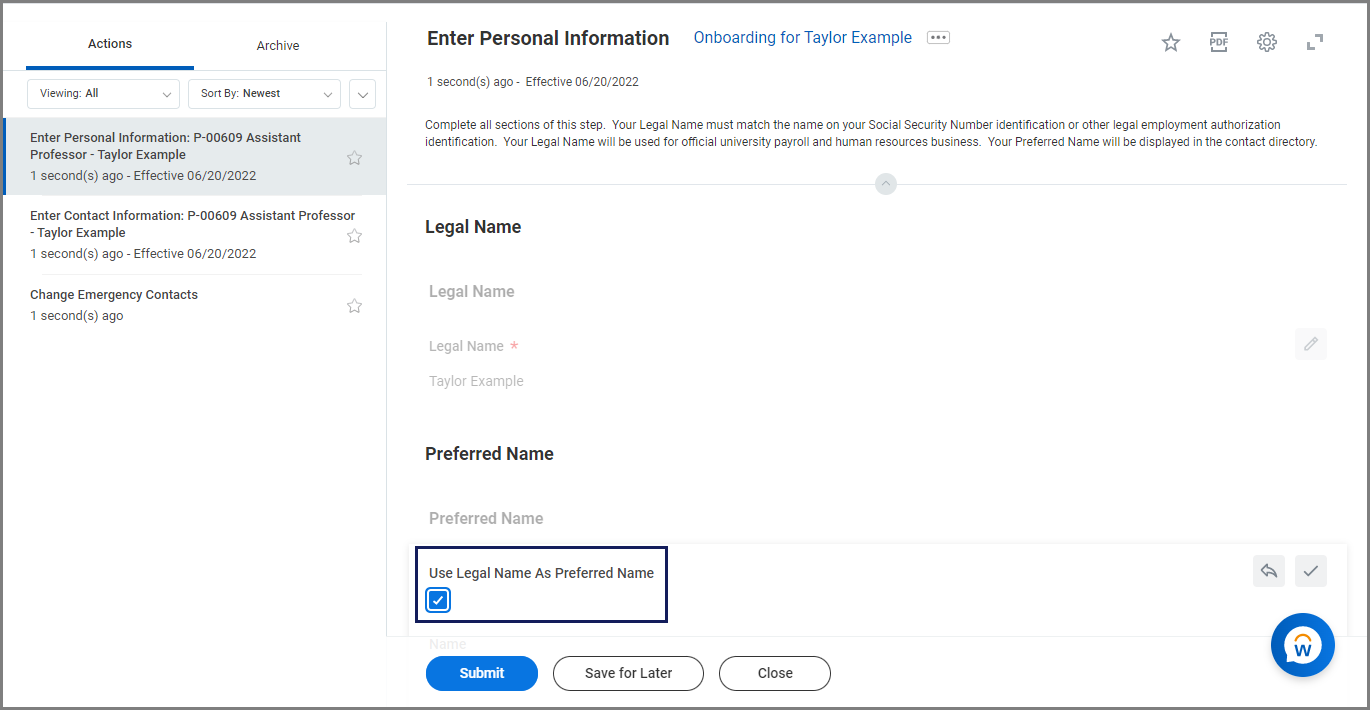
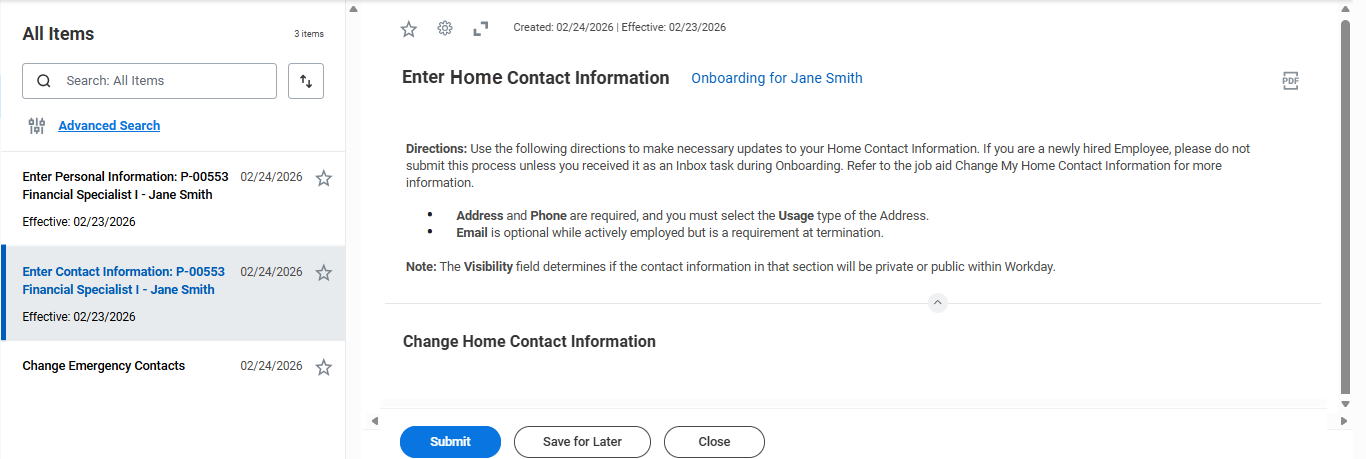
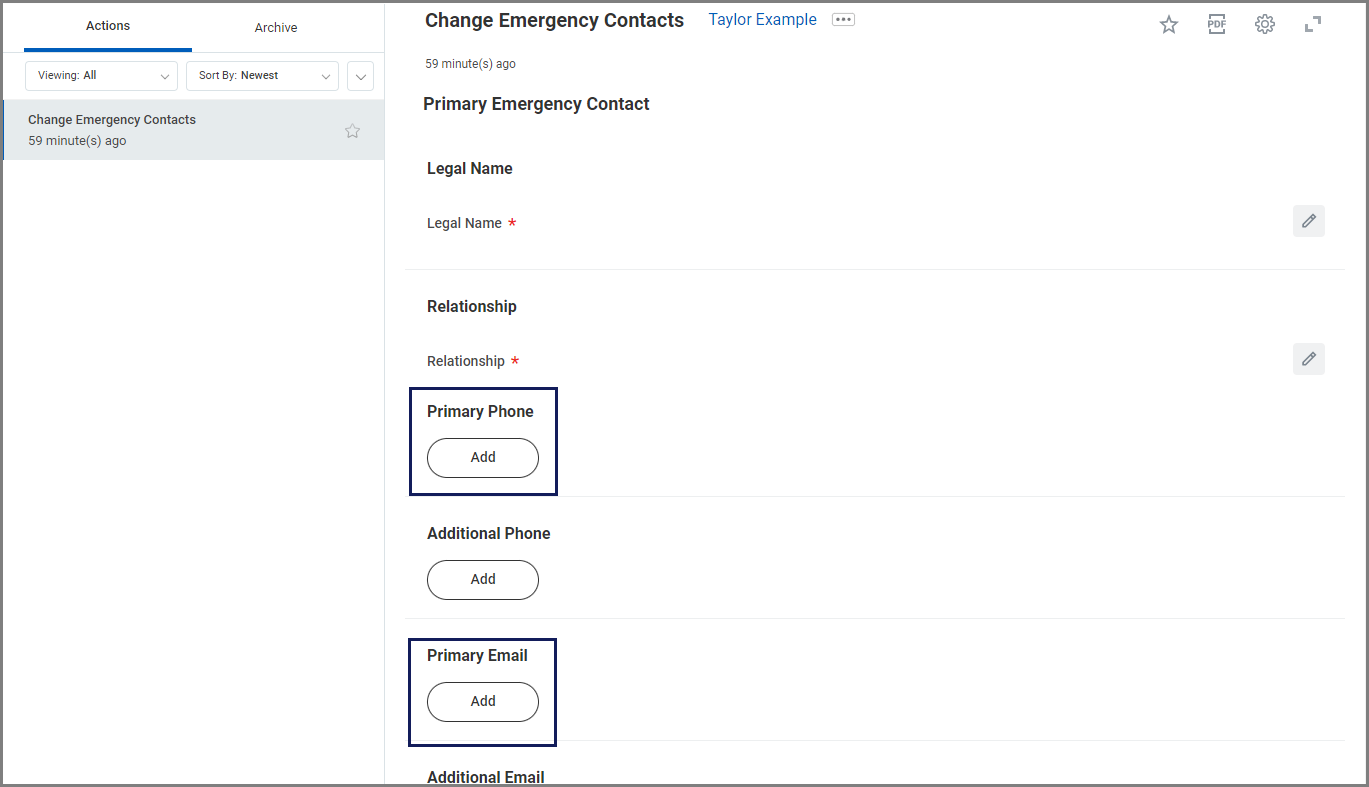
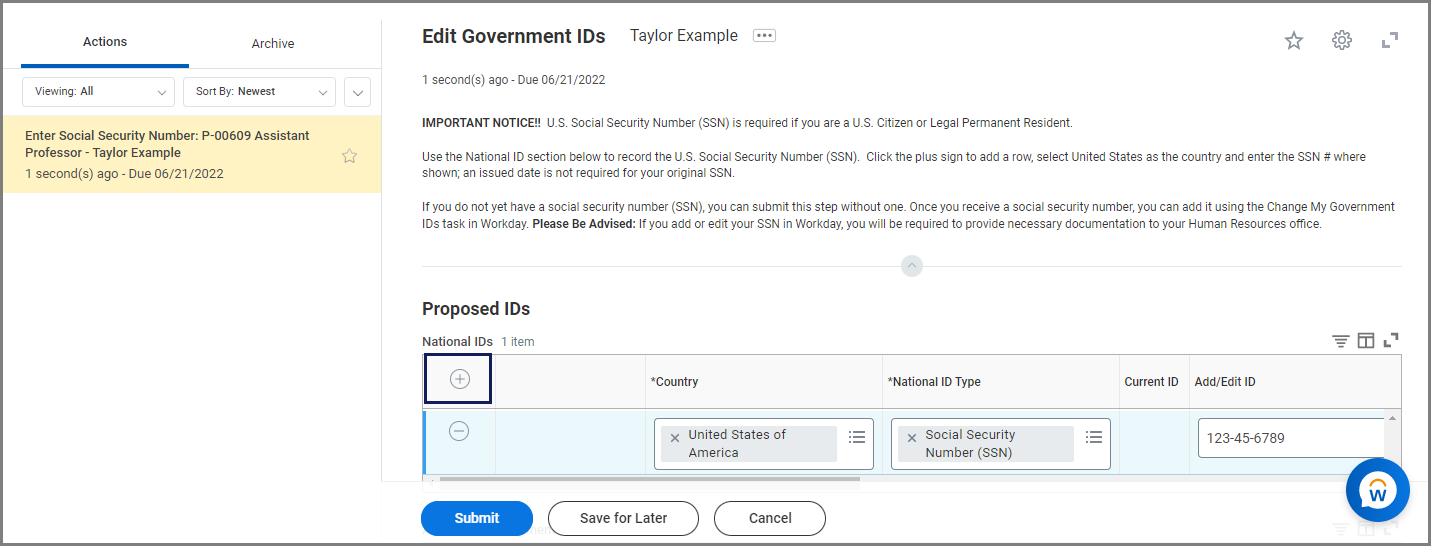
The purpose of this job aid is to provide a new Employee with guidance on how to complete the onboarding process in Workday. However, the experience shown here is only a sample of what an Employee might typically encounter. Onboarding is a process that varies depending on the position and characteristics of the worker hired. Not every Employee will see everything shown in this job aid.

If you have questions on any part of this process, refer to the Additional Resources tab for instructions on how to reach out to your Human Resources department.

Login with SSO to see this content.

Important Information

  • Complete each group of tasks in your inbox in the order they are presented to you and do not submit tasks until you have received the prompt from Workday.
  • Not submitting items in your inbox for onboarding in a timely manner can have negative impacts.
  • Not every Employee will receive the exact same tasks in Workday because situations vary. For example, if you are not benefits eligible, benefit tasks will not appear in your inbox.
  • Depending on whether your member has elected to participate in export control related processes, additional steps may be required.

Getting Started

You will receive a notification that your onboarding has begun. To review this notification follow the steps provided below.

  1. Select the Bell icon in the top right corner of the screen to view your notifications. The Workday Home screen with the bell icon highlighted
  2. Select the Hire notification and review the instructions for the onboarding process.

Onboarding Begins

Onboarding tasks are split into four groups of tasks. The Employee completes each task one at a time. Once the entire group of tasks is complete, the next group of tasks will appear.

  1. To get started, navigate to your Workday inbox and select the Begin Your Onboarding Process task. After reading the information provided, select Submit to begin the onboarding process.The Employee's inbox displayed with he Onboarding task visible and the submit button highlighted.
  2. Refresh your inbox by selecting Refresh. Group 1 onboarding tasks display.The inbox once the task has been submitted to begin onboarding and the refresh button highlighted.

Group 1 Tasks

Group 1 onboarding tasks prompt you to answer various questions. These tasks are received automatically once the onboarding process has started. All Employees will see these three tasks: State Veteran’s Preference, Direct Deposit Declaration and TRS ISD Onboarding Question. Those Employees hired into a Benefits eligible position will also receive the task: Onboarding Benefits Questions.

State Veteran’s Preference

  1. Navigate to your inbox and select the first Hire task for selecting the Employee’s State Veteran Status.The Edit Additional Data task
  2. Read the instructions. Then select whether or not you are a state veteran in the State Veteran’s Preference field.
  3. Enter any comments, as needed.
  4. Select Submit to continue to the next task.

Direct Deposit Declaration

  1. On the next task Direct Deposit Declaration, enter whether or not you will be transferring funds outside of the U.S. with your direct deposit in the Are you Transferring Funds Outside the U.S. field.Direct Deposit Task Note: You will not be able to enroll in direct deposit if you are transferring funds outside the U.S.
  2. Select Submit.

TRS ISD Onboarding Status

  1. On the next task, select your TRS ISD Onboarding Status.TRS Onboarding task
  2. Select Submit.

Onboarding Benefits Questions

  1. On the next task Insurance and Retirement Eligibility Questions, answer the questions related to your benefits eligibility.Benefits eligibility questionnaire taskNote: This task only appears in your inbox if the position you have been hired for is eligible for benefits.
  2. Select Submit.

Once the last Group 1 task is submitted, select Refresh to generate Group 2 tasks.

Group 2 Tasks

Group 2 tasks will initiate after all Group 1 tasks have been completed. Group 2 tasks will prompt you to enter your personal Information, setup your contacts information, and enter your emergency contacts.

Enter Personal Information

  1. Access your inbox and select the Enter Personal Information task.
  2. In the Preferred Name section of the task, select the Use Legal Name As Preferred Name check box.The Enter Personal Information Task with the Legal preferred Name check box highlighted
  3. Enter the remainder of your personal information in the Change Personal Information section.
  4. Select Submit.

Enter Contact Information

  1. Select the Enter Contact Information task in your inbox.Enter Personal Information task
    Note: The Usage field in the Home Contact Information is required, but not marked as such. 
  2. Enter the required contact information as necessary.
  3. Select Submit.

Change Emergency Contacts

  1. Select the Change Emergency Contacts task in your inbox.Change Emergency Contacts task
  2. Enter information for your primary emergency contact as required.

Note: You must enter either a phone number or email address for at least one emergency contact.

  1. Select Submit.

Once the last Group 2 task is submitted, select Refresh to generate Group 3 tasks.

Group 3 Tasks

Group 3 onboarding consists of the following tasks: Enter Social Security Number; Complete Federal Withholding Elections; Manage Payment Elections and Complete State and Local Withholding Elections (if in a state that collects income tax).

Enter Social Security Number

  1. Access your inbox and select the Edit Government IDs task.
  2. Enter your social security number by selecting the Plus Sign (+) icon in the National IDs section and then selecting Social Security Number in the National ID Type field.Edit Government IDs task
  3. Select Submit after entering your social security number.

Complete Federal Withholding Elections

  1. On the Complete Federal Withholdings task, select your marital status and enter your withholding information as required.Complete Federal Witholdings task
  2. Select the I Agree check box.
  3. Select Submit.

Note: If you entered an address for a state that collects income tax, an additional task to Complete State and Local Withholding Elections will appear.

Manage Payment Elections

  1. On the Payment Election Enrollments task, enter the the following information.
    • Payroll. This will default to Direct Deposit but you can elect to have a check.
    • Expense. This will default to Direct Deposit but you can elect to have a check.
    • Account Nickname. This field is optional but it is best practice add one (e.g. Personal Account).
    • Routing Transit Number. This number is located on the bottom of your check or is available from you banking information online.
    • Bank Name. Enter the name of your bank (e.g. Chase)
    • Bank Identification Code. Ignore this field.
    • Account Type. Select Checking or Savings.
    • Account Number. This number is located on the bottom of your check or is available from you banking information online.The manage payment elections task displaying the payroll and expense fields under preferred payment method, the account setup section displaying a sample check, and the account information section, displaying fields such as routing transit number and bank name

Note: You can add additional bank accounts using the Add button that displays after confirming your first account.The add button on the manage payment elections task is emphasized under the accounts table which displays a sample bank account which was entered

  1. Select Submit.

Complete State and Local Withholding Elections

If you entered an address for a state that collects income tax, an additional task to Complete State and Local Withholding Elections will appear in your inbox. The Complete State and Local Withholding Elections task. The company and state fields are editable.

Once the last Group 3 task is submitted, select Refresh to generate Group 4 tasks.

Group 4 Tasks

Tasks in onboarding Group 4 will ask you if you self identify as disabled or as a veteran. You will also be required to complete and agree to several new employee notices for various policies. Group 4 onboarding consists of the following tasks:

  • Review Required New Employee Notices
  • Edit Passports and Visas (if a foreign national)
  • Complete W-4 in GLACIER and Submit to Payroll (if a foreign national)
  • Enroll in Electronic W-2
  • Change Self-Identification of Disability
  • Change Veteran Status Identification

Review Required New Employee Notices

  1. Access your inbox and select the Review Required New Employee Notices task. The information that appears is provided to all new employees.
  2. Review each notice and select the I Agree check box.Review Required Notices task
  3. Once all notices have been reviewed and agreed to, select Submit.

Edit Passports and Visas

If you are a foreign national, you will receive the task Edit Passports and Visas.

  1. To add a Visa, select the Plus Sign (+) icon under the Visas section. In the row that appears, fill in the following fields: Country, Visa ID Type, Identification #, Issued Date, and Expiration Date.
    The Visas table under Proposed IDs.
  2. Enter any comments, as needed.
  3. Select Submit.

Complete W-4 in GLACIER and Submit to Payroll

If you are a foreign national, you will also receive the To Do Complete W-4 in GLACIER and Submit to Payroll. Follow the instructions on the To Do and then select Submit.The Complete W-4 in GLACIER and Submit to Payroll to do displaying instructions and the submit button

Enroll in Electronic W-2
  1. Select the Enroll in Electronic W-2 task from your inbox.
  2. After reviewing the information in the task, select the My Tax Documents  button to edit the way you receive your W-2.Note: Electing to receive your W-2 only in electronic form if preferred
  3. Return to your Inbox task and Select Submit.

Change Self-Identification of Disability

  1. Select the Disability Self-Identification task from your inbox.
  2. Review the instructions and information included in the task and select the appropriate option.Self-Identification of Disability task.
  3. Select Submit.

Change Veteran Status Identification

  1. Select the Veteran Status Self-Identification task in your inbox.
  2. After reviewing the information, select the appropriate option to represent your veteran status.Veteran Status task
  3. Select Submit.

Note: If you are a foreign national, there may be additional tasks to enter your passport and visa information, and complete your GLACIER registration. Complete these tasks as necessary.

After submitting all Group 4 tasks, you can move on to setting up your benefits elections.

Add Dependents

The following steps can be completed once the required Groups 1–4 tasks have been completed. For employees that are eligible for benefits, the following steps can be used to complete your onboarding procedures. If you do not have dependents, proceed to the Make Your Benefits Elections section below.

  1. From your Workday Home Page, select the Benefits worklet.The Workday home page with the Benefits options highlighted.
  2. In the Change section, select Dependents.The change section displayed with the Dependents option highlighted.
  3. Select Add.The dependents page with the add button highlighted.
  4. In the Reason field, select Add Dependent > New Hire.
  5. Enter the required information for the dependent in the corresponding fields and select Submit. Once this task is completed, you will receive an additional task to add the required documents to verify your dependents.

Make Your Benefits Elections

After you have added your dependents, you can make all the necessary benefits elections.

  1. Access your inbox and select the Change Benefits for Life Event task.
  2. Select Let’s Get Started.Change Benefit Elections task
  3. On the Update Your Information page, select the appropriate answer for your tobacco usage and the select Continue.The tobacco questionnaire screen
  4. The next page displays sections for each of the benefits you are eligible for. Select Enroll/Manage for the coverage you want to add or change. Each coverage area displays instructions for how to set it up appropriately.The Benefits Election page
  5. When you are finished with a specific coverage, select Continue to return to the main benefits page.
  6. Once you have enrolled in all the coverage you need, select Review and Sign to continue.
  7. On the next page, review all of your selected coverages.benefit elections summary page
  8. If the elections are correct, scroll down to the bottom of the page and select I Agree.Electronic signature section of the review benefits election page.
  9. Select Submit.

After you have submitted your benefits elections, you can review them from the benefits menu at any time. This process may trigger additional notifications once all the steps are completed. Notifications can be viewed by selecting the Bell icon.

Up Next

If you have not already, you can complete the online training Working in Workday for Employees, available on TrainTraq for more information on how you will use Workday in your position at your organization. If you are also a Manager, we recommend you also complete Working in Workday for Managers next.

For more information on Workday visit the Workday Help website. Both TrainTraq and Workday Help are available on your SSO menu.

This completes the Onboarding business process.

Quicklinks

  • Onboarding Begins
  • Group 1 Tasks
  • Group 2 Tasks
  • Group 3 Tasks
  • Group 4 Tasks
  • Add Dependents
  • Make Your Benefits Elections
  • Up Next

  • ^ Top Of Page

    Additional Resources

    To locate information for your HR Contact in Workday, use the following procedure.

    1. Navigate to your Worker Profile and select Contact.Worker Profile Menu
    2. Select the Support Roles tab.Support Roles tab
    3. Scroll down to HR Contact to find who supports your department for Human Resources needs.HR Contact highlighted on the Support Roles tab

    Copyright © 2023 Texas A&M University System All rights reserved.

    301 Tarrow Street, College Station, TX 77840 | MAP | Phone: (979) 458-7700 | email: support@tamus.edu
    State of Texas | Texas Homeland Security | Texas Veterans Portal | Statewide Search | Risk, Fraud & Misconduct Hotline | Privacy | Web Accessibility | State Link Policy | Campus Carry

    Texas A&M University System