This job aid outlines the primary activities for various security roles during the Hire business process.
Hire
Last updated on March 14, 2026
This custom job aid is intended for TAMU, TAMUG, and TAMHSC.
Page Loading...
Checking SSO...
Prerequisites
- The Position has been created in the desired Supervisory Organization with all required information (i.e., Employee Type, Job Profile, Time Type, Location and Pay Rate Type).
- The employing Supervisory Organization is responsible for ensuring appropriate approvals and budget authority prior to initiating any Hire event (including any additional approvals required beyond what is configured in Workday).
- If hiring through Workday Recruiting, the Candidate needs to be moved to the Ready for Hire stage.
Important Information
- The employing Supervisory Organization should use TAMUS UIN Manager / UIN Search from SSO to search for possible matches to the individual. If a match is located, document the UIN. Only if no possible matches are found should you proceed with creating a new UIN. Remember to follow your System Member guidelines for using UIN Manager / UIN Search.
- If requesting a one-time payment for housing or moving expenses for a new Employee prior to the effective Hire date, the payment must be processed through your System Member’s financial accounts payable system. The Payroll Partner will need to enter the one-time payment as a Manual Payment in Workday.
- After the Employee is hired, the Hiring Manager will receive a notification for when the Employee can begin work.
- When hiring a former employee, the worker profile will retain prior compensation. Remove the prior compensation during the Propose Compensation step of the Hire process and enter the appropriate compensation for the worker.
- Depending on whether your member has elected to participate in export control related processes, additional steps may be required.
Getting Started
Locate the Position (Initiator)
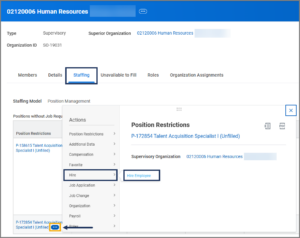
- Navigate to the Manager’s Supervisory Organization to find the open position.
- Select the Staffing tab.
- Select the Related Actions icon for the position and select Hire > Hire Employee.

Locate/Create Pre-Hire Record (Initiator)
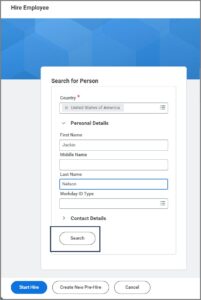
A Pre-Hire record is required to hire an Employee in Workday. First, you will search Workday for an existing Pre-Hire record. If none exists, you will create a Pre-Hire record for the Employee.
Important: If not hiring through Workday Recruiting, always remember to conduct a Global Search using the Workday Search Bar to ensure the individual does not already have a Pre-Hire, Employee or Contingent Worker record.
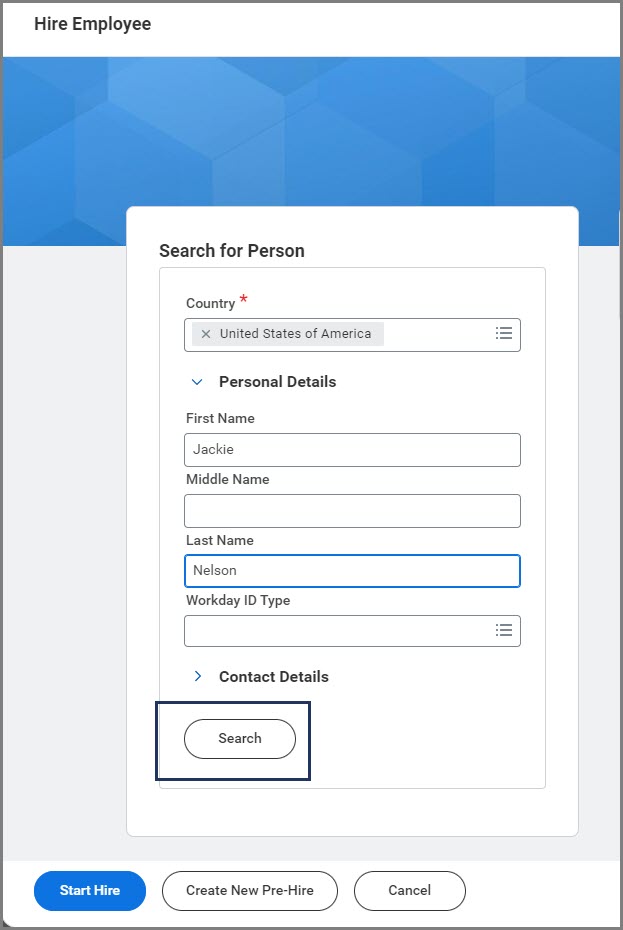
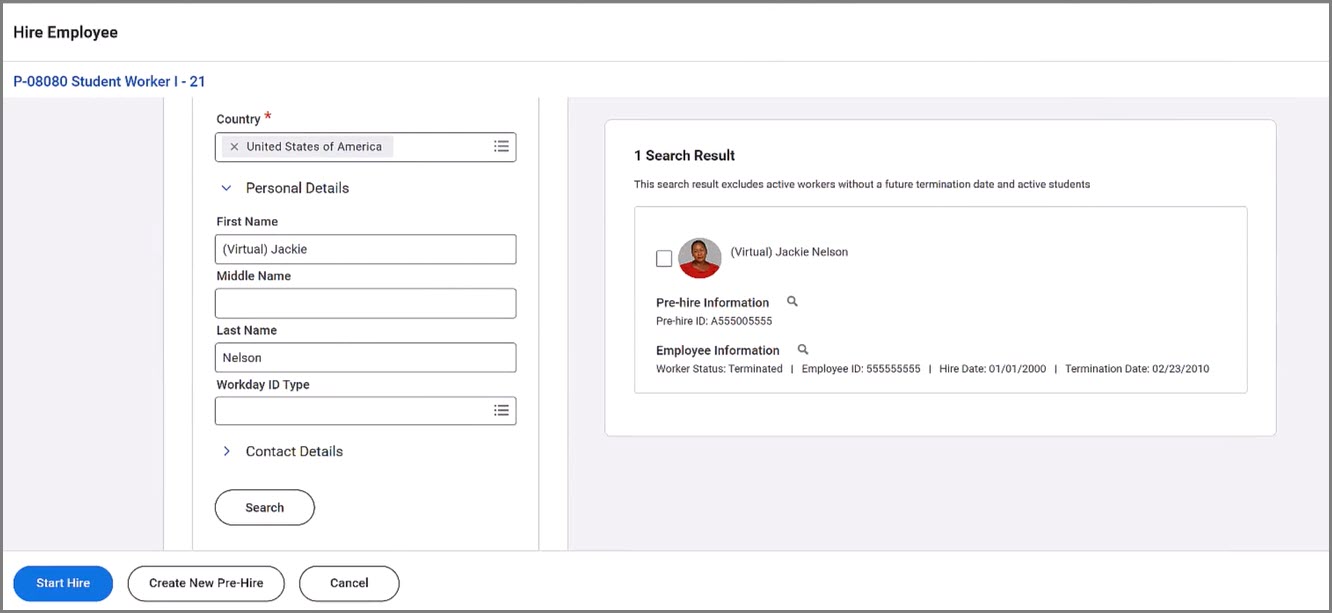
- Enter First Name, Last Name and select Search.
- After selecting the Search button, the details will automatically display. If you locate the correct Pre-Hire record, mark the checkbox for the appropriate record and be sure to document the Employee ID.
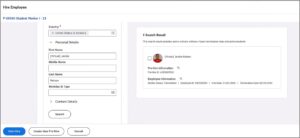 Important: You will need to provide the Employee ID to the UIN Partner later within the Hire Details.
 - Now select Start Hire. Then move to the Hire Details of this job aid to continue.
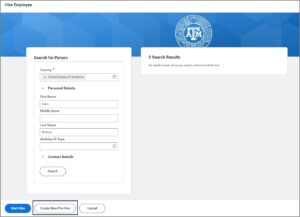
Pre-Hire Record Not Found (Initiator)
If there are 0 results and you have exhausted all possibilities, or if the results do not include the individual you are looking for and you have exhausted all possibilities, select Create New Pre-Hire. Otherwise, proceed to the next section called Hire Details.
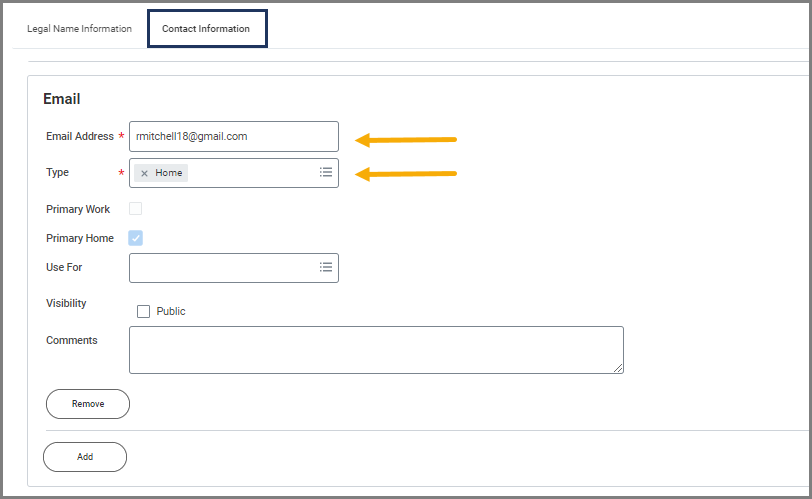
- On the Legal Name Information tab, add a First Name and Last Name.
- On the Contact Information tab, Email is the only required field. Enter the email address and select OK.

- On the next page, the position will populate for the Pre-hire. Select OK to begin.

Hire Details (Initiator)
- Enter the effective Hire Date and the Reason for the hire.
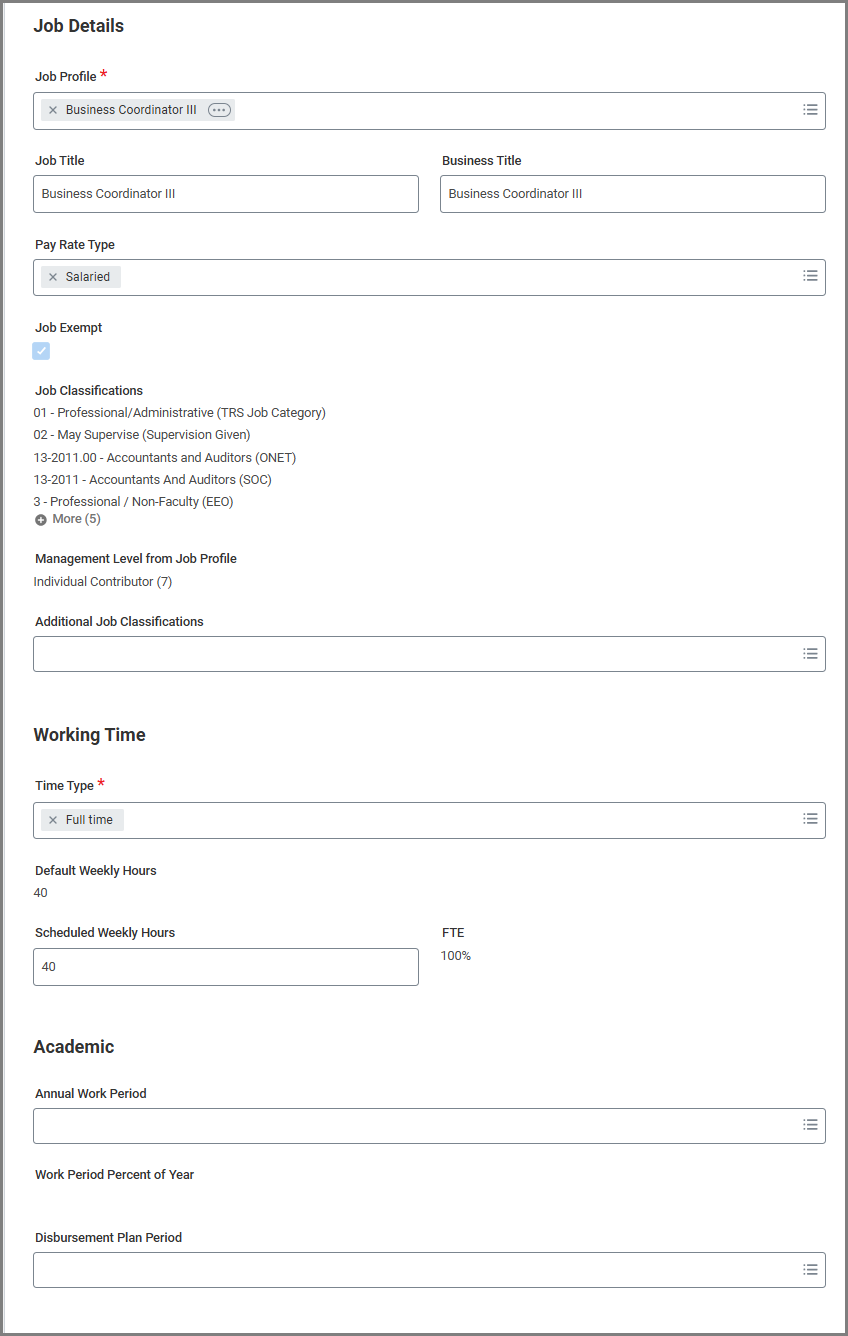
- Under Position and Job Details, verify the information is accurate. The Position, Employee Type, and Location fields are automatically populated from the selected position and are required.
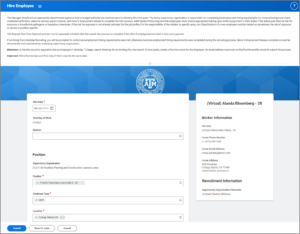
- Under Job Details, select the Job Profile. This will auto-populate the Job Title, Business Title, Pay Rate Type, Job Classifications, Time Type, and Schedule Weekly Hours. You will need to select the Annual Work Period and Disbursement Plan Period. These must be the same.

Important: For positions that require risk training, be sure to select the Additional Job Classifications: Exposure Risk Training if the job classification is not already assigned at the Job Profile level.
- If you were able to locate an existing Pre-Hire record, Workday Services recommends to enter the UIN (Employee ID) in the comments section as a best practice to help the UIN Partner later in the process.
- Select Submit.
Approvals will be routed to the Hiring Manager, HR Partner and others depending on member routing configuration.
Navigate to the Up Next tab for the next steps in the process.
Up Next
Propose Compensation Hire (HR Partner or HR Contact)
Depending on your member preferences, either the HR Partner or HR Contact will receive the Inbox action item to Propose Compensation Hire. Fields will default from the Position Restrictions, if they exist for this position.
- Review the Default Compensation. If no changes are needed, select Submit. If changes are needed, select Make Changes.

- Edit the Salary or Hourly section, as needed. When you adjust the Amount, Amount Change, or Percent Change fields, Workday automatically calculates the other two fields.
- Select Save.
- To add a Plan Assignment, such as an Allowance, select the Add Plan Assignment button.
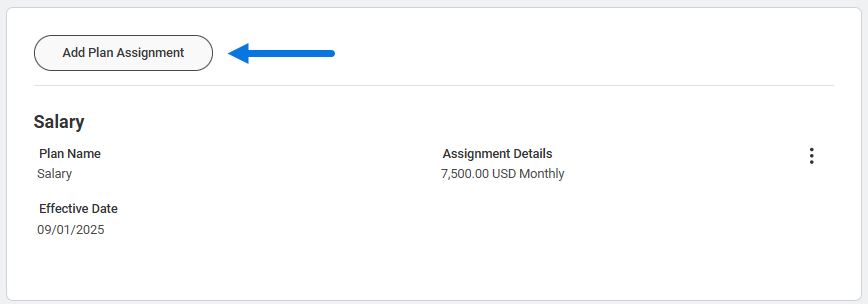
- The Add Plan Assignment slide-out will appear on the right.
- Compensation Plan Type. Select Hourly, Allowance or Merit.
IMPORTANT: Merit should not be added during the Request Compensation Change business process unless coordinated with the designated Merit Partner during the annual merit process.

-
- Compensation Plan. Select the type of allowance (e.g., Communication Allowance, Department Head Stipend, Temporary/Interim Increase, etc.).

- Select OK.
- On the next screen add the plan details:
- Amount. This is where you enter the monthly amount of the allowance being offered.
- Currency. This will always be set to USD.
- Frequency. This will always be set to Monthly.
- Additional Details. Selecting this will reveal optional fields.
- Expected End Date. This field will not terminate payment, it is only entered to indicate when you expect the payment will need to end.
- Actual End Date. Any date entered here will automatically terminate all payment on that date. It will remove the entire compensation plan for the Employee.
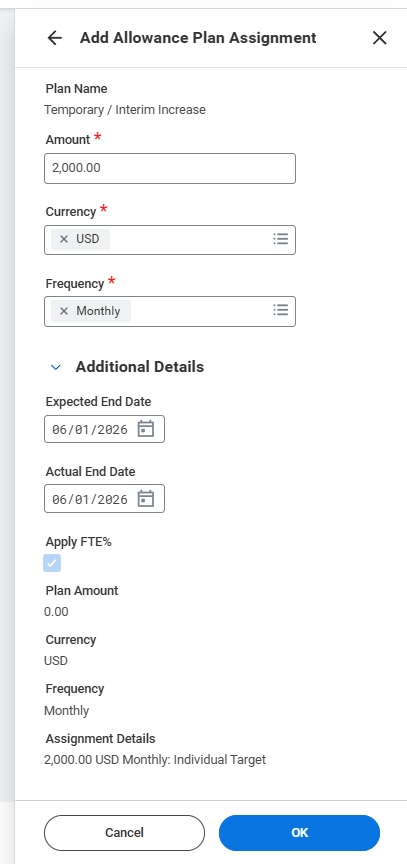
- Select OK.
- Select Submit.
Once submitted, the Propose Compensation Hire inbox item will be archived.
To Do: Confirm New or Rehire Worker Record (UIN Partner)
This To Do directs the UIN Partner to confirm whether the individual currently undergoing the Hire process does or does not already exist in Workday. If an existing individual was duplicated by creating a new Pre-Hire record, the Hire process needs to be canceled immediately, and the To Do should not be submitted.
The employing Supervisory Organization should use TAMUS UIN Manager / UIN Search from SSO to search for possible matches to the individual. If a match is located, document the UIN. Only if no possible matches are found should you proceed with creating a new UIN. Remember to follow your System Member guidelines for using UIN Manager / UIN Search.
By submitting this To Do, the UIN Partner completes the Hire process. It is important to clarify any doubts prior to hitting submit. Conducting a Global Search in Workday using the UIN can help to confirm.
- Open the To Do: Confirm New or Rehire Worker Record.
- Follow the instructions of this To Do carefully.
- Select Submit.

Important: If the rehire was hired as a new hire, and the person is shown to exist in Workday, do not submit this To Do. Stop and cancel the Hire process.
To Do: Get the UIN and edit the Employee ID (UIN Partner)
You should have already used the Global Search functionality in Workday and the UIN Search application to look for any possible record that may exist for the individual to be hired to avoid creating duplicate records. The UIN should have already been retrieved or a new one created using UIN manager in the previous To Do. It is now time to enter the UIN into the Worker Profile as their Employee ID.
Important: The To Do should NOT be submitted until the Edit System ID task has been completed as described below.
- Open the To Do: Get the UIN and edit the Employee ID.
- Follow the instructions of this To Do carefully.
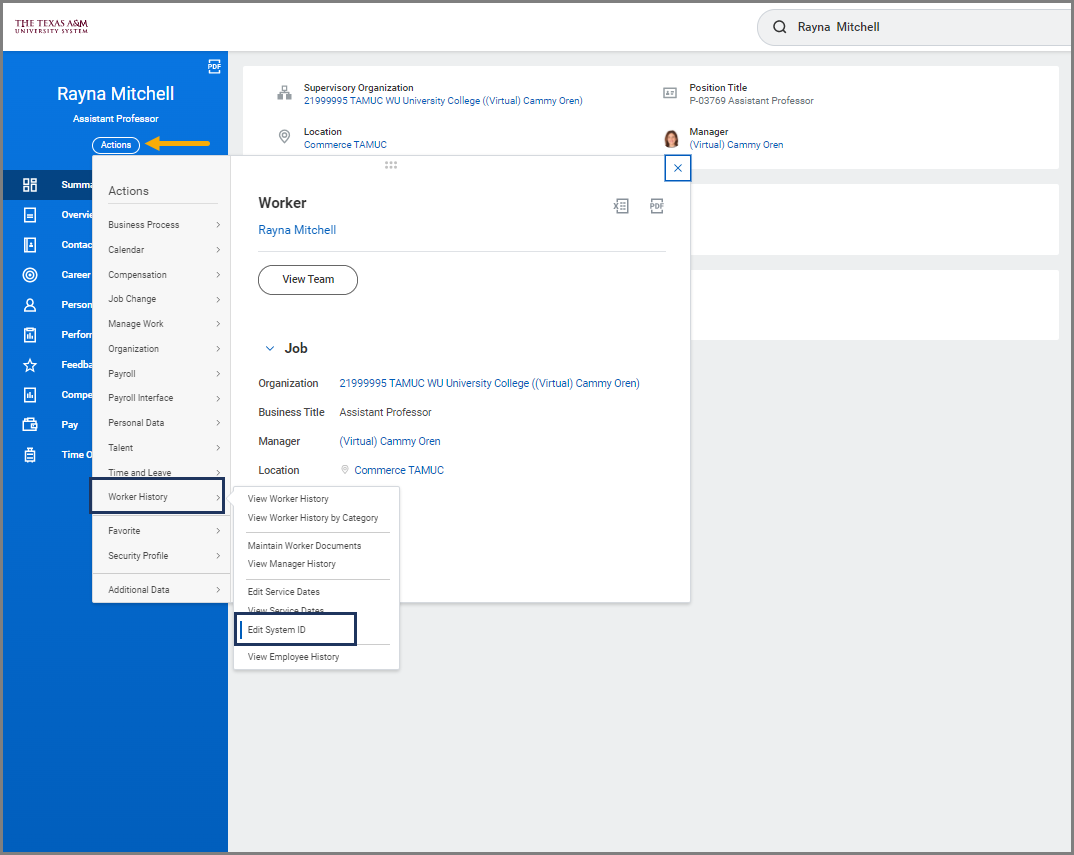
- Navigate to the Employee’s Worker History and select Edit System ID.

- In the Employee ID field, replace the Workday generated Employee ID with the UIN provided by UIN manager. Note: If you find that the Worker already has a UIN in the Employee ID field, no action is needed. This individual is a rehire.
- Select OK and continue.
ERROR: This ID already exists! If you receive this error, stop. Do not hit submit on the To Do. You need to contact your HR office immediately to have the Hire business process rescinded. This error means it is a duplicate Pre-Hire record for this individual in Workday and must be fixed.
- Return to the To Do in your inbox, enter the UIN in the comments box and select Submit.
Important Reminders for this To Do
- Do not hit submit until you are sure the UIN has been updated in Workday. Selecting Submit without completing the instructions listed on the To Do will cause many downstream issues
- An email with SSO login credentials SSO is sent to New Hires after the Hire business process completes and a successful record is received by SSO from Workday. Note: The hire effective date must be 60 days or less in the future. Rehires will not receive an email. An SSO Central Administrator can reset an SSO password for Rehires if needed.
Potential Additional Routing
Additional Job Classification change to MSO Code will route to the HR Partner for review
Important: The Employee’s Workday account has been created.
Assign Costing Allocation (Budget Contact)
- Navigate to your Inbox and select the Costing Allocation for Hire action item.
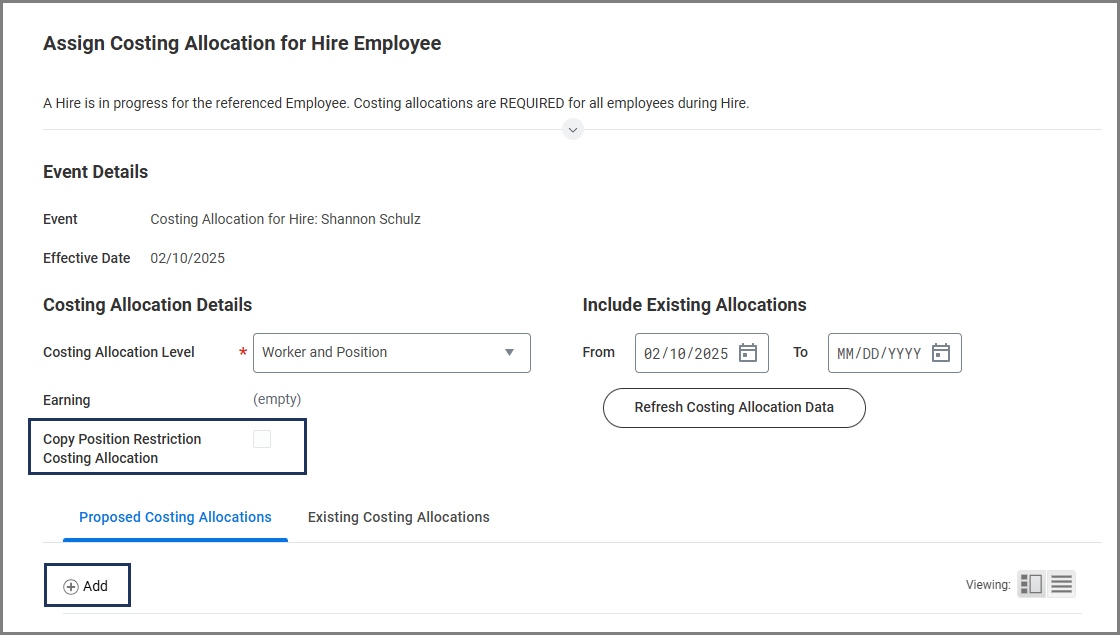
- On the Assign Costing Allocation for Hire page, select Worker and Position for Costing Allocation Level.


When completing Assign Costing Allocation as a sub process of Hire, you should only select Worker and Position. If you select Worker, Position, and Earning, the costing allocation will only affect a specific earning type such as cell phone, housing or car allowance. It will not be assigned to the Worker or position. Costing allocations for the Worker may differ than those originally set for the position when it was created.
- You can check the box for Copy Position Restriction Costing Allocations to use the same information as what is assigned to the Position Restrictions. You can also use this method to populate information and then edit for greater efficiency.
Important: You are now assigning costing allocations to the Worker as opposed to the position itself. Costing allocations assigned to the position may differ from what was decided later to assign to the Worker upon hire.
- Select Add to begin.
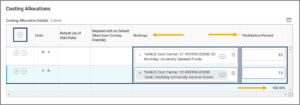
- Complete the following:
- Start Date. This date indicates the first date that the salary / wages will be charged to the designated cost center. When completing the Hire business process it is recommended to set this as the Hire date.
- End Date (optional). This date indicates the last date that the salary/wages will be charged to the designated cost center. If you are only using one cost set for an undetermined amount of time, an end date may not be necessary.
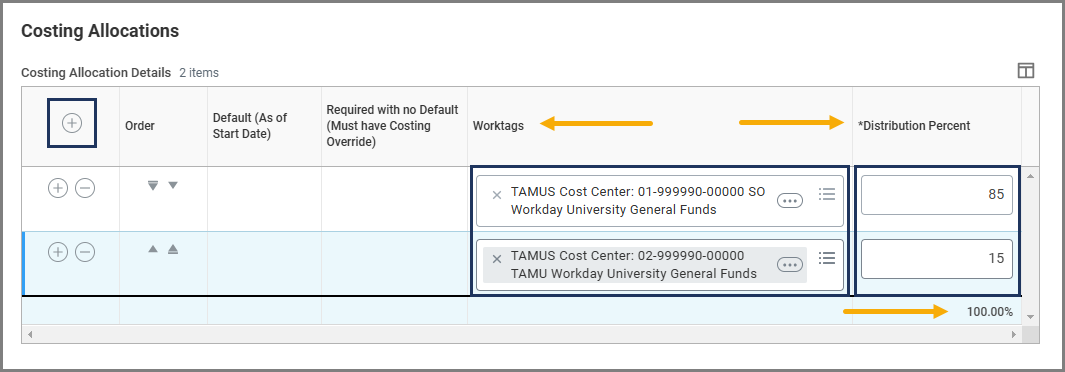
- Worktags. Select the Prompt icon to select the TAMUS cost center from which this position will be paid. One or more cost centers may be needed.
- Distribution Percent. This will default to 100%.


Important: You cannot leave the Worktags field blank. You will not be allowed to continue.
- If the position will be paid out of multiple cost centers, select the Plus Sign (+) icon to create a new row and add additional cost centers as needed. Designate the appropriate percentage for each cost center under the Distribution Percent column, ensuring that the percentages from all cost centers add up to 100%.
- In the event you need multiple cost sets for different time periods, you will need to enter an End Date for the previous cost set(s) so the dates do not overlap with the new cost set. Then select the Add button above the table. For the new cost set, repeat the steps above.

- Select Submit.

Other Onboarding Procedures (HR Contact or HR Partner)
- If Employee is not a rehire, the I-9 Processor will receive the To Do: Complete Form I-9 in Guardian. If the Employee is a rehire, the I-9 Partner will receive the To Do: Complete Form I-9 Section 3 of the Rehire. Refer to the Form I-9 Processing Quick Reference Guide on Workday Help for more details.
- The Employee will receive a To Do: Begin the Onboarding Process.
- The hiring Manager and HR Contact will receive a notification for when the Employee can begin work when the Hire business process is complete.
This completes the Hire Employee business process.
Assign Pay Group (Payroll Partner)
The Payroll Partner for the Supervisory Organization where the additional job is located will receive an Inbox action item to Assign Pay Group.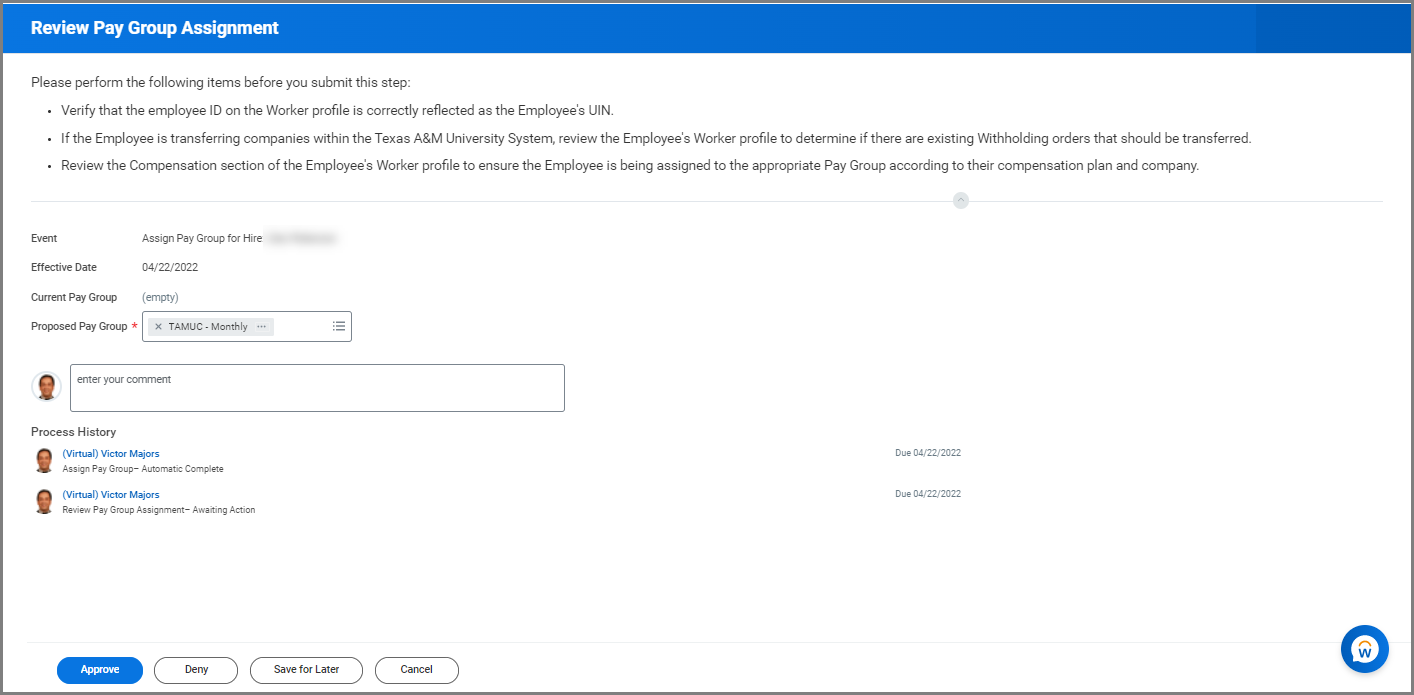
Record Background Check, Selective Service, Mail Stop and Verify Education
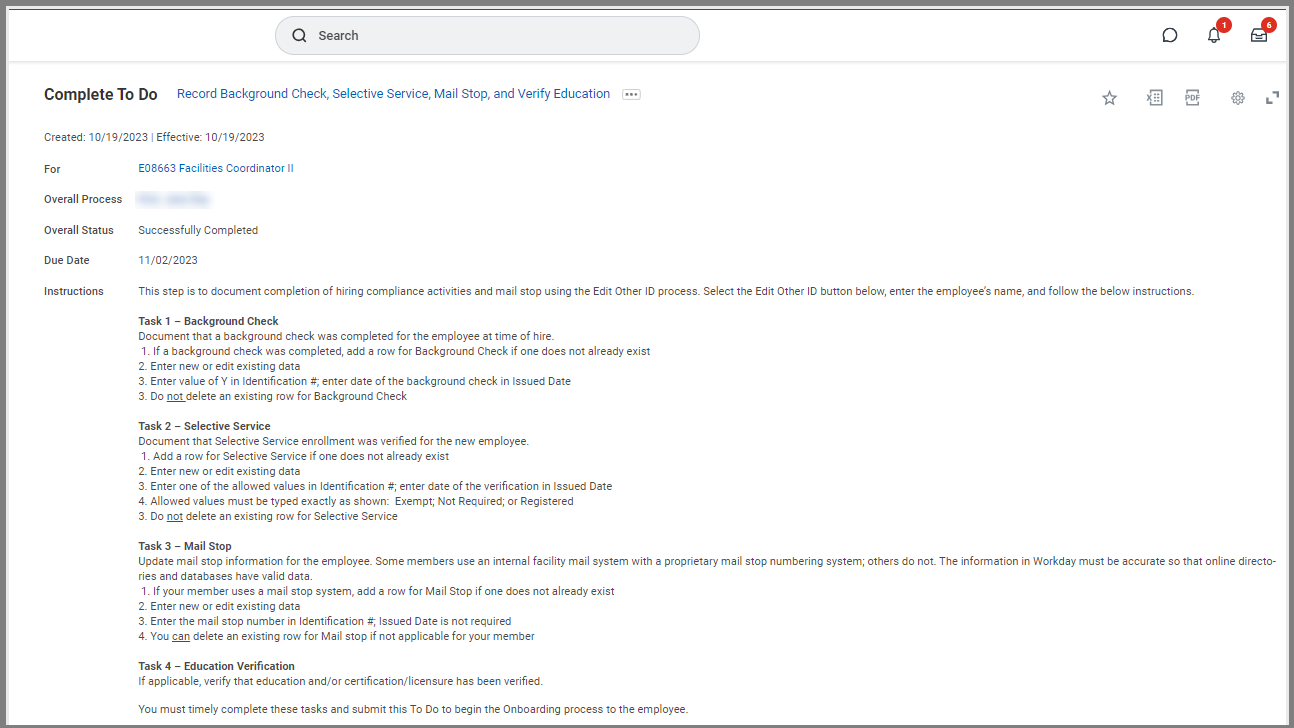
The HR Contact or HR Partner receives the To Do: Record Background Check, Selective Service, Mail Stop, and Verify Education. There are four tasks that need to be reviewed to move the business process forward. The following task need to be completed:
- Task 1- Background Check
- Task 2- Selective Service
- Task 3- Mail Stop
- Task 4- Education Verification
- Navigate to your inbox and select the To Do: Record Background Check, Selective Service, Mail Stop, and Verify Education.
- Read the directions and complete tasks in the To Do as instructed.
- Return to the To Do and select Submit the business process forward.
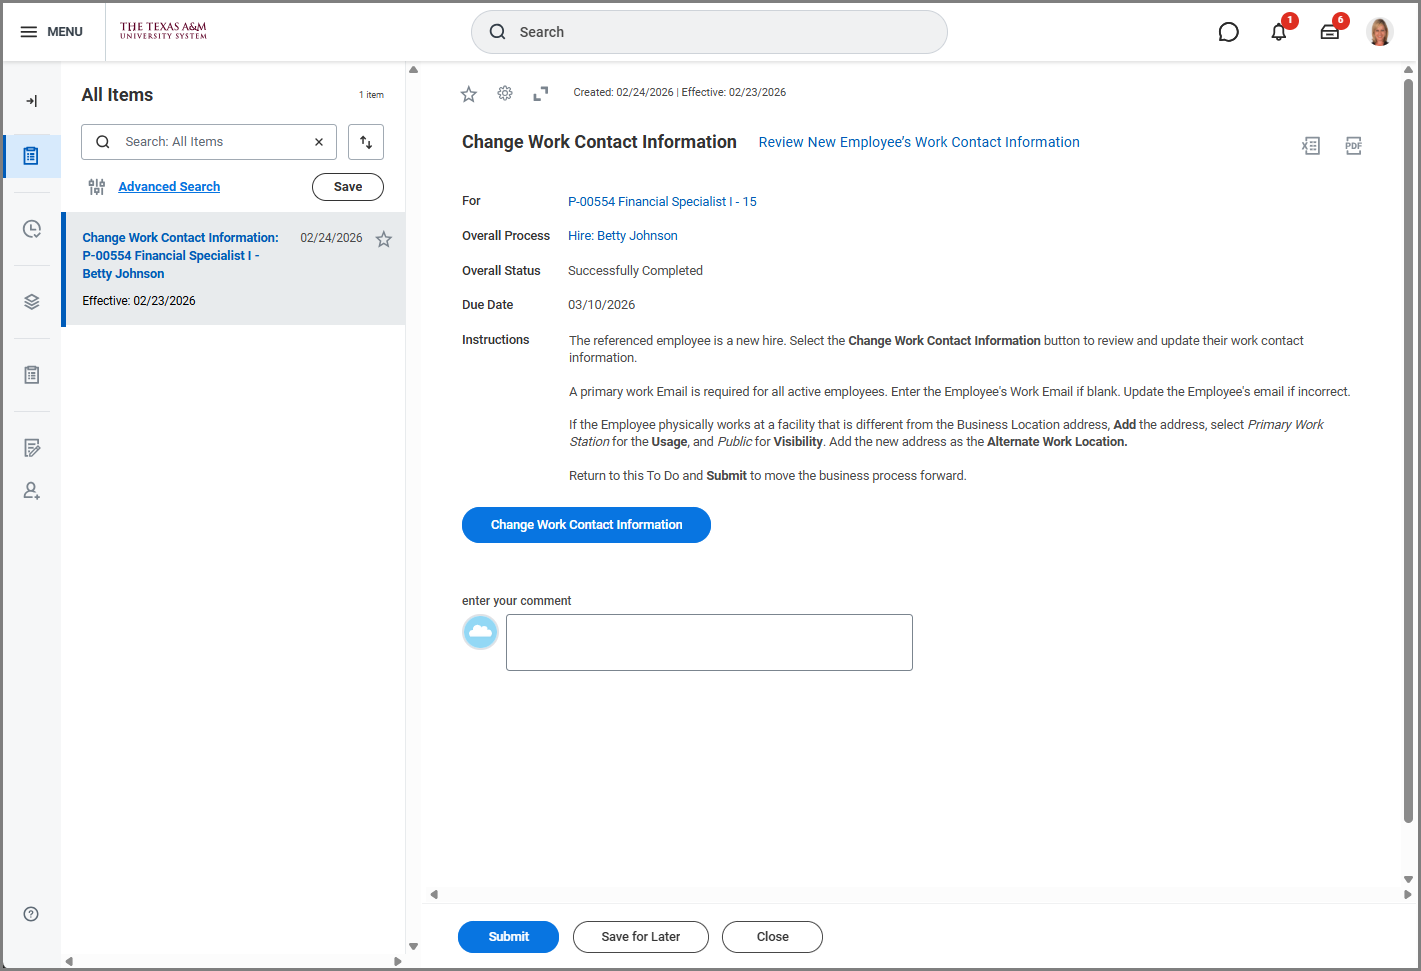
To Do: Review New Employee's Work Contact Information (HR Partner or HR Contact)
The HR Contact or HR Partner will review or add a primary work email for the Employee. If the Employee physically works at a different address than the Business Location address, a new address can be added and selected as their Alternate Work Location.
- Navigate to your inbox and select the To Do: Review New Employee’s Work Contact Information.
- Read the directions and complete tasks in the To Do as instructed.
- Return to the To Do and select Submit to move the business process forward.

Additional Resources
Additional Information
An email containing login credentials to SSO will be sent to New Hires after the Hire process completes and a successful record is received by SSO from Workday. Rehires will not receive an email. An SSO Central Administrator can reset an SSO password for Rehires if needed.
Trouble Shooting Tip
Scenario
The Hire business process was initiated from Recruiting. The Check Duplicates step was skipped/missed during Onboarding, therefore the Candidate was not merged with the Prior Worker Record.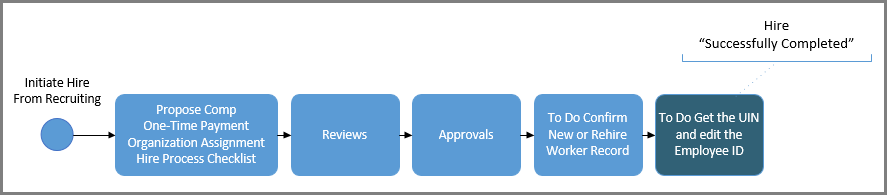
Remediation
- If the Hire event reached the “Successfully Completed” status, Workday Services will need to Rescind the Hire event and Delete the Pre-Hire record.
- If the Hire event is still “In Progress”, the HR Partner will Cancel the Hire event and Mark Pre-Hire for Deletion. HR will then email support@tamus.edu so Workday Services can Delete the Pre-Hire Record that has been marked for deletion.
The Candidate is now back in recruiting.
Next Steps
- Undo Move From Hire.
- Merge the Candidate and Prior Worker records.
- Then move the Candidate back through Ready For Hire.
Additional Tips
- Do not Merge any records until the Pre-Hire record is deleted by Workday Services.
- Using the Workday Inbox tasks to complete the Interview and Reference Check steps assures all steps in those individual processes are triggered.
- If a duplicate record does not appear in the Potential Duplicates list, there is a button at the bottom of the duplicate task that says “Merge with Other” that allows you to search for the record.