This job aid outlines the primary activities for various security roles during the Hire business process.
Hire (TAMU)
Last updated on March 14, 2026
This custom job aid is intended for TAMU, TAMUG, and TAMHSC.
Page Loading...Checking SSO..

Prerequisites
- The Position has been created in the desired Supervisory Organization with all required information (i.e., Employee Type, Job Profile, Time Type, Location and Pay Rate Type).
- The employing Supervisory Organization is responsible for ensuring appropriate approvals and budget authority prior to initiating any Hire event (including any additional approvals required beyond what is configured in Workday).
- When hiring through Workday Recruiting (Job Requisitions), the Candidate needs to be moved through the Ready for Hire stage by the Recruiting Partner before the HR Contact completes the Workday tasks in their inbox.
- The Laserfiche Onboarding Process has been initiated and any pre-hire requirements (background checks, prospective hire forms, and/or degree verifications) have completed. Laserfiche will notify the HUB’s shared email once the Employee reaches the HUB Process in Workday step indicating that the hire can now be entered into Workday.
Important Information
- The HR Contact should verify the UIN with the information they have in the HUB Review step in Laserfiche by using TAMUS UIN Search from SSO to search for ALL of the following (legal first name, legal last name, birth date, and social security number) to find possible matches to the individual. If the HR Contact is unable to verify the UIN, the Onboarding Specialist will verify or create the UIN in the OS Review step in Laserfiche. If a duplicate or incorrect UIN is used, the A&M System Office will need to take corrective action and the Employee may experience issues with their Onboarding tasks.
- If requesting a one-time payment for housing or moving expenses for a new Employee prior to the effective Hire date, the payment must be processed through your System Member’s financial accounts payable system. The Payroll Partner will need to enter the one-time payment as a Manual Payment in Workday.
- After the Employee is hired, the Hiring Manager will receive a notification for when the Employee can begin work.
- When hiring a former Employee the Worker Profile will retain prior assigned compensation. Remove the prior assigned compensation during the Propose Compensation business process during Hire and add the appropriate compensation for the Worker.
- For any Faculty, Staff, or Temp/Casual hires that are not initiated through Workday Recruiting (Job Requisitions) and are also not a U.S. person, the Hire business process will also route through an Export Control Partner for approval.
Getting Started
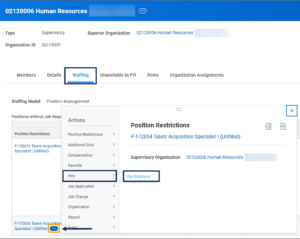
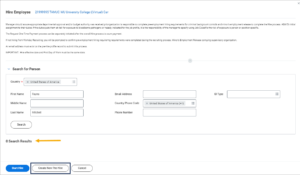
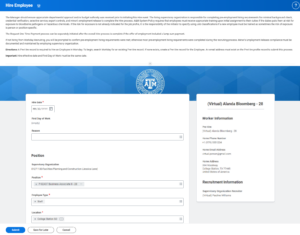
Locate the Position (HR Contact)
- Navigate to the Manager’s Supervisory Organization to find the open position.
- Select the Staffing tab.
- Select the Related Actions icon for the position and select Hire > Hire Employee.

Locate/Create Pre-Hire Record (HR Contact)
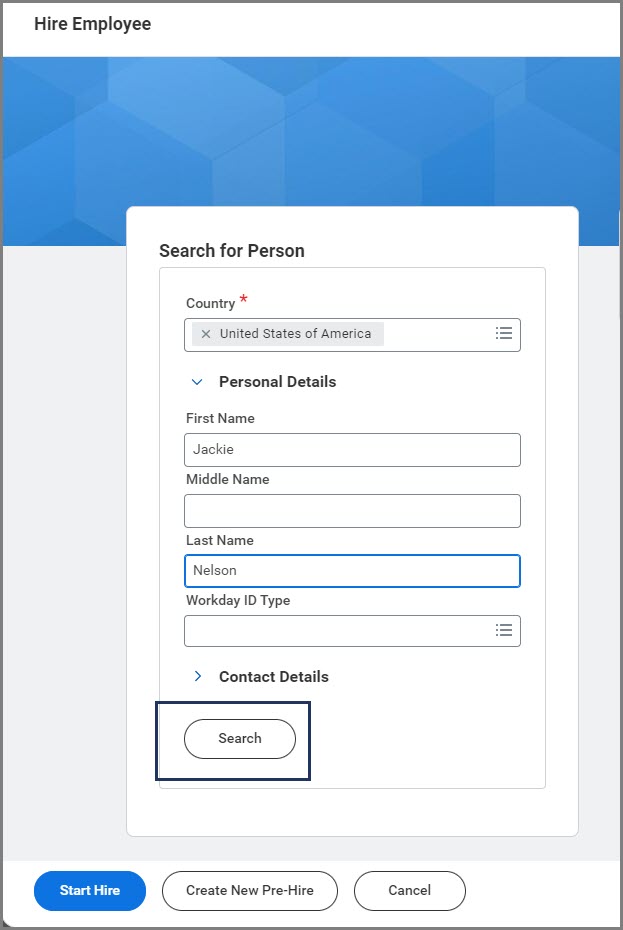
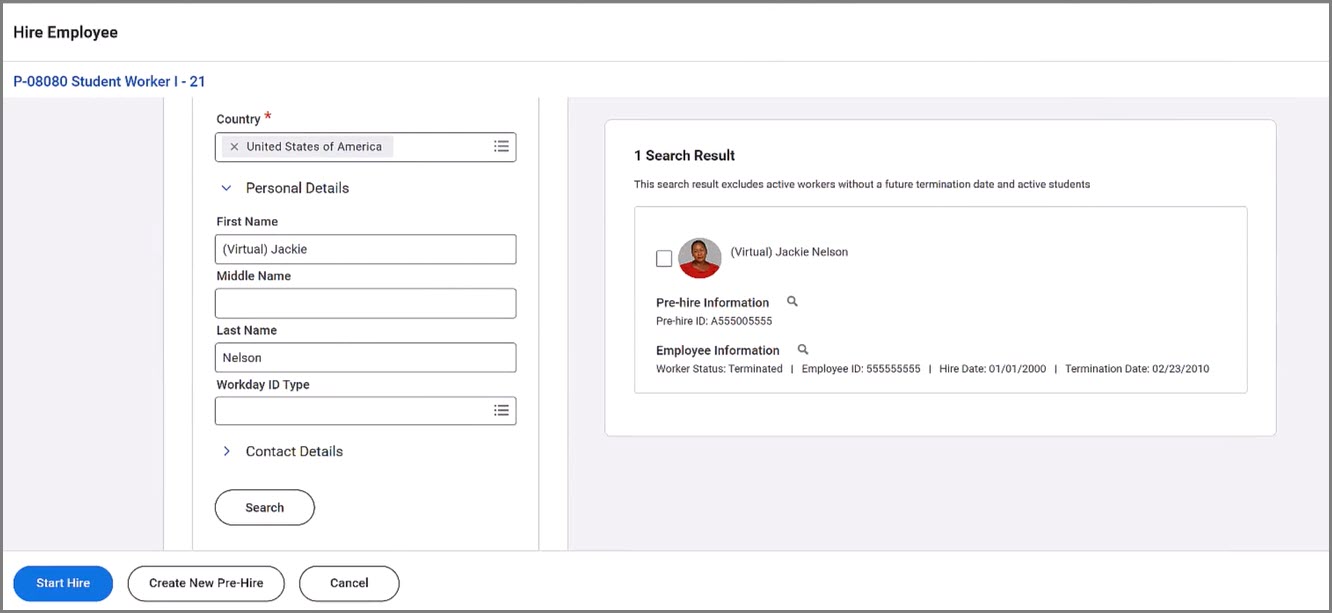
A Pre-Hire record is required to hire an Employee in Workday. First, you will search Workday for an existing Pre-Hire record. If none exists, you will create a Pre-Hire record for the Employee.
Important: If not hiring through Workday Recruiting, always remember to conduct a Global Search using the Workday Search Bar to ensure the individual does not already have a Pre-Hire, Employee or Contingent Worker record.
- Enter First Name, Last Name and select Search.

- After selecting the Search button, the details will automatically display. If you locate the correct Pre-Hire record, mark the checkbox for the appropriate record and be sure to document the Employee ID.
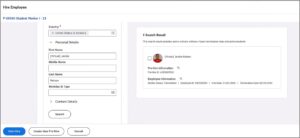 Important: You will need to provide the Employee ID to the UIN Partner later within the Hire Details.
 - Now select Start Hire. Then move to the Hire Details of this job aid to continue.
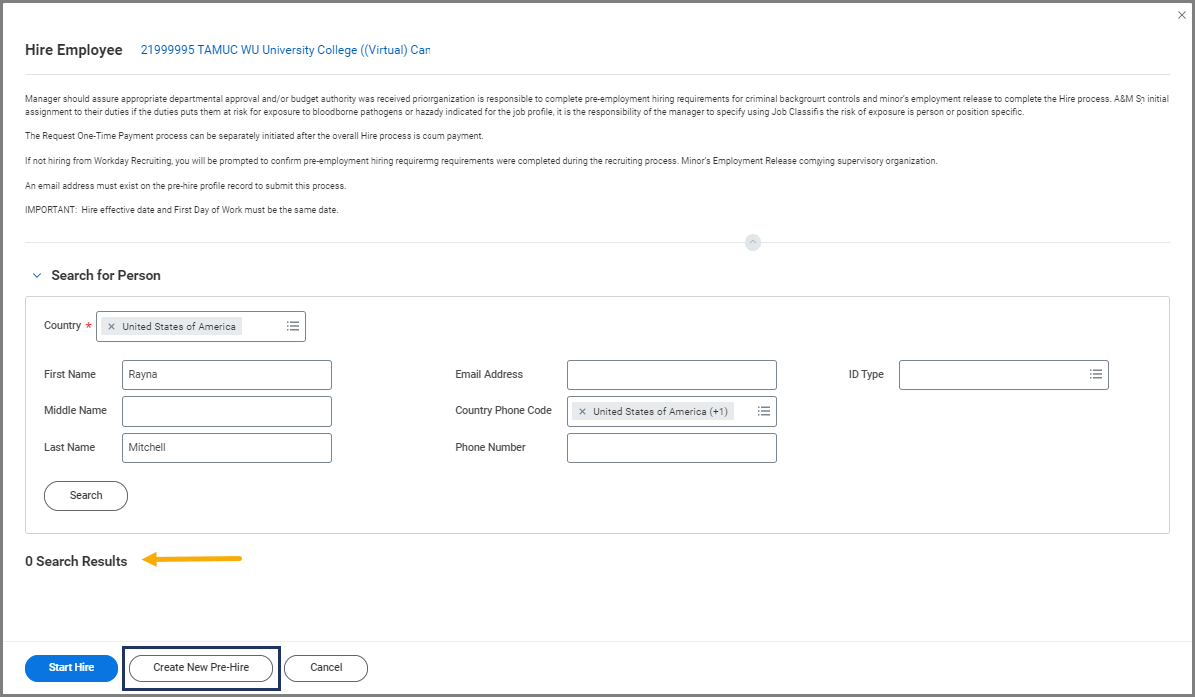
Pre-Hire Record Not Found (HR Contact)
If there are 0 results and you have exhausted all possibilities, or if the results do not include the individual you are looking for and you have exhausted all possibilities, select Create New Pre-Hire. Otherwise, proceed to the next section called Hire Details.
- On the Legal Name Information tab, add a First Name and Last Name. (Ensure you are entering in the Employee’s correct Legal Name when creating this record. Enter in the name as it appears in UIN Search.)
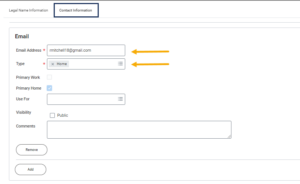
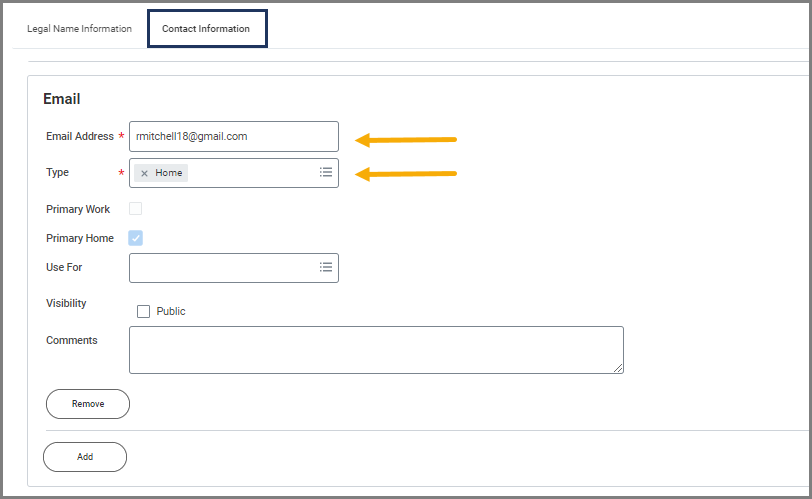
- On the Contact Information tab, Email is the only required field. Enter the email address and select OK.
- On the next page, the position will populate for the Pre-hire. Select OK to begin.
Hire Details (HR Contact)
- Enter the effective Hire Date and the Reason for the hire.
- Hire > New Hire is most commonly used for any Employee being hired that does not fall into the other situations below.
- Hire > New Hire – Benefits at Hire. This option is not recommended since the Employee most likely will not have a decision regarding their benefit elections.
- Hire > Transfer from a Texas State agency, college or university is used when the hire is transferring from a different state agency without a break in service (e.g., they are ending employment with Texas Department of Criminal Justice on 10/15 and starting with Texas A&M on 10/16).
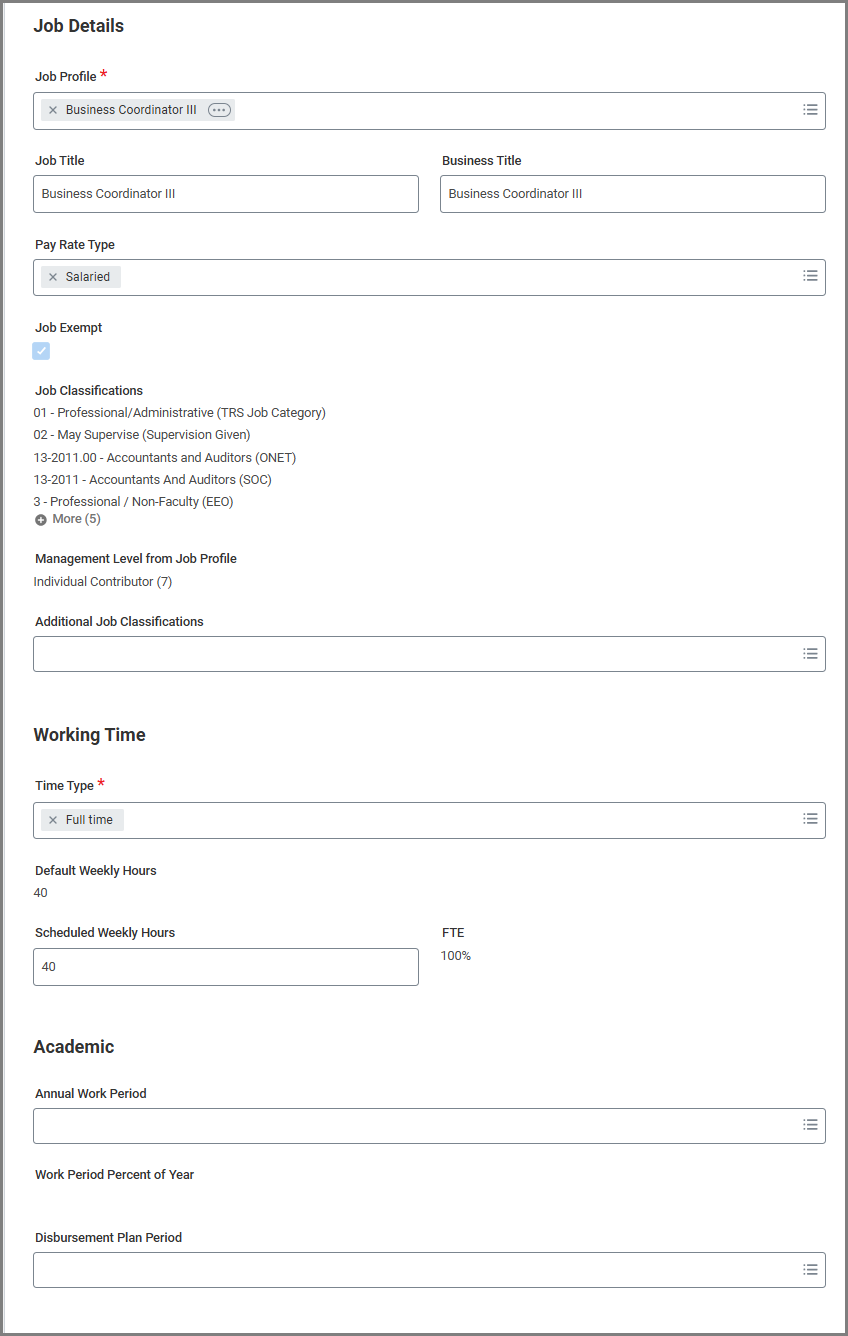
- Under Job Details, select the position the Employee should be hired into and then verify the information is accurate. The Employee Type, Job Profile, Time Type, Location and Pay Rate Type fields are automatically populated from the selected position and are required.
- Under Working Time, update the Employee’s Scheduled Weekly Hours (If they are a part-time Employee, their Default Weekly Hours will be 40 and you will enter in their expected hours worked per week in the Scheduled Weekly Hours section. This will update their FTE%.) Be advised: You should not adjust the Default Weekly Hours.
- Update any items on the rest of the page that need to be changed:
- Job Title. This will update based upon the position selected.
- Business Title. If you want the Employee’s title to be more defined, you can change this from the job title to a more appropriate working business title that will show up under their name in Workday (e.g., Job Title: Student Technician, Business Title: IT Student Technician).
- Annual Work Period. Use the Annual Work Period that was entered into the Laserfiche Hire/Onboarding Request. The Annual Work Period can be from as little as 1 month to 9 months (a regular academic year), to 12 months (standard for Staff). For questions regarding a Faculty hire, please contact the HROE Faculty Liaison at HRnetwork@tamu.edu. For Graduate Assistant Work Period questions, reach out to grad-employment@tamu.edu
If the Employee is in a temporary/casual position, the Annual Work Period should be updated to cover the appropriate time the temporary/casual Employee will be working. - Disbursement Plan Period. This must match what is selected for the Annual Work Period.
- Additional Job Classifications. This last field is used to override or add job classifications on the position if needed.

Important: For positions that require risk training, be sure to select the Exposure Risk Training if the job classification is not already assigned at the Job Profile level. Any secondary positions will need to have an Overtime Flag added. Questions regarding which flag should be used can be sent to Class & Comp at hrcomp@tamu.edu.
-
- End Employment Date. A date must be entered in for any Temporary/Casual Staff positions. This date does not terminate the Employee and the termination business process needs to be submitted as normal.
- In the comments section, include the new hire’s Laserfiche Instance Number along with the Costing Allocation Comment Template that the HUB receives from Laserfiche in their email/ticketing system at the HUB Review step for the Employee. Ensure you have copied everything including the UIN so that the UIN Partner is able to review later in the process. The UIN can be found in the Laserfiche Onboarding process at the Hub Review step, by searching for it in UIN Search, or it has been created in the Laserfiche process by the UIN Partner.
- Select Submit.
Navigate to the Up Next tab for the next steps in the process.
Up Next
Propose Compensation Hire (HR Contact)
The HR Contact will receive the Inbox action item to Propose Compensation Hire. Fields will default from the Position Restrictions, if they exist for this position.
- Navigate to your Inbox.
- Select the Propose Compensation Hire action item.
- Review the Default Compensation. If no changes are needed, select Submit. If changes are needed, select Make Changes.

- Edit the Salary or Hourly section, as needed. When you adjust the Amount, Amount Change, or Percent Change fields, Workday automatically calculates the other two fields. Do not add or change the additional details section, which includes adding an end date to the compensation.
- Select Save.
- To add a Plan Assignment, such as an Allowance, select the Add Plan Assignment button.
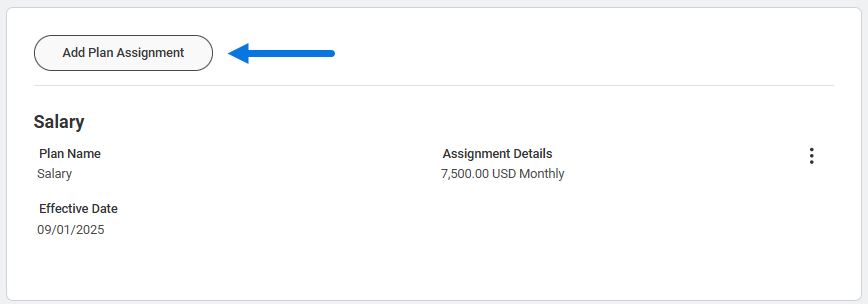
- The Add Plan Assignment slide-out will appear on the right.
- Compensation Plan Type. Select Hourly, Allowance or Merit.
IMPORTANT: Merit should not be added during the Request Compensation Change business process unless coordinated with the designated Merit Partner during the annual merit process.

-
- Compensation Plan. Select the type of allowance (e.g., Communication Allowance, Department Head Stipend, Temporary/Interim Increase, etc.).

- Select OK.
- On the next screen add the plan details:
- Amount. This is where you enter the monthly amount of the allowance being offered.
- Currency. This will always be set to USD.
- Frequency. This will always be set to Monthly.
- Additional Details. Selecting this will reveal optional fields.
- Expected End Date. This field will not terminate payment, it is only entered to indicate when you expect the payment will need to end.
- Actual End Date. Any date entered here will automatically terminate all payment on that date. It will remove the entire compensation plan for the Employee.
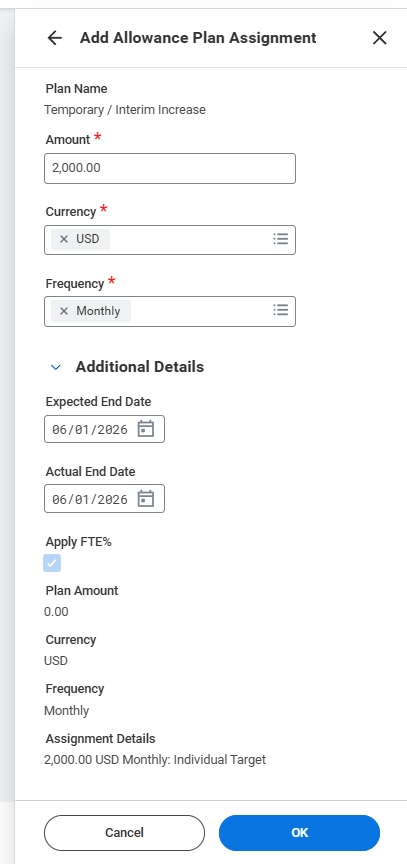
- Select OK.
- Select Submit.
Once submitted, the Propose Compensation Hire inbox item will be archived.
Change Organization Assignments (HR Contact)
The business process will route to the HR Contact to Change Organization Assignments. Review the Company and System Member Part fields, which will default from the Position Restrictions. In most cases, no changes are needed.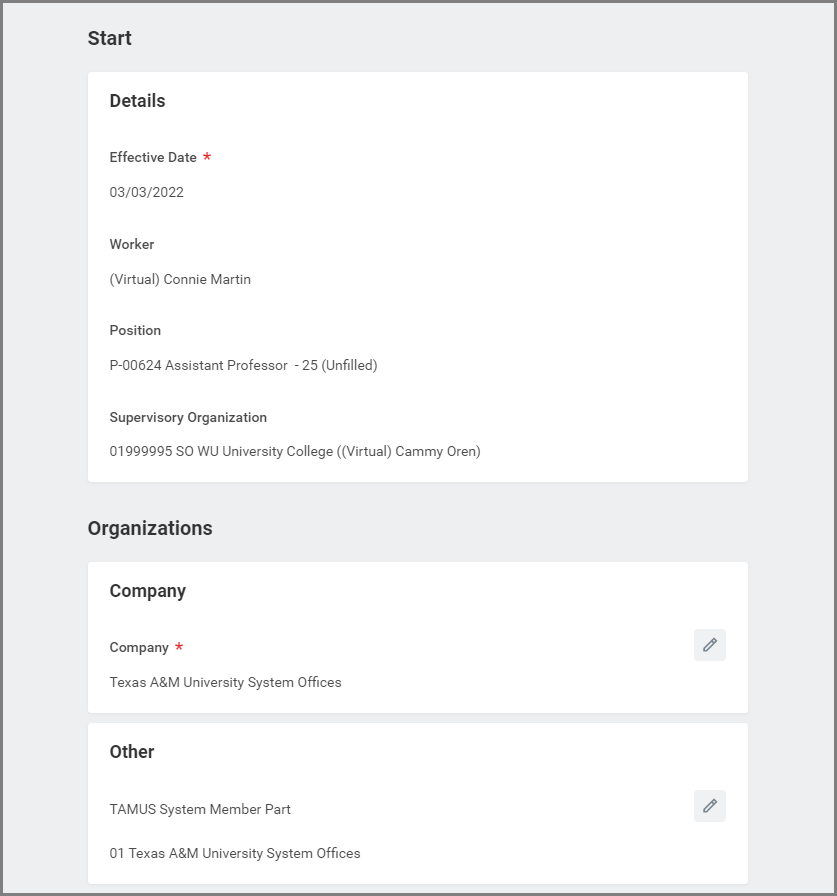
Approvals will then be routed to the Hiring Manager, UIN Partner, Budget Contact, Cost Center Approvers, Payroll Partner, HR Contact, then the Employee will receive their Onboarding tasks. Additional Job Classification change to MSO Code will route to the HR Partner for review.
Is Candidate a U.S. Person? (HR Contact)
The HR Contact will receive a Complete Questionnaire task asking if the Employee is a U.S. Person. Select Yes, No, or Unknown at this time. It may route for additional approvers if necessary.
To Do: Confirm New or Rehire Worker Record (UIN Partner)
This To Do directs the UIN Partner to confirm whether the individual currently undergoing the Hire process has been entered in correctly in Workday. If an existing individual was duplicated by creating a new Pre-Hire record, the Hire process will be canceled immediately, and the To Do will not be submitted.
The UIN should have been entered into the comments section for the UIN Partner to review and confirm the action. If the UIN Partner has any questions regarding the hire, they will reach out to the HR Contact to confirm details regarding the Employee. It is important to respond to the UIN Partner quickly to avoid delays the hire of the Employee.
By submitting this To Do, the UIN Partner completes the Hire process. It is important to clarify any doubts prior to hitting submit. Conducting a Global Search in Workday using the UIN can help to confirm.
- Open the To Do: Confirm New or Rehire Worker Record.
- Follow the instructions of this To Do carefully.
- Select Submit.

Important: If the rehire was hired as a new hire, and the person is shown to exist in Workday, the UIN Partner will cancel the Hire process.
To Do: Get the UIN and edit the Employee ID (UIN Partner)
The UIN should have already been verified or a new one created if not found in Workday or UIN Search. Once the Hire is confirmed, the Pre-Hire becomes an Employee and an Employee ID is assigned to their record in Workday. The UIN Partner updates the Employee ID to the UIN on record for the Employee.
Important: The To Do should NOT be submitted until the Edit System ID task has been completed as described below.
- Open the To Do: Get the UIN and edit the Employee ID.
- Follow the instructions of this To Do carefully.
- Navigate to the Employee’s Worker History and select Edit System ID.

- In the Employee ID field, replace the Workday generated Employee ID with the UIN provided by UIN manager. Note: If you find that the Worker already has a UIN in the Employee ID field, no action is needed. This individual is a rehire.
- Select OK and continue.
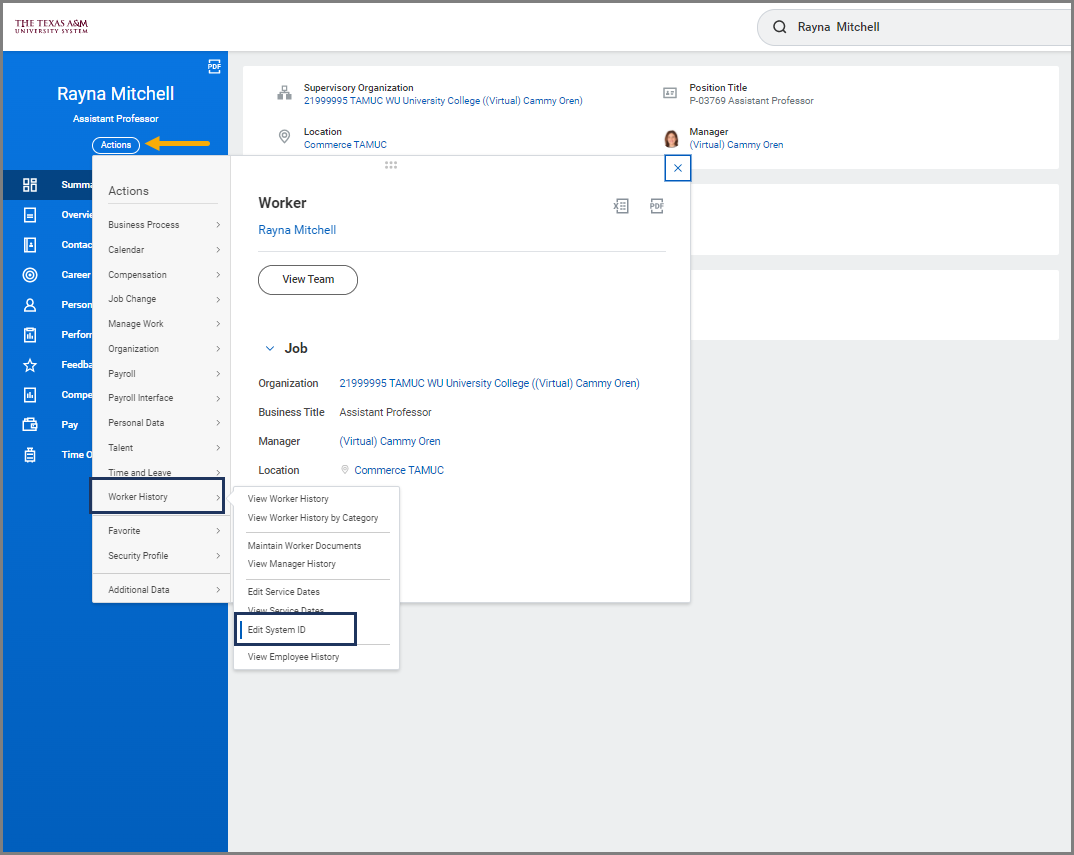
ERROR: This ID already exists! If you receive this error, stop. Do NOT hit submit on the To Do. The Hire business process must be rescinded immediately. This error means it is a duplicate Pre-Hire record for this individual in Workday and must be fixed.
- Return to the To Do in your inbox, enter the UIN in the comments box and select Submit.
Important Reminders for this To Do
- Do not hit submit until you are sure the UIN has been updated in Workday. Selecting Submit without completing the instructions listed on the To Do will cause many downstream issues
- An email with SSO login credentials is sent to New Hires after the Hire business process completes and a successful record is received by SSO from Workday. Note: The hire effective date must be 60 days or less in the future. Rehires will not receive an email.
Important: The Employee’s Workday account has been created.
Assign Costing Allocation (Budget Contact)
- Navigate to your Inbox and select the Costing Allocation for Hire action item.
- On the Assign Costing Allocation for Hire page, select Worker and Position for Costing Allocation Level.


When completing Assign Costing Allocation as a sub process of Hire, you should only select Worker and Position. If you select Worker, Position, and Earning, the costing allocation will only affect a specific earning type such as cell phone, housing or car allowance. It will not be assigned to the Worker or position. Costing allocations for the Worker may differ than those originally set for the position when it was created.
Refer to the reference guide Costing Allocations for an overview and/or the job aid Assign Costing Allocations for detailed information.
- You can check the box for Copy Position Restriction Costing Allocations to use the same information as what is assigned to the Position Restrictions. You can also use this method to populate information and then edit for greater efficiency.
Important: You are now assigning costing allocations to the Worker as opposed to the position itself. Costing allocations assigned to the position may differ from what was decided later to assign to the Worker upon hire.
- Select Add to begin.
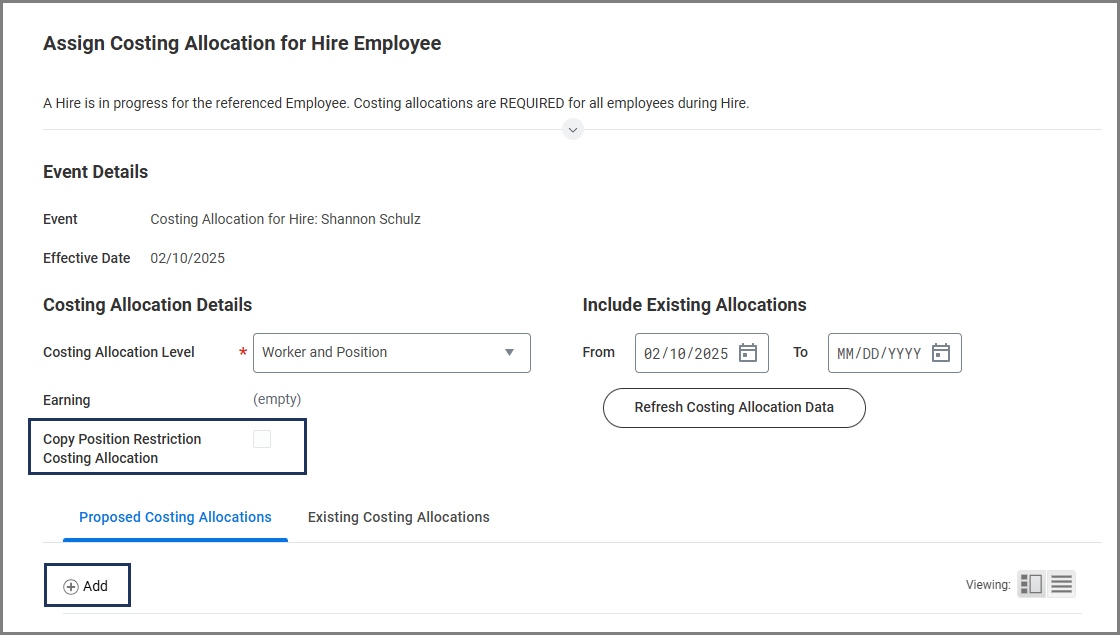
Note: When you select Add to add a cost set, a row automatically appears to select the Worktags.
- Complete the following:
- Start Date. This date indicates the first date that the salary / wages will be charged to the designated cost center. The entire pay period must have a costing allocation(s), regardless of an Employee’s hire date or termination date.
- Monthly employees: Costing allocations should begin on the first calendar day of the month (e.g., 01/01, 02/01, 03/01), not the first business day, regardless of the hire date.
- Biweekly employees: Costing allocations should begin on the first day of the biweekly pay period, which always starts on a Sunday, regardless of the hire date.
- To view pay schedules, refer to the Payroll Processing Calendars.
- End Date (optional). This date indicates the last date that the salary/wages will be charged to the designated cost center. It is best to leave this field blank until you need to make a new cost set. Costing allocations for both monthly and biweekly employees should ideally be open-ended, with the following exception:
- If you use end dates on accounts (ex. grant-funds), ensure the costing allocations cover the entire pay period in which the Employee is paid.
- For monthly employees, if the Annual Work Period ends on 05/15, the costing allocation should extend to 05/31 (the last day of the pay period).
- For biweekly employees, if the Annual Work Period ends on 05/15, the costing allocation should extend to the last day of that two-week pay period.
- Aligning the start and end dates of costing allocations with pay periods prevents funding from being split.
- If you use end dates on accounts (ex. grant-funds), ensure the costing allocations cover the entire pay period in which the Employee is paid.
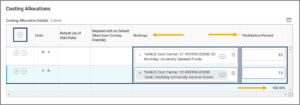
- Worktags. Select the Prompt icon to select the TAMUS cost center (FAMIS account) from which this position will be paid. One or more cost centers may be needed. Projects are searchable from this field, but should not be selected.
- Distribution Percent. This will default to 100%.

- Start Date. This date indicates the first date that the salary / wages will be charged to the designated cost center. The entire pay period must have a costing allocation(s), regardless of an Employee’s hire date or termination date.

Important: You cannot leave the Worktags field blank. You will not be allowed to continue.
- If the position will be paid out of multiple cost centers, select the Plus Sign (+) icon to create a new row and add additional cost centers as needed. Designate the appropriate percentage for each cost center under the Distribution Percent column, ensuring that the percentages from all cost centers add up to 100%.
- In the event you need multiple cost sets for different time periods, you will need to enter an End Date for the previous cost set(s) so the dates do not overlap with the new cost set. Then select the Add button above the table. For the new cost set, repeat the steps above.

- Select Submit.

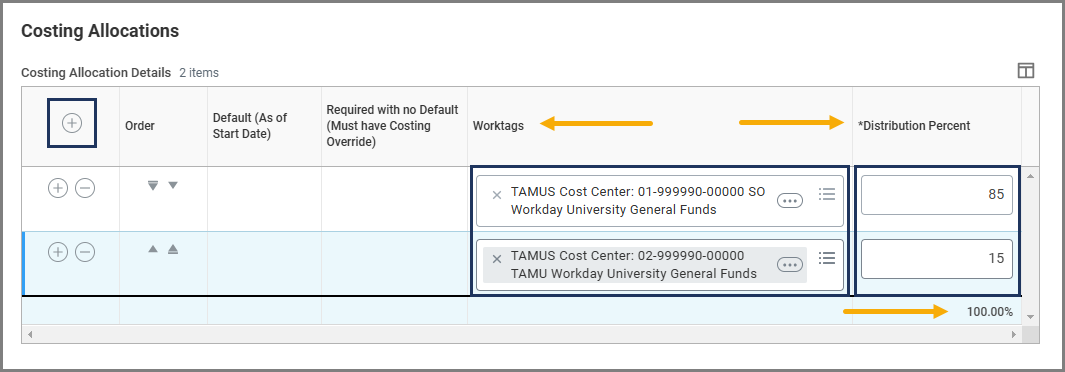
Assign Pay Group (Payroll Partner)
The Payroll Partner for the Supervisory Organization where the job is located will receive an Inbox action item to Assign Pay Group. If not completed in a reasonable amount of time, the HR Contact should email the Employee’s name and UIN to payroll@tamu.edu and request completion of the task. 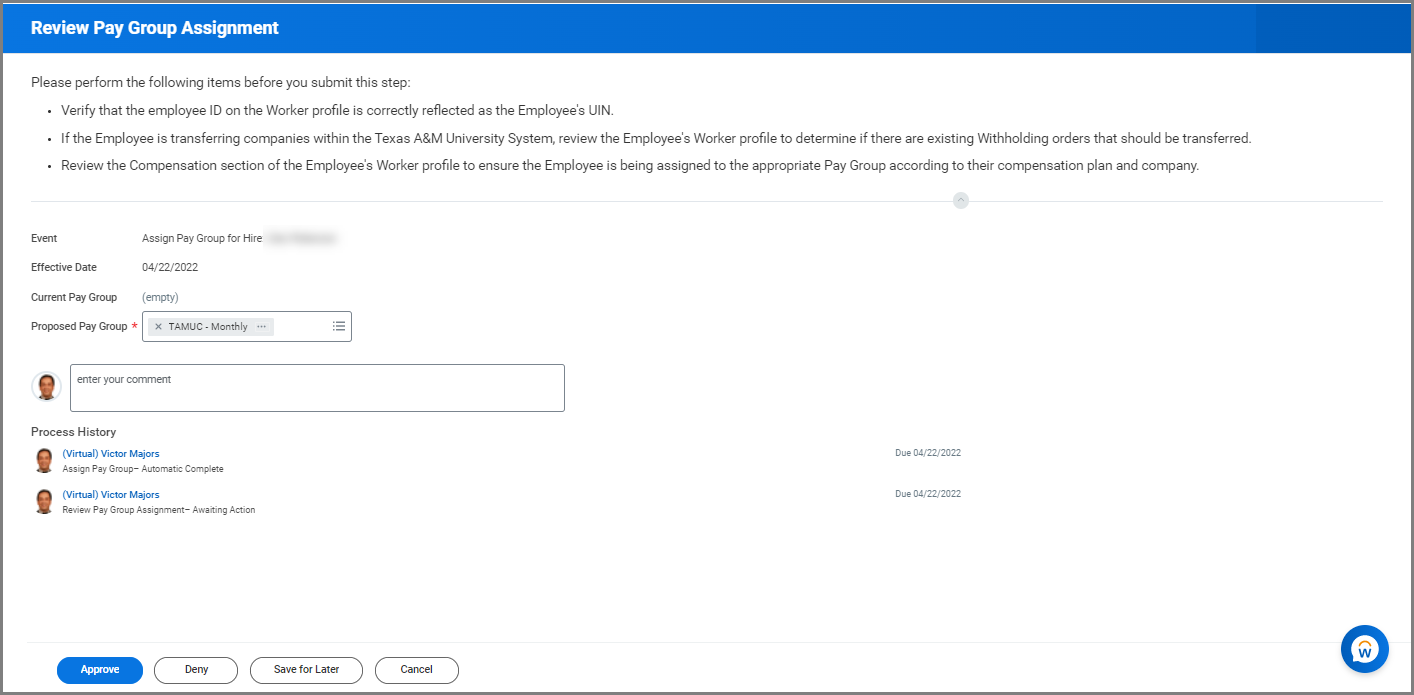
To Do: Record Background Check, Selective Service, Mail Stop, and Verify Education (HR Contact)
The HR Contact receives the To Do task. Three items need to be updated on the Employee’s Edit Other ID’s task before submitting this To Do.
- Update when the background check was completed.
Important: The Background Check being completed before submitting the Hire business process is a pre-requisite. Do not submit this step forward until this has been completed and documented.
- If the Employee is a male between the ages of 18-25, have they registered for selective service? Update when the Selective Service enrollment was verified for the new Employee or if it is not required.
- Update the Employee’s Mail Stop information. This is important for virtual parking permits to be issued and used correctly.
- Education Verification – not applicable. This information is retained outside of Workday.
- Navigate to your inbox and select the To Do: Record Background Check, Selective Service, Mail Stop, and Verify Education.
- Select the Edit Other IDs button in the To Do task and then select Submit. Additional information can be found in the Custom Other IDs reference guide in Workday Help.
- Return to the To Do and select Submit to move the business process forward.
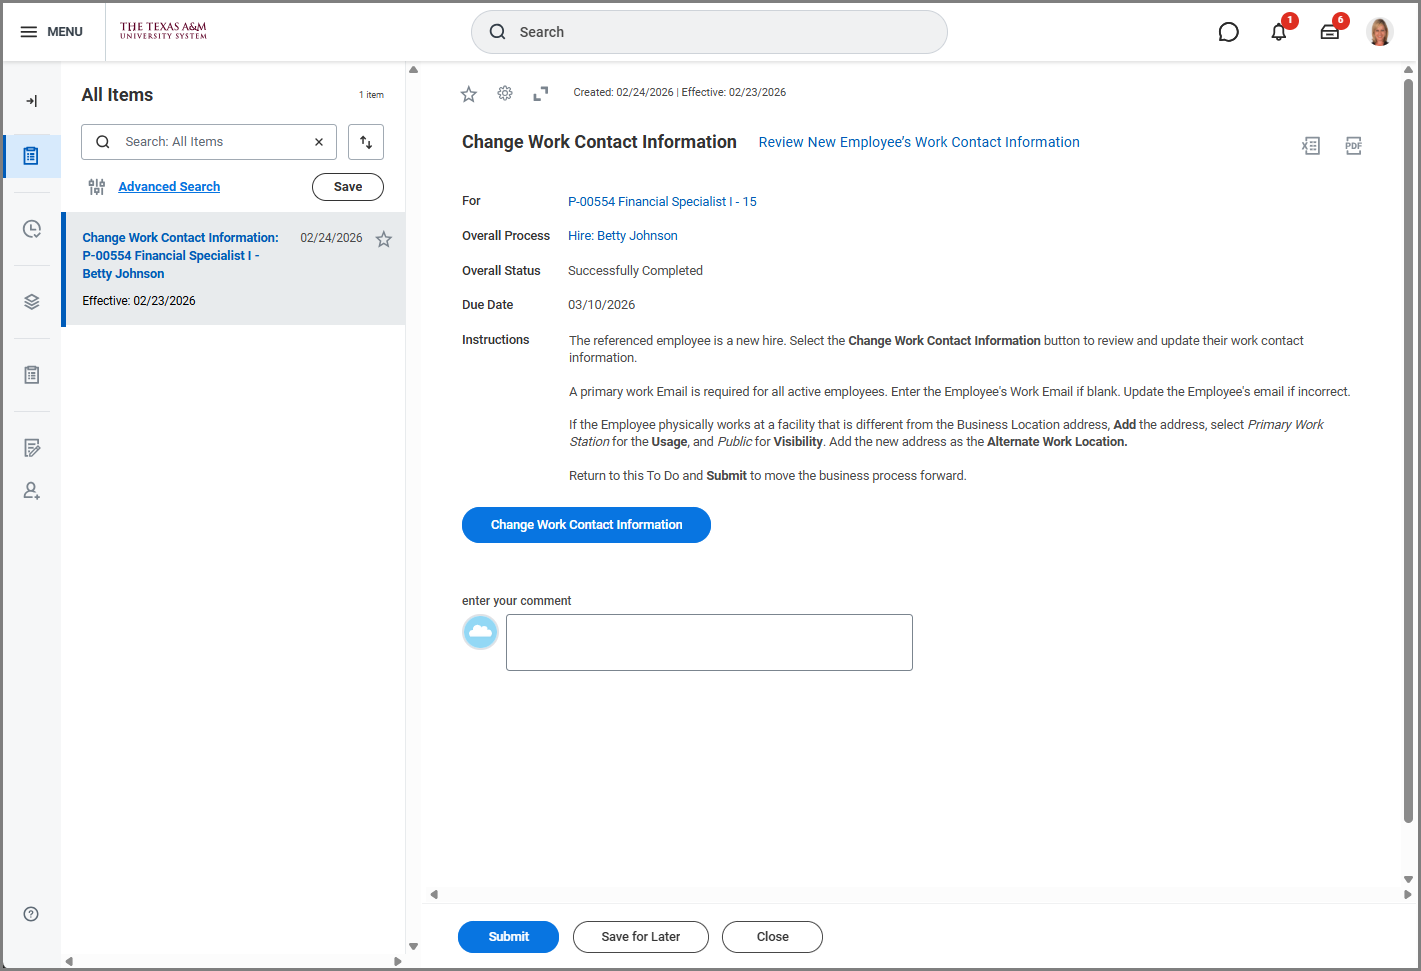
To Do: Change Work Contact Information (HR Contact)
The HR Contact will review or add a primary work email for the Employee. If the Employee physically works at a different address than the Business Location address, a new address can be added and selected as their Alternate Work Location.
- Navigate to your inbox and select the To Do: Change Work Contact Information.
- Read the directions and complete tasks in the To Do as instructed.
- Return to the To Do and select Submit to move the business process forward.

This completes the Hire Employee business process.
- The Employee will receive a To Do: Begin the Onboarding Process.
- The Hiring Manager and HR Contact will receive a notification that the Onboarding process in Workday has started. The Employee must complete the Form I-9 in order to be cleared to start working.
Additional Resources
Additional Information
An email containing login credentials to SSO will be sent to New Hires after the Hire process completes and a successful record is received by SSO from Workday. Rehires will not receive an email.
Trouble Shooting Tip
Scenario
The Hire business process was initiated from Recruiting. The Check Duplicates step was skipped/missed during Onboarding, therefore the Candidate was not merged with the Prior Worker Record. Reach out to Talent Management at jobs@tamu.edu if you have this issue.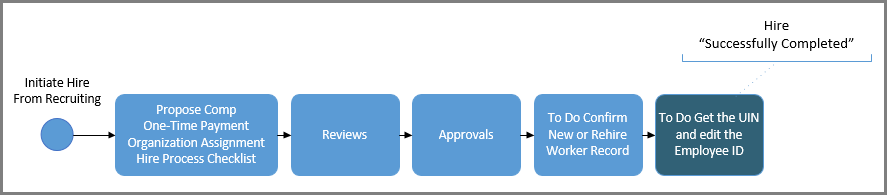
Remediation
- If the Hire event reached the “Successfully Completed” status, Workday Services will need to Rescind the Hire event and Delete the Pre-Hire record.
- If the Hire event is still “In Progress”, the HR Partner will Cancel the Hire event and Mark Pre-Hire for Deletion. Recruiting Partner will then email Workday Services to Delete the Pre-Hire Record that has been marked for deletion.
The Candidate is now back in recruiting.
Next Steps
- Undo Move From Hire.
- Merge the Candidate and Prior Worker records.
- Then move the Candidate back through Ready For Hire.
Additional Tips
- Do not Merge any records until the Pre-Hire record is deleted by Workday Services.
- Using the Workday Inbox tasks to complete the Interview and Reference Check steps assures all steps in those individual processes are triggered.
- If a duplicate record does not appear in the Potential Duplicates list, there is a button at the bottom of the duplicate task that says “Merge with Other” that allows you to search for the record.