This job aid outlines the activities necessary to set up the appropriate custom ID and initiate the Change Job business process for a Graduate Fellow who has been hired into a non-benefits eligible position.
Change Job (Graduate Fellow)
Page Loading...Checking SSO..

Important Information
- The Benefits Partner must add the Working Graduate Fellow custom ID before a job change is completed to move the Graduate Fellow into another job profile.
- The Working Graduate Fellow custom ID will ensure benefits are retained even if the new position is not benefits eligible. It will also be used for reporting purposes.
- Graduate Fellows do not receive SGIP and are billed for elected coverages.
Getting Started
Add the Custom ID (Benefit Partner)
The Benefits Partner will first add the appropriate Custom ID.
- Navigate to the Employee’s Worker Profile. Using the Action button select Personal Data > Edit Other IDs.

- In the Other ID Type table, select the Plus sign to add a new row for Working Graduate Fellow.
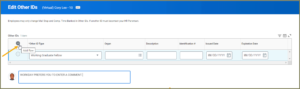
- Enter data for the following fields:
- Identification #. Y
- Issue Date. Hire date of the Fellow position
- Enter a Comment
- Select Submit

Initiate Change Job Business Process
The HR Partner, HR Contact or Manager should initiate the Change Job business process.
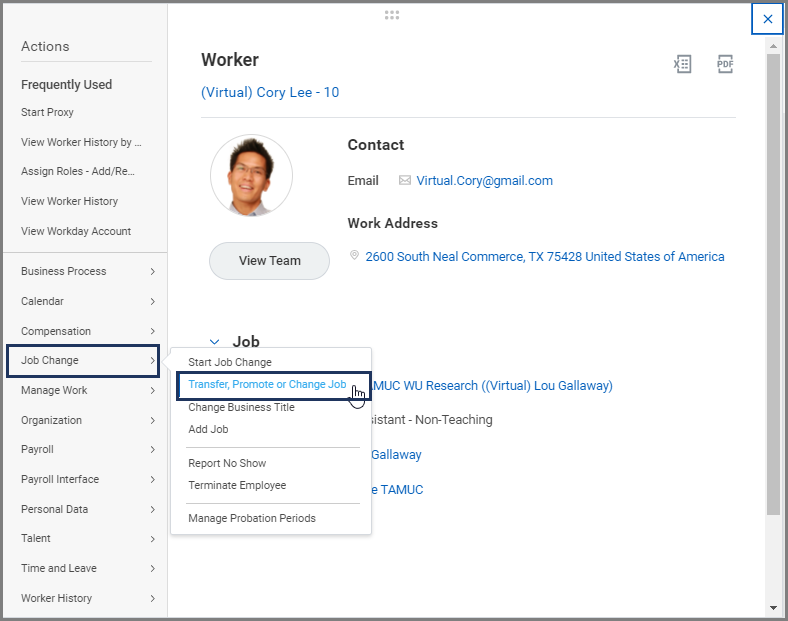
- Navigate the Graduate Fellow’s Worker Profile. Using the Action button select Job Change > Transfer, Promote or Change Job.

- Complete the required questions on the start page by selecting the Edit button.
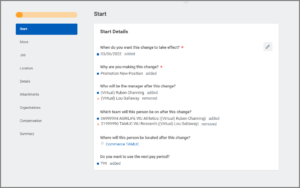
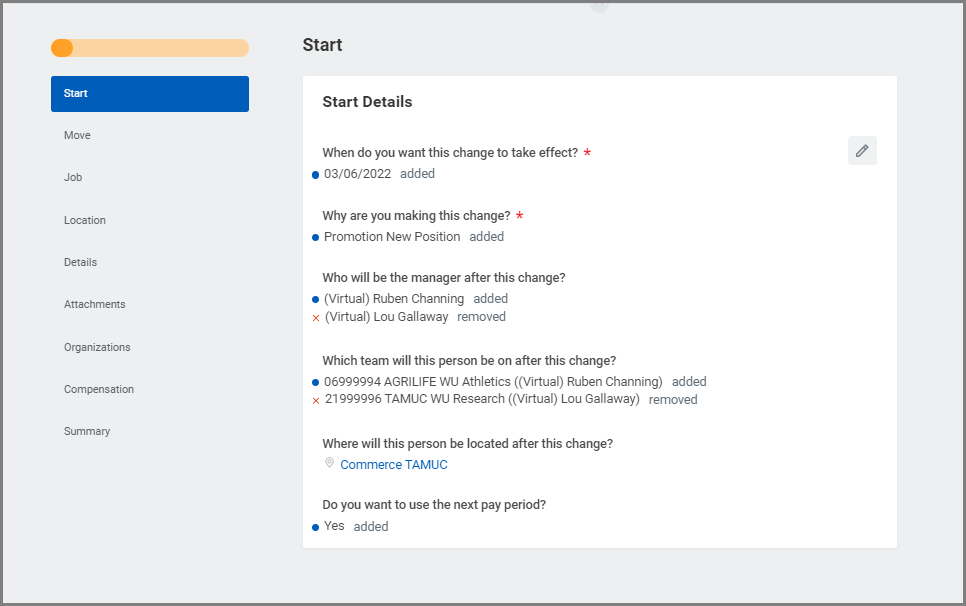
Note: Choose the most predominant reason if multiple actions are occurring in the business process. For this example, the transfer option was chosen.
- Save your changes and select Start.
- In the Move section, select the appropriate option for the question, “What do you want to do with the opening left on your team?”
Options include:
-
- I plan to backfill this position.
- Move this headcount to the new Manager.
- Close this headcount.

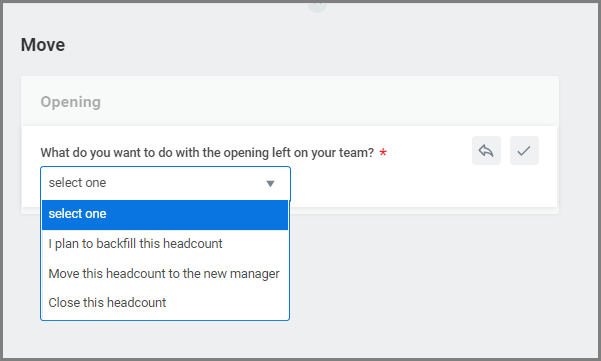
Notes: This section will only display when there is a change in Supervisory Organization for the Employee. Or this question may appear later if the person initiating the change is in the future supervisory organization.
- Select Next.
- In the Job section, add or edit information. If a new position does not exist, select the Create New Position checkbox. The checkbox displays when you edit the Position section
-
- Job Profile
- Job Title
- Business Title
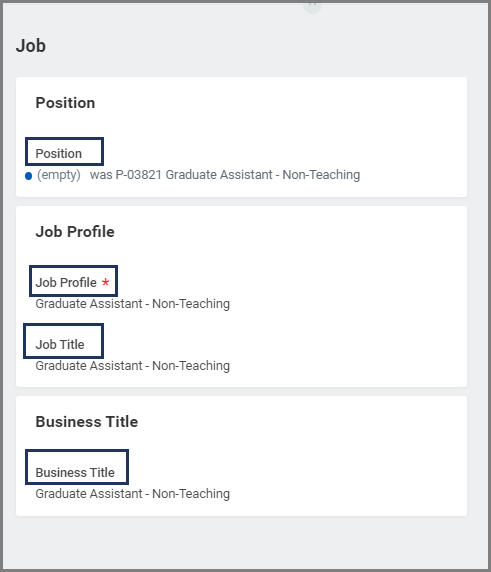
- Select Next.
- In the Location section, add or edit the following:
-
- Location. Location is the geographic city appended with the System Member Part abbreviation (not Company).
- Scheduled Weekly Hours
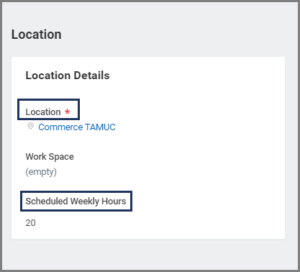
- Select Next.
- In the Details section, add or edit the following:
- Additional Job Classifications. This field will be used to override or add job classifications on the position if needed. IMPORTANT: For positions that require risk training, be sure to select the Additional Job Classifications: Exposure Risk Training, if the job classification is not already assigned at the Job Profile level
- Employee Type
- Time Type
- Pay Rate Type
- Annual Work Period. Must match Disbursement Plan Period
- Disbursement Plan Period. Must match Annual Work Period
- Default Weekly Hours. DO NOT CHANGE. This will always be 40.

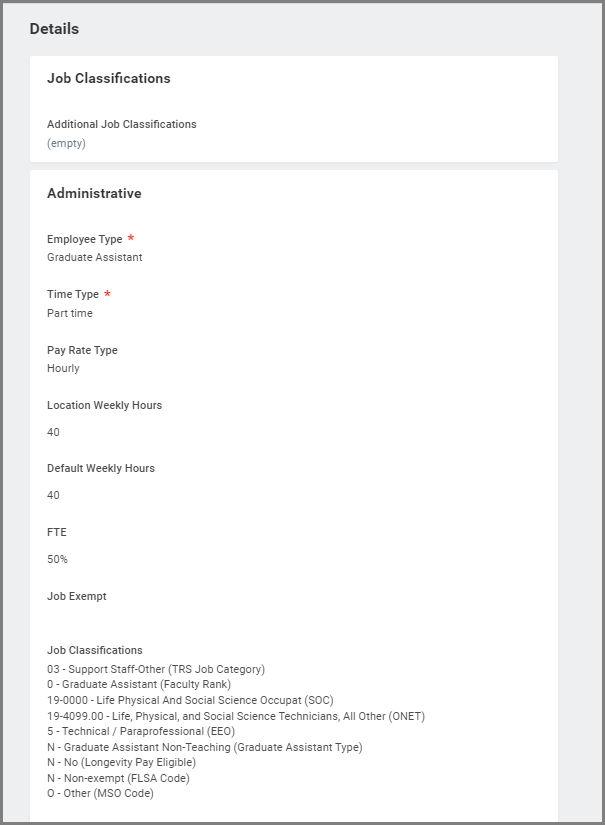
- Select Next.
- Add attachments if necessary and select Next.
- In the Organizations section, review and edit the Company and TAMUS System Member Part if needed and select Next.
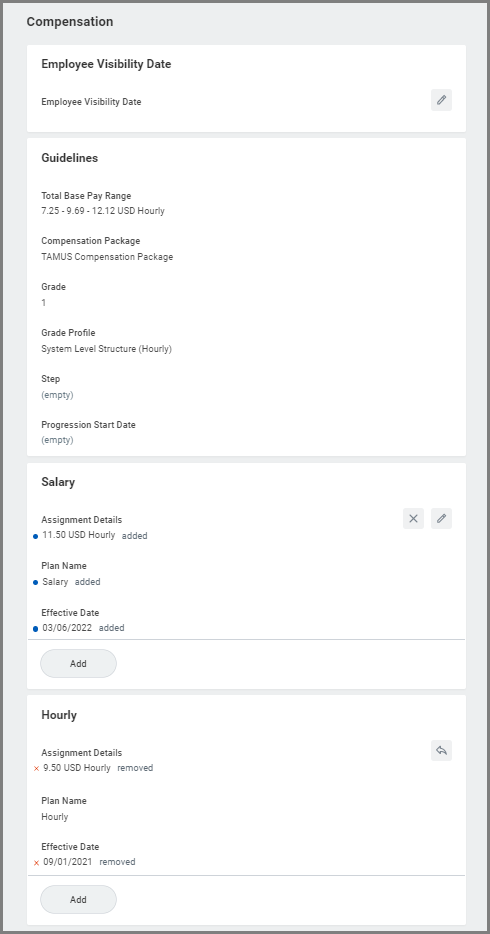
- In the Compensation section, add or edit the Employee Visibility Date, Salary, Hourly, Allowance and Merit Information. The Compensation Package and Grade Profile are guidelines to assist in determining the monthly or hourly plan amount
 Merit should not be added during the Change Job process unless indicated by the Merit Partner during the annual merit process.
 - Update Salary or Hourly sections as appropriate. Frequency for Salary plans should be updated from Annual to Monthly
- Select Next.
- Review the Summary section before submitting the process.
- Select Submit.
Navigate to the Up Next tab for next steps in the process.
Up Next
Offboarding Procedures
- The HR Contact or HR Partner will receive a To Do: Offboarding Procedure if there is a change in Location, Company or Supervisory Organization.
- The Absence Partner will receive the To Do: Determine Time Off Payout for Change Job to evaluate the potential payout for any Time Off balance.
- The HR Contact or HR Partner will receive a To Do: Other onboarding Procedures if the new job has location, company, or supervisory organization changed.
- The Payroll Partner will receive a To Do: Assign Pay Group if the worker’s new job position or pay rate type, or company changed.
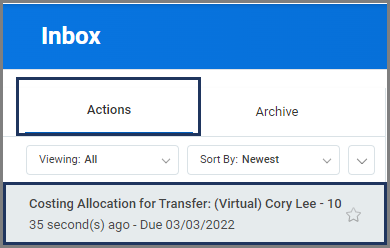
Assign Costing Allocation
The initiator will receive the Assign Costing Allocation if the worker is not changing Supervisory Organizations; otherwise, it is routed to the HR Contact supporting the new Supervisory Organization if the worker is moving to a different Supervisory Organization.
- Navigate to the Assign Costing Allocation for Change Job action item in your inbox.

IMPORTANT: If no changes to costing allocations are needed, skip this task using the gear icon. If no changes are made and the task is not skipped, this process routes to Workday Services causing a delay
- If changes are needed to costing allocations, select the Costing Allocation Level as Worker and Position.

- Enter the duration of the costing allocation.
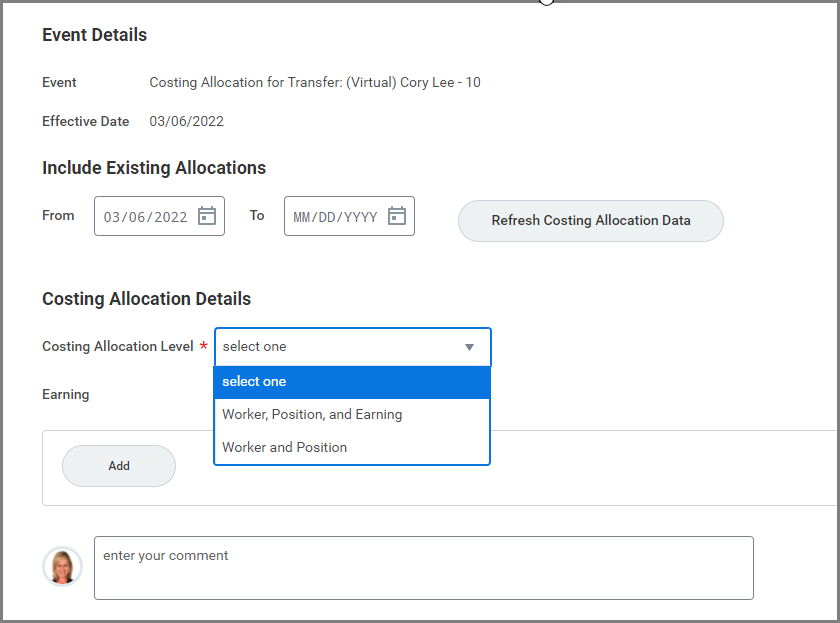
-
- Start Date This is the first date that the salary / wages will be charged to the designated account.
- End Date (Optional) This is the last date that the salary / wages will be charged to the designated account.
- Update the account number in the Worktags field (e.g., Business Computing Services) as needed.
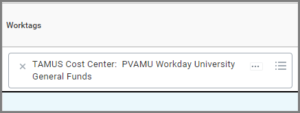
Note: Projects are searchable from this field, but should not be selected.
- Update percentages as needed. The Distribution Percentage will default as 100. To distribute percentages across multiple cost centers, select the Add Row icon and enter distribution percentage for each cost center.
- Select Submit.
Note: A change to either the Effective Date, Percentage or TAMUS Cost Center must be made in order for the business process to route.
For more in depth information on Assign Costing Allocation, see the Assign Costing Allocation job aid or the Costing Allocation quick reference guide on Workday Help.
Additional Potential Routings
- The I-9 Processor will receive the To Do: Complete Form I-9 in Guardian for Transfer or Additional Job if the business process results in a new Company for the Employee’s position.
- Next, the I-9 Partner will receive the To Do: Record Form I-9 Completed in Guardian. Refer to the Form I-9 Processing Quick Reference Guide on Workday Help for more details.
- The HR Contact or HR Partner will receive To Dos to Update Position Restriction Costing Allocation and Update Position Restriction Default Compensation on the vacated position if the vacated position is left open (Faculty, Staff or Graduate Assistant worker types).
This completes the Change Job (Graduate Fellow) process.