This job aid outlines the activities for a Manager or Timekeeper to assign a work schedule to an Employee they support. Details are also provided on how to create a work schedule if the available options do not meet the current needs of the Employee.
Assign Work Schedule
Last updated on January 13, 2023
Page Loading...Checking SSO..


Important Information
Work schedules do not impact an Employee’s pay.
Getting Started
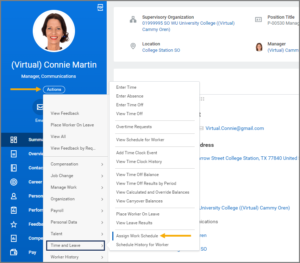
- From the Employee’s Worker Profile, select Actions > Time and Leave > Assign Work Schedule.

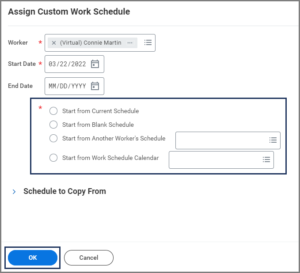
- In the Assign Work Schedule window, enter the Start Date for when this work schedule should be followed.
Note: An End Date is not required.
- Select one of four options to begin and then make changes as necessary:
- Start from Current Schedule. This option will copy the information from whatever the current schedule is for the Employee.
- Start from Blank Schedule. This option will provide a blank schedule from which you can build a custom schedule that will then become available to others to use in your Supervisory Organization. See the Start From Blank Schedule section of this job aid for specific details on how to use this option.
- Start from Another Worker’s Schedule. This option will copy another Employee’s existing schedule.
- Start from Work Schedule Calendar. This option will provide you a list of work schedules that currently exist that you can use.

Note: Select the drop-down arrow next to Schedule Copy From to see the selection you made in calendar form.
- Select OK.
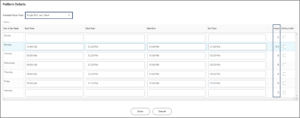
- On the Schedule Patterns table, select the Pattern Details button to make edits.

- Edit the Start Time, Meal Start, Meal End, and/or End Time for each day as needed. The total hours will be reflected at the end of the row for each day.

Note: The Schedule Pattern Type will default to Single Shift and Meal but you can also select Multiple Shifts and Meals from the drop-down menu. See the next section for more information.
- Select Done.
Start from Blank Schedule
After following Steps 1 – 2, select Start from Blank Schedule to begin creating a new work schedule for the Employee.
- On the Schedule Patterns table, select the Plus Sign (+) icon to add a new schedule pattern.
- Select the Pattern Details button at the end of the row.

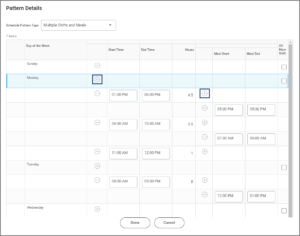
- Select the appropriate Schedule Pattern Type.
- Single Shift and Meal. Edit the Start Time, Meal Start, Meal End, and/or End Time for each day as needed. The total hours will be reflected at the end of the row for each day.

- Multiple Shifts and Meals. This Schedule Pattern Type allows for more customization. Select the Plus Sign (+) icon to the right of a day to add a shift. Select the Plus Sign (+) icon to the right of a shift to add a meal.

- Single Shift and Meal. Edit the Start Time, Meal Start, Meal End, and/or End Time for each day as needed. The total hours will be reflected at the end of the row for each day.
- Select Done.
This completes the Assign Work Schedule business process.
