This job aid outlines the process for an HR Contact to initiate the process to add an additional job for an Employee in Workday.
Add Additional Job (TAMU)
Last updated on March 14, 2025
This custom job aid is intended for TAMU, TAMUG, and TAMHSC.

Prerequisites
- Ensure Department Heads (or designees) in the departments are aware and in agreement with the Dual Employment of the Employee.
- Gather details for the Dual Employment template that will need to be included in the Comments section of the Add Additional Job business process.
- The Laserfiche Onboarding Process has been initiated and any pre-hire requirements (background checks, prospective hire forms, and/or degree verifications) have been completed. Laserfiche will notify the HUB’s shared email once the Employee reaches the HUB Process in Workday step indicating that the hire can now be entered into Workday.
Important Information
- If the additional job will be the Employee’s new primary job, first complete the Add Additional Job business process, then use the Switch Primary Job business process to designate the newly added job as the Employee’s primary position.
- If the Company assigned to the additional job is different than the Company assigned to the Employee’s primary position (AgriLife, HSC, Engineering, TAMU, TAMU Galveston, etc.), a new Form I-9 will need to be completed in Guardian. Refer to the Form I-9 Quick Reference Guide on Workday Help for additional details on Form I-9 processing.
- For questions regarding Overtime please refer to Overtime Calculation in Workday or contact hrcomp@tamu.edu
- The Employee is not eligible to start the additional job until the Add Additional Job business process has successfully completed.
Important: For positions that require risk training, be sure to select the Additional Job Classifications: Exposure Risk Training, if the job classification is not already assigned at the Job Profile level.
Getting Started
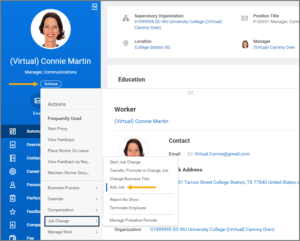
- Navigate to the Employee’s Worker Profile using their UIN and select Actions > Job Change > Add Job.
- Enter the name of the Supervisory Organization where the additional job is located.
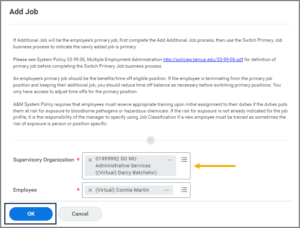
- Select OK.
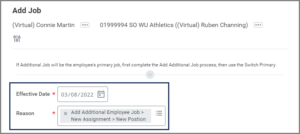
- In the next window, enter the Effective Date and Reason. For the Effective Date, follow HROE’s standard Onboarding/Hire Dates.
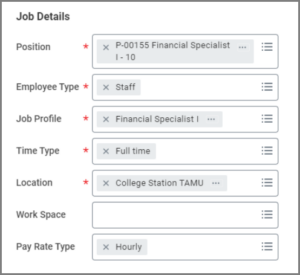
- Under Job Details, verify/edit the details populated in the following fields as necessary: Position, Employee Type, Job Profile, Time Type, Location, and Pay Rate Type. Update the Position, Pay Rate Type, and Scheduled Weekly Hours sections. Once a position is selected, the other items will automatically fill in with data from the position.
- Position. Select the position being added; the options will only display vacant positions under the supervisory organization originally selected that are available on the effective date indicated. Available options will be for vacant positions with and without job requisitions.
- Pay Rate Type. Hourly or Salaried.
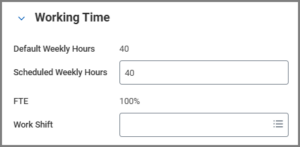
- Under Working Time, verify/edit the Scheduled Weekly Hours and FTE fields as necessary.
- Scheduled Weekly Hours. This will affect FTE; should be number of hours the Employee is estimated to work on a weekly basis.
- FTE. Will calculate based on Scheduled Weekly Hours and Default Weekly Hours. If Employee is scheduled for 20 hours and the default is 40, Workday will display 50% effort, etc.
- In the Additional Details section, complete the following fields:
- The Job Title, Business Title, and Job Classifications fields will be automatically populated from the selected position.
- Job Title. Should match Job Profile.
- Business Title. This is the working title of the position and may be different. This title will show up on the Employee’s Worker Profile and in job requisitions.
Note: The Employee’s title change should not be to another System-wide Pay Plan title or a title that reflects a higher level.
-
- Annual Work Period. Use the Annual Work Period that was entered into the Laserfiche Hire/Onboarding Request. The Annual Work Period can be from as little as 1 month to 9 months (a regular academic year), to 12 months (standard for Staff).
Note: To find an annual work period, type the number of months (3, 9, 10, etc.) you are looking for in the search field to return the available options. Once this is selected you will immediately get a red error because Workday will want you to select the Disbursement Plan Period.
Note: If the Employee is in a temporary/causal position, departments should update the annual work period to cover the appropriate time period worked.
-
- Work Period Percent of the Year. Will auto-populate based on the Annual Work Period and Disbursement Plan Period selected.
- Disbursement Plan Period. Must match the Annual Work Period.
- Job Exempt. This will be check marked if the position is exempt under FLSA.
- Job Classification. Cannot edit; details are pre-set based on the position.
- Additional Job Classifications. Select one of the following overtime flags:
- Exclude from Overtime. Hours from this job are not combined with other jobs for overtime purposes. Refer to the Overtime Flag section of the website for more information.
- Include in Overtime. Hours are combined for overtime. Refer to the Overtime Flag section of the website for more information.
Note: Classification and Compensation will discuss with department if positions are found to be eligible for exclusion and will update the overtime flag to exclude from overtime.
Important: For positions that require risk training, be sure to select the Additional Job Classifications: Exposure Risk Training, if the job classification is not already assigned at the Job Profile level.
-
- First Day of Work. The first day the Employee is working the additional job. The Employee is not eligible to start the additional job until the Add Additional Job business process has successfully been completed.
- End Employment Date. Required field for Temporary/Casual positions, but otherwise should be left blank.
Note: If the Employee is temporary/casual and working 20 hours or more per week, they can only work a maximum of 4.5 months.
-
- Exclude from Headcount. Can choose to do this if the Manager does not want to see workers who are doing additional jobs in their headcount reports which show the number of employees that work for them (some managers may only want to see full-time staff rather than temporary employees in a headcount report, for instance).
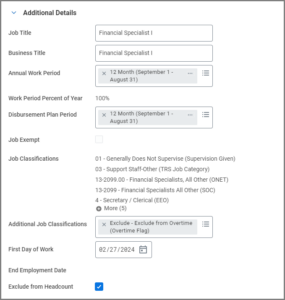
- Exclude from Headcount. Can choose to do this if the Manager does not want to see workers who are doing additional jobs in their headcount reports which show the number of employees that work for them (some managers may only want to see full-time staff rather than temporary employees in a headcount report, for instance).
- In the Comments section, include the new hire’s Laserfiche Instance Number, Costing Allocation information obtained from the Laserfiche Onboarding Process, and copy and paste the completed Dual Employment Comment Template for staff and student worker positions. This information is used to review the dual employment and determine if the positions should be combined for overtime or excluded from overtime.
- Select Submit.
Navigate to the Up Next tab for the next steps in the process.
Up Next
Propose Compensation Hire (HR Contact)
The HR Contact will receive the Inbox action item to Propose Compensation Hire. Fields will default from the Position Restrictions, if they exist for this Position.
- The Effective Date is not editable. It should be the date the additional job is effective.
- The Guidelines section will auto-populate. No changes should be made.
- Update the following as necessary:
- Compensation Plan (Salary or Hourly). Do not touch the additional details section, which includes adding an end date to the compensation.
- Amount (Pay Rate). Use the approved budgeted rate.
- Frequency (Monthly or Hourly). If the role is non-exempt, the frequency will be hourly. If the role is exempt, the frequency will be monthly. Information can be found at Job Descriptions. For a salary amount, the section will default to an annual frequency and this needs to be updated to be monthly including the amount.
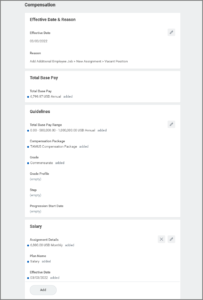
- After making your changes in the Salary section, ensure the salary listed in the Total Base Pay section at the top of the page is correct with your changes.
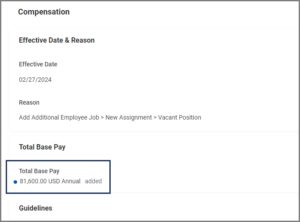
- Select Submit.
Review and Approvals
- The business process will route to the HR Partner. Once approved, the HR Partner will add comments (viewable in the Process tab of the additional job event) regarding how Overtime should be handled between both departments. Both Department Heads will receive a consolidated approval task.
- Additional Job Classification change to MSO Code will route to the HR Partner for review.
- If the employee is adding a job with a different system member, their HR Partner may receive approval.
Assign Costing Allocation (Budget Contact)
The Budget Contact receives an Inbox task to Assign Costing Allocation. Costing Allocations are required for all individuals employed in additional jobs. Refer to the reference guide Costing Allocations for an overview of Costing Allocations or the Assign Costing Allocations job aid for more information.
- Select a Costing Allocation Level.
- Select Add.
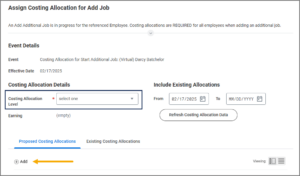
- Enter the duration of the costing allocation. Complete the following fields:
- Start Date. This date indicates the first date that the salary / wages will be charged to the designated cost center. The entire pay period must have a costing allocation(s), regardless of an Employee’s hire date or termination date.
- Monthly employees: Costing allocations should begin on the first calendar day of the month (e.g., 01/01, 02/01, 03/01), not the first business day, regardless of the hire date.
- Biweekly employees: Costing allocations should begin on the first day of the biweekly pay period, which always starts on a Sunday, regardless of the hire date.
- To view pay schedules, refer to the Payroll Processing Calendars.
- End Date (Optional): This indicates the last date that the salary/wages will be charged to the designated account.
- Worktags. Add the account number (e.g., Business Computing Services) as needed. One or more cost centers may be needed. This is a required field. It cannot be left blank. Projects are searchable from this field, but should not be selected.
- Distribution Percentage. Update as needed. To distribute percentages across multiple cost centers, select the Plus Sign (+) icon which will create a new row. The percentages from all cost centers must add up to 100%.
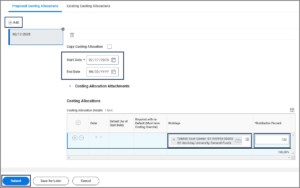
- Start Date. This date indicates the first date that the salary / wages will be charged to the designated cost center. The entire pay period must have a costing allocation(s), regardless of an Employee’s hire date or termination date.
- Select Submit.
Review Costing Allocation (Cost Center Approver)
If the Budget Contact entering the costing allocation(s) in the previous step is also the Cost Center Approver on the account(s) entered, this step will auto-complete. Otherwise, the Cost Center Approver receives an Inbox task, Review Costing Allocation for Start Additional Job.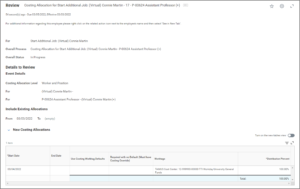
Assign Pay Group (Payroll Partner)
The Payroll Partner for the Supervisory Organization where the additional job is located will receive an Inbox action item to Assign Pay Group. If you are needing this step completed please contact payroll@tamu.edu with the Employee’s information and request that the Assign Pay Group tasks be completed.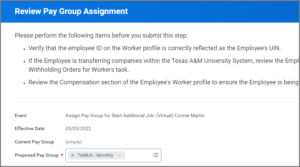
Other Onboarding Procedures (HR Contact)
The HR Contact receives the To Do Other Onboarding Procedures if the Company, Location or Supervisory Organization assigned to the additional job is different from the Company assigned to the Employee’s primary position.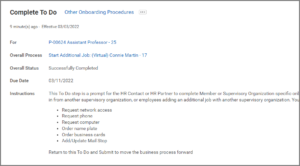
Other To Dos
- If the additional job is benefits eligible, the HR Contact receives the To Do to trigger the Edit Effective-Dated Custom Object event for the Employee. This will prompt the Employee to receive various onboarding tasks.
- The I-9 Processor will receive the To Do Complete Form I-9 in Guardian for Transfer or Additional Job if the company assigned to the additional Job is changed.
- The I-9 Partner receives a To Do to Record Form I-9 Completed in Guardian if the company assigned to the additional job is changed. Refer to the Form I-9 Processing Quick Reference Guide on Workday Help for more details.
- If the additional job is benefits eligible, the Benefit Partner receives the To Do Review Benefits Onboarding Questions and SGIP Date Driver.
This completes the Add Additional Job business process.

