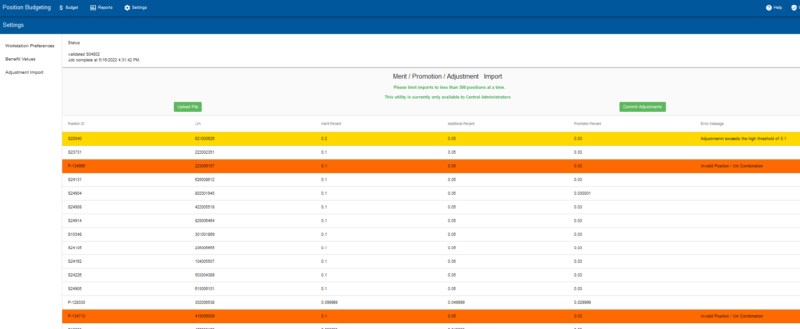
Adjustment Import
Central Administrator can upload/import a .csv file of rate adjustments into the application.
File Format
The file to upload must be of file type comma separated values (CSV) and contain the following columns as the first 5 columns:
- PositionID
- UIN
- Merit
- Additional
- Promotion
If the user wishes to add more columns, they may do so at their own discretion, but must be added after the first 5 required columns. The System Budget Office has a template that members can get. The first row of the file must be a header row. The values must be in the format of 0.000000. example: for 3.2579% the value in the file should be 0.032579.
Run the EDW00217-HCM Workday Merit Entry for Upload to PBA report located here: Public Folders/TAMUS Publications/Budget/2. WD/EDW00217
- Export the “Save as csv” tab in the report and save as a .csv file
- Upload to PBA
- Correct critical errors on .csv file and upload again to PBA
- Run PBA EDW reports to verify upload data is correct
- Save internal salary template as .csv file
- Upload to PBA
- Correct errors on .csv file and upload to PBA until no critical errors
- Runr PBA EDW reports to verify upload data is correct
- After entry is verified; email Sri and copy Kelli to process the EIB
The process of importing a file has three steps.
When the user presses the Upload button, they will be allowed to select only .csv files. When they select a file and click Ok, the file will automatically begin to upload. The process will skip the first row (the header row) and begin validating at the second row. The following validations are performed during the upload process:
- Rounding of the values to 6 decimal places
- Checks the values uploaded for errors
- Greater than 99% is a critical error (cannot be committed)
- Less than 0% is a critical error (cannot be committed)
- Greater than 10% is a warning (can be committed)
- UIN is currently in the Position
- User is authorized for the Position
After the validation process has occurred, the positions are sent back to the user’s screen so they can see if there were any problems with the validation process. If there were problems, the user can edit the CSV file and go through the upload process again which will overwrite what is on the user’s screen after the modified file is validated.
When the user is satisfied with the adjustments, they can click the “Commit” button. This will send the adjustments that are listed on their screen to the server to be saved and recalculated.
This process can take a while. There is a Status area at the top of the screen that will let the user know what is happening during the process. If the user leaves the screen, the process will continue.

