This job aid outlines the process for a Recruiting Coordinator or Recruiting Partner to create a job requisition and the Recruiting Partner to post the job on the internal and/or external career sites.
Create Job Requisition and Post Job
Page Loading...Checking SSO..

Prerequisites
The position should be created prior to creating a job requisition.
Important Information
- The Hiring Manager is responsible for assessing the resources needed to meet business targets and identifying requirements. After requirements for the position are defined, the creation of a job requisition initiates the recruiting process.
- Creating a job requisition will not post the job. Your Recruiting Partner must complete the Post Job business process for the job to be visible on any career site.
Getting Started
Initiate Create Job Requisition Process
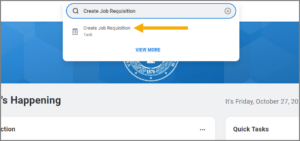
- Search for the Create Job Requisition task in the Search Bar and select it.
- In the Create Job Requisition window, select the Supervisory Organization where you need to create a job requisition. In the Worker Type field, select Employee.
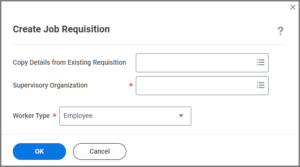
- Select OK.
- In the Recruiting Information section, add or edit information including:
- Reason. Select Administrative, New Hire, or Replacement based on the needs of the position.
- Replacement For. This is used to indicate the name of the last person who held the position or the incumbent’s name if one exists.
- Recruiting Instruction. This is where you designate where the job will be posted.
- Recruiting Start Date.Note: This date cannot be backdated. Workday Services recommends you use Today’s date
- Target Hire Date. This should match the Recruiting Start Date. It is recommended to enter today’s date.
- Target End Date. Leave blank.

- Select Next.
- In the Job Details section, add or edit the following:
- Job Posting Title. This is used for both internal and external job postings, which may be different than the job profile. Also known as the business title or working title.
- Justification. This is not a field TAMU uses at this time. However, check with your department. Otherwise, Enter N/A.
- Job Profile. Will populate from the position. However, If the position was recently reclassified, this information may not be accurate. Verify that the information is correct.
- Job Description. This may not automatically populate from the Job Profile. You can edit to add more detailed information.
- Additional Job Description. Utilize this field to communicate any other relevant information about the job requisition to Talent Management such as salary information, applicant information to include, supplemental questions, information on search committee members, etc.
- Worker Sub-Type. Select the appropriate worker sub-type for this position (Faculty, Staff, etc.).
- Time Type. Indicate if this position is full time or part time.
- Primary Location. This is the primary work location for this position.
- Primary Job Posting Location Will populate from the position.
 Note: Many of the fields may auto-populate based on the position associated with the requisition.
- In the Questionnaires section, the Primary Questionnaire will automatically attach. The Recruiting Partner may add a secondary questionnaire, if applicable.


- Select Next.
- The Qualifications section is only visible to Recruiting Partners and should be skipped. No edits should be made here.

- Select Next.
- In the Organizations section, confirm the Company Member and System Member part for the requisition. Select the correct Member part for the position from the TAMUS System Member Hierarchy drop-down listing.

- Select Next.
- Check with your department for any standard operating procedures regarding attachments. These attachments are not visible.
- Select Next.
- If posting the requisition as commensurate, navigate to the section below Posting as Commensurate for directions. Otherwise, add or edit the following information in the Compensation section, including:
- Salary Plan or Hourly Plan. Update the appropriate sections based on the position being filled. If the position is an exempt position, the Salary Plan frequency must be monthly; if the position is a non-exempt position, the Hourly Plan frequency must be Hourly. Details for posting as commensurate are in the following section.
- Allowance Plan. Skip this section.
- Merit Plan. Skip this section.
 Note: Many fields may already be populated based on the position. The Compensation Package and Grade Profile will auto-populate from the position and serve as guidelines to assist the hiring department in determining the monthly or hourly rate.


Important: Always ensure that the compensation entered is the minimum per the job profile.
- Select Next.
- In the Summary section, review all details before submitting the requisition. You can still make edits from this page.
- Select Submit.
Posting as Commensurate
If the position will be posted as commensurate, you will need to ensure that the Salary / Hourly plans are empty.
Locate either the Salary or Hourly section within the Compensation portion of the Guided Editor.
Select the “X” to delete information located in the Salary section.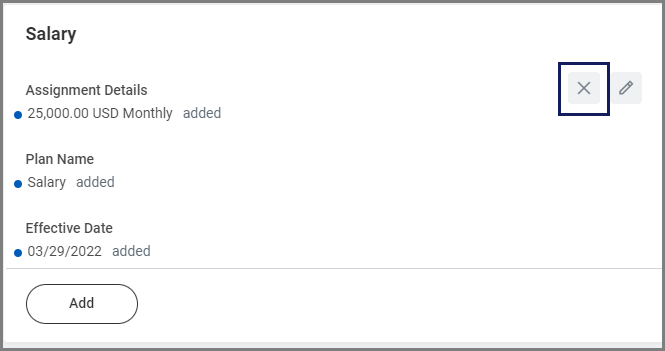
Select the “X” to delete any information located in the Hourly section for positions on an Hourly plan.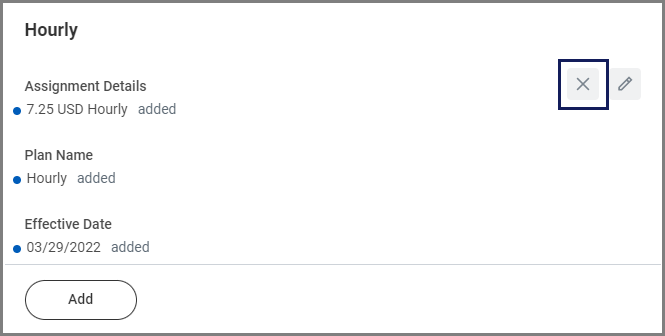
Navigate to the Up Next tab for the next steps in the process.
Up Next
Review and Approvals
- The business process will route to the Recruiting Partner (if they are not the initiator) for review.
- The business process may route to the Department Head or Executive Approver.
Create and/or Manage Interview Settings
The Recruiting Coordinator, Recruiting Partner and Manager receive the To Do Create and/or Manage Interview settings. However, we do not use the interview function in Workday. The Recruiting Partner will submit this to move the business process forward.
Post Job Process (Recruiting Partner)
The Recruiting Partner receives an inbox task to post the job.
- Navigate to your inbox and select the Post Job task.

- In the Job Posting Site field, select Internal or External.Note: Internal candidates will not use the external career site. Rather, there is a single internal career site for the entire A&M System.

- Select OK. The page updates to display all of the places where the job should be posted.
- Enter the Job Posting Start Date and Job Posting End Date (if applicable) or select the correct date. Check with your department for standard operating procedures for entering a job posting end date.
 Note: Workday considers the Job Posting End Date to be 12:01 a.m. (start of day) for the end date selected, rather than 11:59 p.m. (end of day). If you need to update the Job Posting End Date, use the Update Job Posting task.

- Select Submit.
This completes the Post Job process.